
What are these tools for?
Some days are known in advance. The property tax deadline, exam results, election night and scholarship applications are examples. Other situations come suddenly. The server needs maintenance or an unexpected crowd arrives. The host's Maintenance and notifications page offers ready-made tools for these situations. The Peak traffic cache is on the host's Publishing settings page.
When should you use them?
- You are going to update software on the server and you don't want visitors to see half-loaded pages.
- You have planned maintenance for 02:00-04:00 at night and you don't want to wait in the panel at that hour.
- Exam results are about to be announced and you expect more visitors than your server can handle.
- On election night, the results page will be opened thousands of times a minute.
- You want to take an address completely offline for a while.
Publishing status
The Publishing status card shows whether the host is on or off. The Temporarily turn off the host button takes the site offline, and visitors cannot reach it. The settings and the certificate are kept. You can bring the site back at any time with the Turn the host back on button.
For short jobs, use maintenance mode instead of turning off the host. In maintenance mode, visitors see a page that explains what is going on.
Maintenance mode
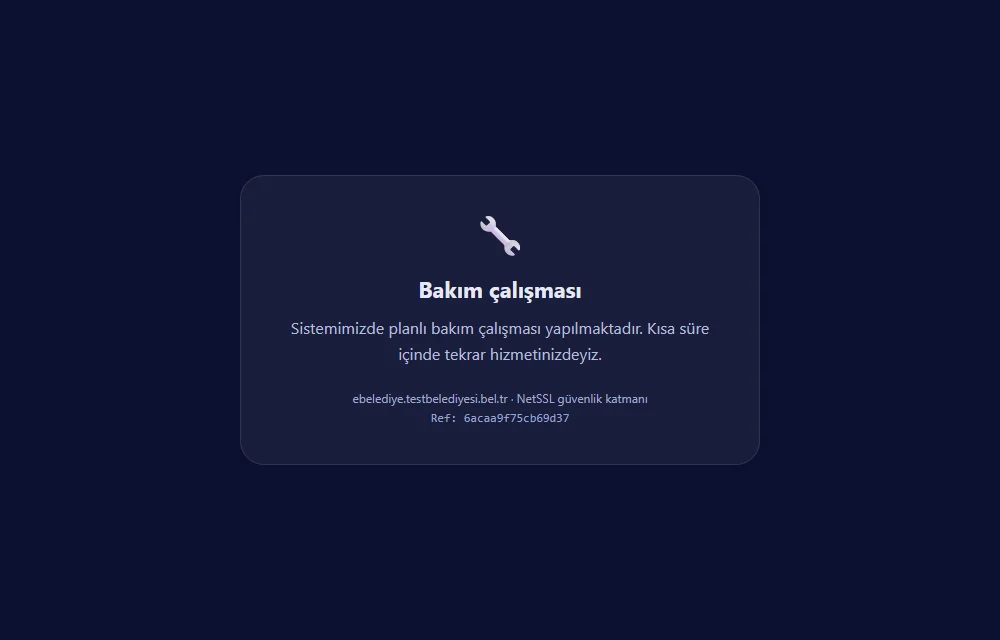
While Maintenance mode is on, visitors see the “Maintenance in progress” page. You write the message on the page yourself. Your team keeps seeing the site as normal.
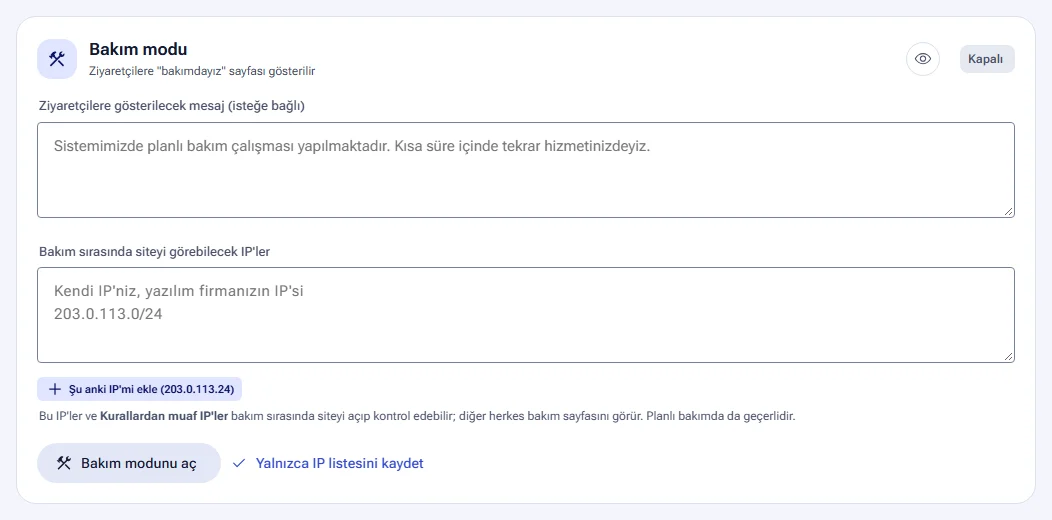
- Write your message in the Message to show visitors (optional) field. The message can be up to 300 characters long. If you leave it empty, the default maintenance message is shown.
- In the IPs that can see the site during maintenance field, enter your own IP and the IP of your software company. Write one IP or network per line (e.g.
203.0.113.0/24). The Add my current IP button adds your address with one click. - Click the Turn on maintenance mode button.
- When the work is done, click the Turn off maintenance mode button.
- The IPs on the list and the IPs exempt from rules can open and check the site during maintenance. These people see a “maintenance mode is on” bar at the top of the page.
- The Save IP list only button saves the list without turning on maintenance.
- The IP list also applies to scheduled maintenance.
IPs exempt from rules are set on the host's Security page. The details are in the Bot and access rules guide.
Scheduled maintenance
Scheduled maintenance turns maintenance mode on and off by itself at the times you set. You don't need to wait in the panel for maintenance at night.
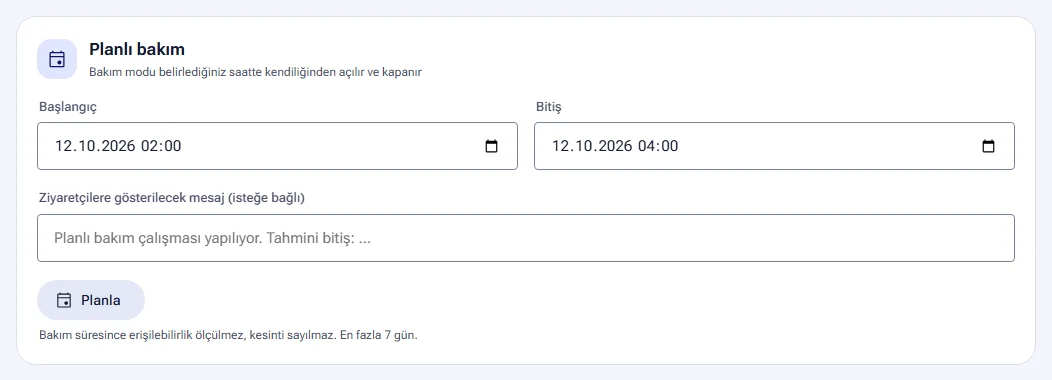
- Choose the Start and End times. Maintenance can last up to 7 days.
- If you wish, write the estimated end time in the Message to show visitors field.
- Click the Schedule button.
Once the plan is set, the card shows the date range and the Scheduled status. When maintenance starts, the status changes to In progress. The Cancel plan button deletes the plan before it starts. The End maintenance now button ends ongoing maintenance early.
During maintenance, availability is not measured and the time does not count as an outage. If you have a public status page, visitors see the scheduled maintenance there in advance. The status page is explained in the Reports and status page guide.
Waiting room
The Waiting room limits the number of visitors on the site at the same time. When the limit is exceeded, new arrivals wait in a queue for a short time. Below the limit, nobody notices anything. The site does not crash, and everyone gets in by turn.
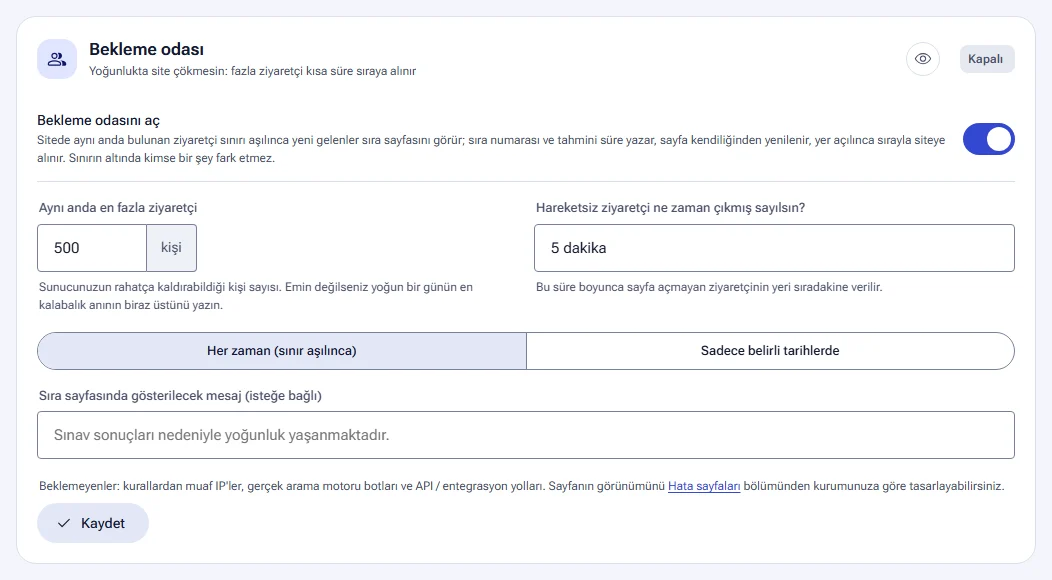
- Turn on the Enable waiting room switch.
- In the Maximum visitors at the same time field, enter the number of people your server can comfortably handle (at least 10). If you are not sure, enter a number slightly above the busiest moment of a busy day.
- For When does an idle visitor count as gone?, choose a time between 2 and 30 minutes. If a visitor opens no page during this time, their place goes to the next person in the queue.
- Choose when it runs: Always (when the limit is exceeded) or Only on specific dates. The date range can be up to 31 days.
- If you wish, fill in the Message to show on the queue page field (e.g. “Exam results are causing heavy traffic.”).
- Click the Save button.
A visitor in the queue sees their queue number and the estimated waiting time. The page refreshes by itself. When their turn comes, the site opens by itself. The visitor does not need to refresh the page, and their place in the queue is kept.
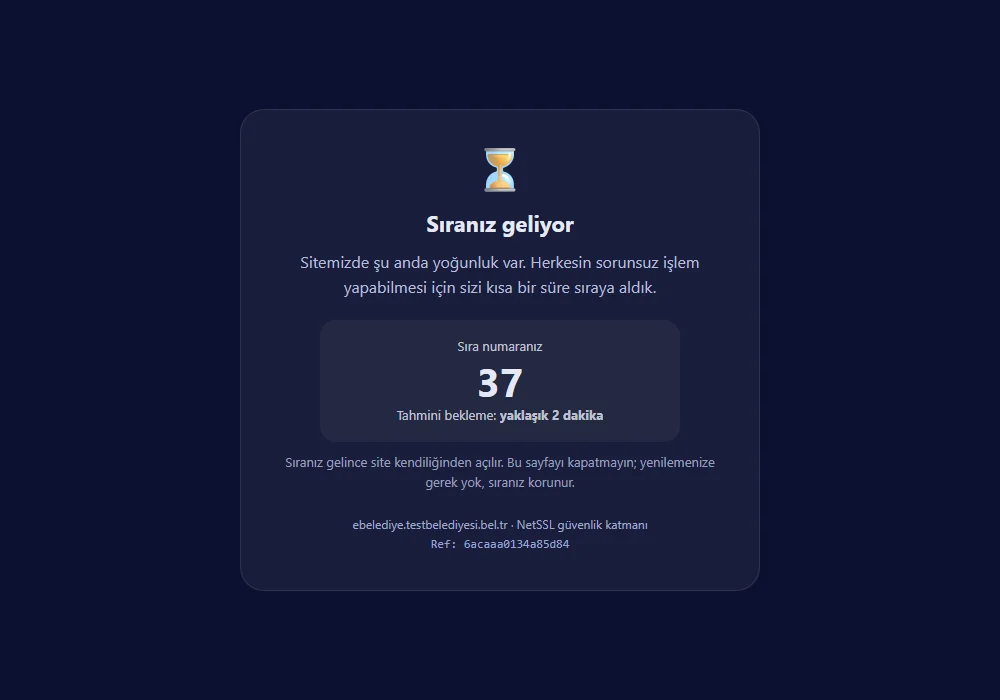
The following are never queued:
- IPs exempt from rules
- Real search engine bots
- API and integration paths
While the waiting room is active, the card shows its live status. The card also shows how many visitors were queued in the last 24 hours. You can design the look of the queue page to match your organization. The details are in the Announcements and error pages guide.
Peak day plan
The Peak day plan is for busy periods you know about in advance. Exam results, elections, application or tax deadlines and campaigns are examples. The measures you choose switch on by themselves at the set time. When the plan ends, your settings return to how they were.
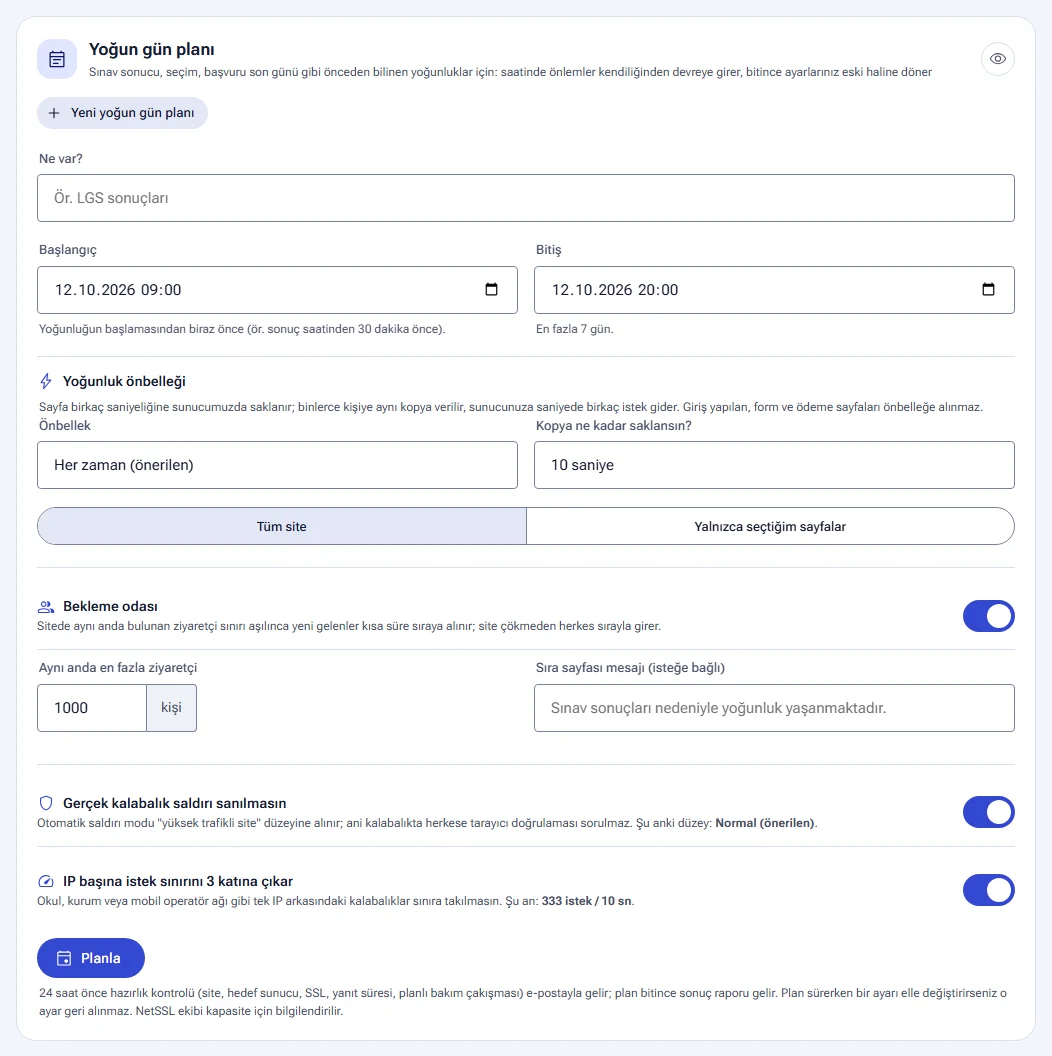
- Click the New peak day plan button.
- Enter a name for the plan in the What's happening? field (e.g. “LGS results”). The field also suggests example names.
- Set the Start time a little before the rush begins. 30 minutes before the results are announced is a good choice.
- Choose the End time. A plan can last up to 7 days and can be set up at most one year in advance.
- Select the measures you want from the list below.
- Click the Schedule button.
| Measure | What does it do? |
|---|---|
| Peak traffic cache | Pages are stored on NetSSL for a few seconds, and thousands of people get the same copy. In the Cache field, you choose Always (recommended), Only during peaks or Don't change. You also choose how long a copy is kept, and either Whole site or Only the pages I choose. |
| Waiting room | It sets the maximum number of visitors on the site at the same time and the message on the queue page. |
| Don't mistake a real crowd for an attack | Automatic under-attack mode is set to the “high traffic site” level. A sudden crowd does not make everyone go through browser verification. If automatic under-attack mode is off, nothing changes. |
| Multiply the request limit per IP by 3 | Crowds behind a single IP, such as school, organization or mobile operator networks, do not hit the limit. If there is no request limit, nothing changes. |
The plan runs like this:
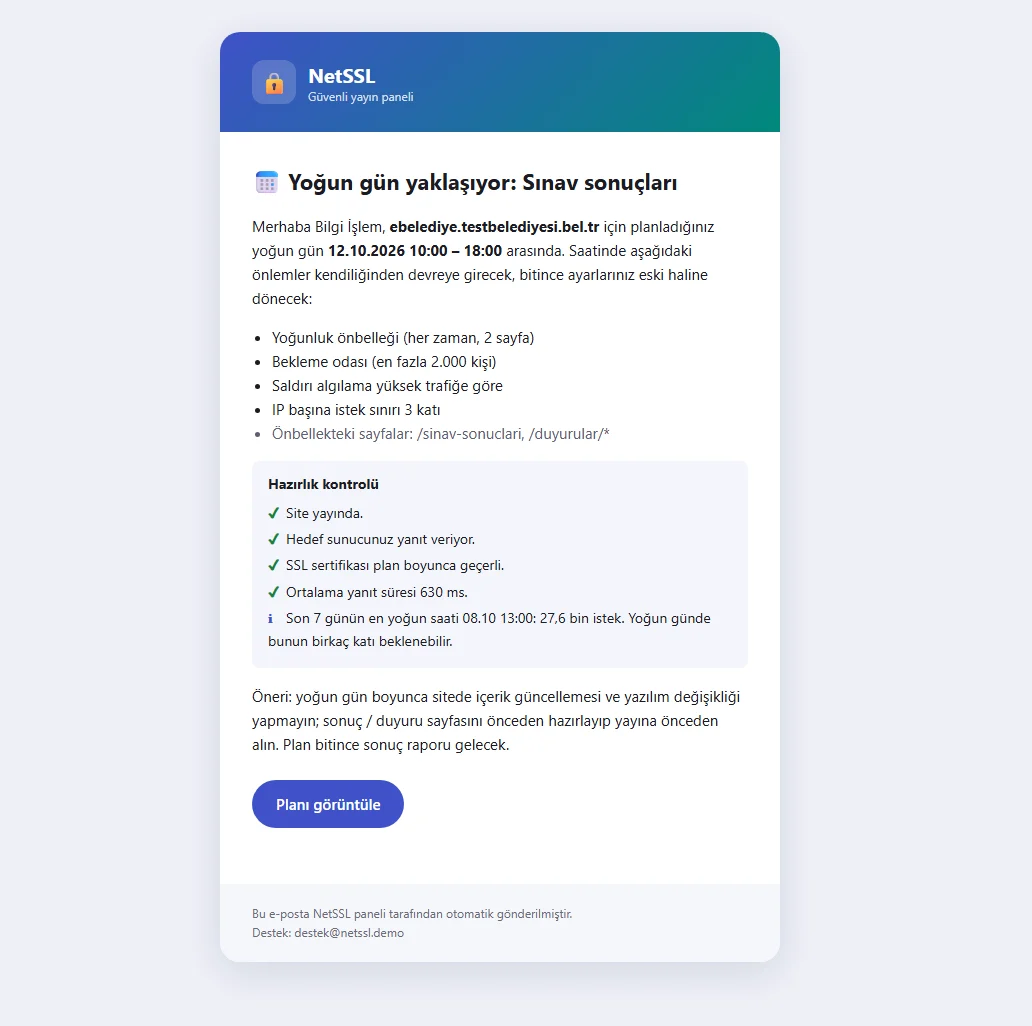
- 24 hours before the plan, you get a readiness check email. It checks the site, the target server, SSL, response time and any clash with scheduled maintenance. The result also appears on the card.
- The plan starts on time and shows as In progress on the card. The End now button ends the plan early.
- When the plan ends, you get a results report. The report shows total requests, the share served from the cache, queued visitors, server errors and downtime.
- You can remove a plan that has not started with the Cancel button.
- The NetSSL team is informed so that it can plan capacity.
7 days before the start, a “Peak day” chip appears in the host header. While the plan runs, the chip says “Peak day in progress”.
If you change a setting manually while the plan runs, that setting is not reverted when the plan ends. The results report lists these settings separately.
Peak traffic cache
The Peak traffic cache is on the host's Publishing settings page. During a sudden rush, such as election or exam results, copies of pages are kept on NetSSL for a short time. Thousands of visitors who arrive in that time get the same copy. Your target server receives at most one request per page. If your target server returns errors or crashes, the last copy keeps being served.
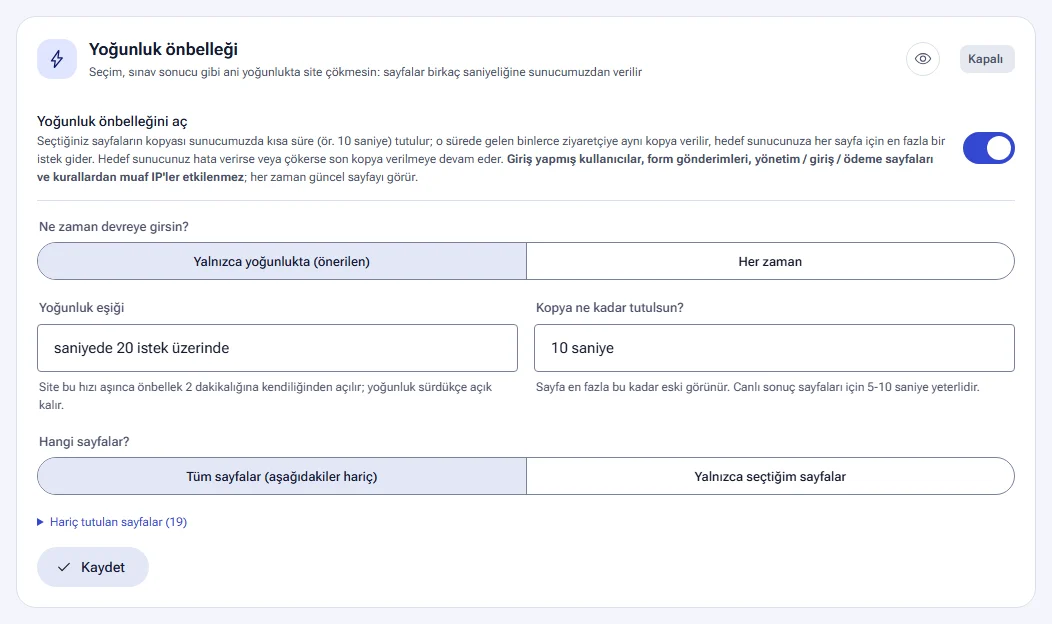
- Turn on the Enable peak traffic cache switch.
- For When should it switch on?, choose Only during peaks (recommended) or Always.
- If you chose Only during peaks, set the Peak threshold: 10, 20, 50 or 100 requests per second. When the site goes above this rate, the cache turns on for 2 minutes and stays on as long as the rush continues.
- For How long should a copy be kept?, choose a time between 5 seconds and 5 minutes. For live results pages, 5-10 seconds is enough.
- For Which pages?, choose All pages (except those below) or Only the pages I choose.
- Click the Save button on the card.
In the page list, write one address per line:
/secim-sonuclaricovers this address and all pages under it./covers only the home page.*.htmlselects pages by extension.
The following never get a cached copy and always see the current page:
- Logged-in users and form submissions
- Admin, login, membership, cart, payment, application, API and e-municipality paths in the Excluded pages list
- IPs exempt from rules
- Paths that have an address rule
If your site has a section with personal content (e.g. /borc-sorgulama), add that address to the Excluded pages list. If you have updated a page urgently, delete the copy at once with the Clear cache button.
For the last 24 hours, the card shows the requests served from the cache, the requests sent to the target server, the load reduction and how many times the cache switched on during a rush.
What does the visitor see?
The eye icon in each card header (What does the visitor see?) opens the page or email that will appear when the setting takes effect. This way, you see the result before you turn the setting on.
| Card | Preview behind the eye icon |
|---|---|
| Maintenance mode | The maintenance page the visitor sees |
| Waiting room | The queue page with the queue number and the estimated waiting time |
| Peak day plan | The readiness email, the results report and the waiting room page |
| Peak traffic cache | The number of requests that reach your target server with the cache on and off |
Maintenance and queue pages can also appear in English, Arabic or German, based on the visitor's browser language. This setting is explained in the Publishing settings guide.
Property tax installment periods end at the end of May and the end of November. Set up a peak day plan for the e-municipality site one week before the deadline. On the last day, visitors see a queue page instead of an error.
Frequently asked questions
Does the waiting room interrupt someone in the middle of a transaction?
No. The queue applies only to visitors who arrive after the limit is exceeded. A visitor already on the site keeps their place as long as they keep opening pages. If they stay idle for the time you chose, their place goes to the next person in the queue.
Does the peak traffic cache affect logged-in users?
No. Logged-in users, form submissions, admin, login and payment pages, and IPs exempt from rules always see the current page.
Does our availability percentage drop while maintenance mode is on?
No. Periods in maintenance mode and periods when the host is turned off are not checked. These periods do not lower the availability percentage.
Can I keep the waiting room and the peak traffic cache on all the time?
Yes. The waiting room's Always (when the limit is exceeded) option and the peak traffic cache's Only during peaks option run all the time. Neither of them switches on until the limit or the threshold is exceeded. The peak day plan, on the other hand, applies temporary measures only for a specific period.