
What does this screen do?
The host's Security events page shows the requests caught by security rules. Here you see which request was stopped, when, from which IP and because of which rule. Currently banned IPs, counters, charts and the incident report are on this page too. The combined summary for all your sites is on the Your sites → Security page.
Besides the events page, this guide also covers these tools:
- Reference code search: Finds a single event from the code a visitor sends you.
- False block assistant: Finds attack rules that catch real visitors and suggests exceptions.
- Visitor appeals: Receives the appeal of a blocked visitor and lets you reply to it.
- Incident report (USOM / CSIRT): Prepares a PDF report of the attack period and a list of attacking IPs.
When should you use it?
- When a citizen says “I can't get into the site”.
- When you want to see when an attack started, where it came from and what it targeted.
- When an IP was banned by mistake.
- When an attack rule stops a real use, such as a search box or a file link.
- When you prepare an incident notification for USOM or your organization's CSIRT.
Security events page
Open the Security events page from the host menu. Select the period at the top right: 24 hours, 7 days or 30 days. If automatic attack protection is active on the site, a red warning appears at the top of the page. This protection switches off by itself 30 minutes after the attack ends.
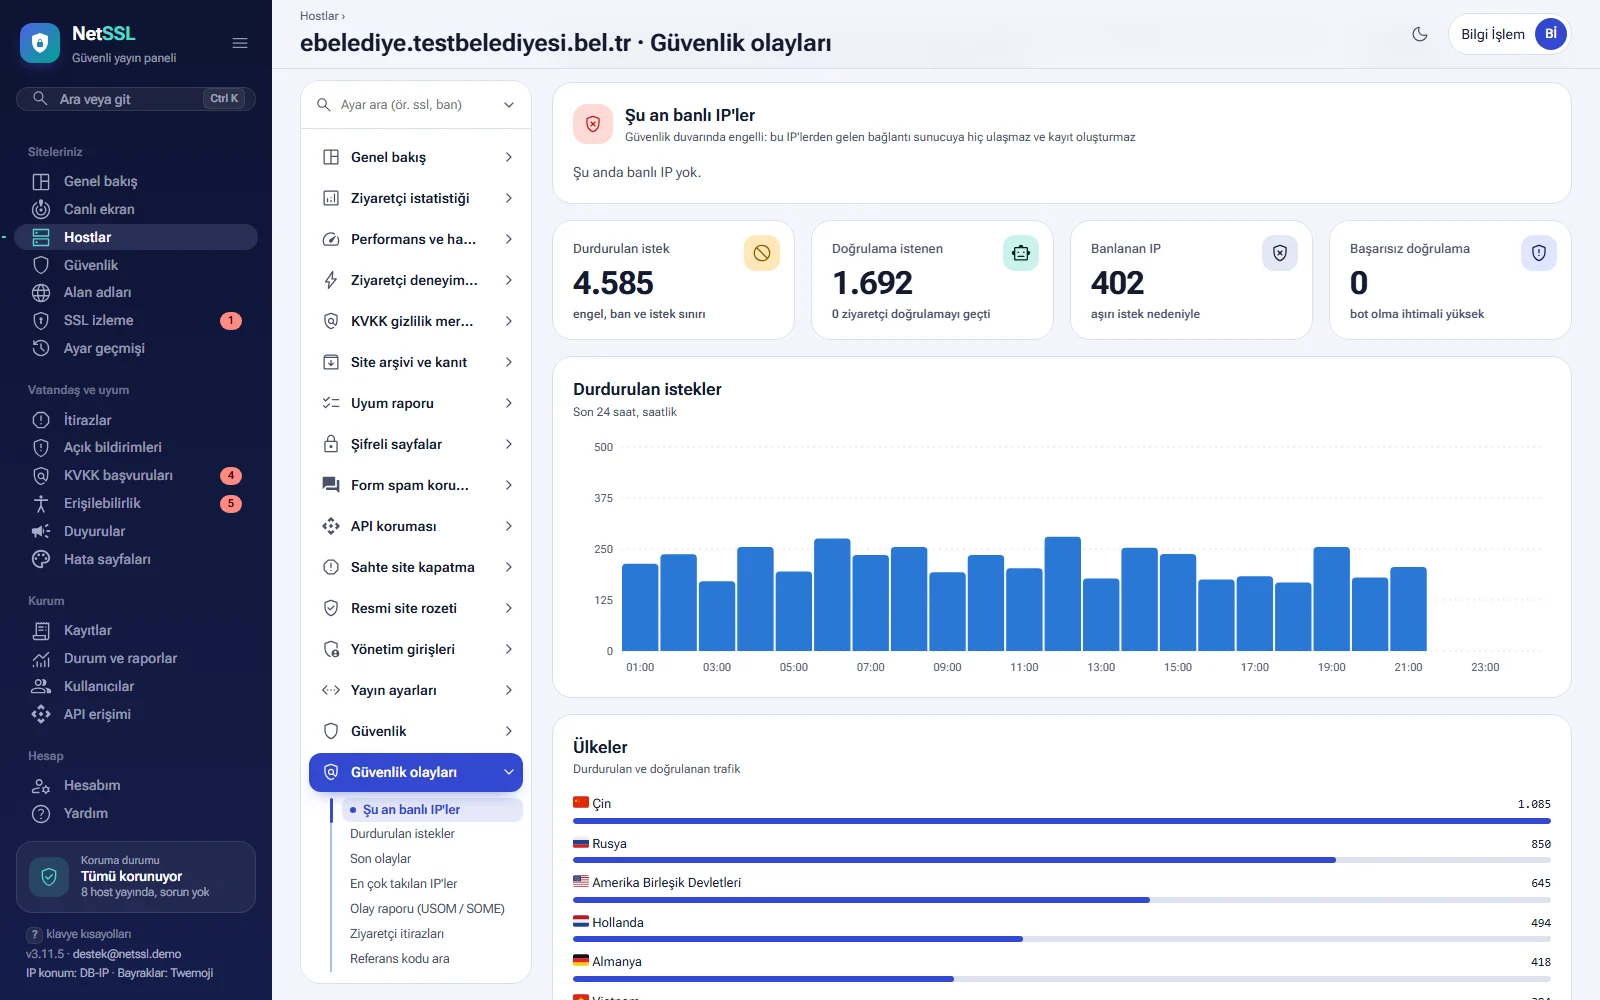
Currently banned IPs
The IPs in this table are blocked at the firewall. Their connections never reach the server and create no log entries. The table shows the IP, the reason, the ban time and the earliest end time. For a repeat attacker, the ban doubles each time, up to a maximum of 24 hours.
- Click Lift ban in the row of the IP that was banned by mistake.
- Confirm the dialog. The ban is lifted within 1 minute.
- If you trust the address, add it to the IPs exempt from rules list. Then it will not be caught again.
Counters and charts
| Counter | What does it count? |
|---|---|
| Stopped requests | The total of blocks, bans and request limit hits |
| Verification requested | Requests that were asked for browser verification. The number of visitors who passed verification appears below it. |
| Banned IPs | Addresses banned for excessive requests |
| Failed verifications | Requests that failed verification. These are very likely to be bots. |
The Stopped requests chart is drawn by hour for the 24-hour period and by day for the 7-day and 30-day periods. The Countries list shows which countries the stopped and verified traffic came from.
Recent events
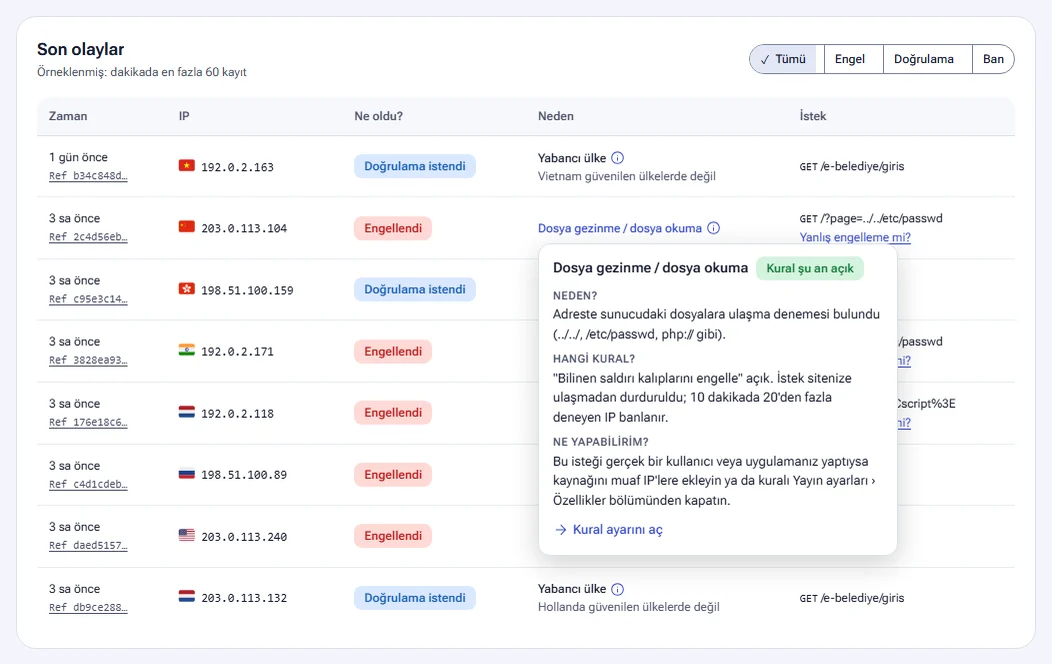
The Recent events table is sampled. During an attack, it keeps at most 60 entries per minute. The counters, however, count every request. The All, Block, Verification and Ban buttons above the table filter the list.
| Column | What does it show? |
|---|---|
| Time | The time of the event and its reference code. The Ref link opens the event details. |
| IP | The country flag and the IP address. Tags show a verified search engine or AI bot, a fake bot and the name your organization gave this IP. |
| What happened? | The result: Blocked, Verification requested, Banned, Rate limit or Verification failed |
| Reason | The rule that created the event. Hover over the explanation to see the details. |
| Request | The method and address of the request. Attack rule events show a False block? link. |
Finding out why a request was blocked
- Find the row in the Recent events table.
- Hover over the explanation in the Reason column. On a phone, tap the explanation.
- Read the box that opens. The box has three headings: Why?, Which rule? and What can I do?. It also shows whether the rule is currently on or off.
- To change the setting, click the Open rule setting or Open security settings link at the bottom of the box. The link takes you straight to that rule's setting.
IPs caught most often
This list shows the addresses caught by rules most often during the period. The Block button next to an address blocks the IP permanently for this host. The address is added to the IP address lists on the Security page and appears there with the Blocked tag.
Reference code search
Every block, verification, admin panel lock, maintenance and “site is not responding” page that NetSSL shows has a 16-character Ref code at the bottom. API responses also contain a ref field. If a visitor sends you this code, you find the event with a single search.
You can open the search page from three places:
- The Search by reference code box on the Your sites → Security page
- Security events → Reference code search in the host menu
- The Search or go box at the top of the panel (Ctrl K). When you paste the code, a “Search for Ref ...” option appears.
- Paste the code into the search box. The “Ref:” prefix and spaces cause no problem.
- Click Search.
- Read the time, site, IP address, country, request and browser on the result card. The box on the right explains why the rule was triggered.
- If the visitor is someone you trust, click Exempt this IP on this site. If the IP is currently banned, a Lift ban button also appears.
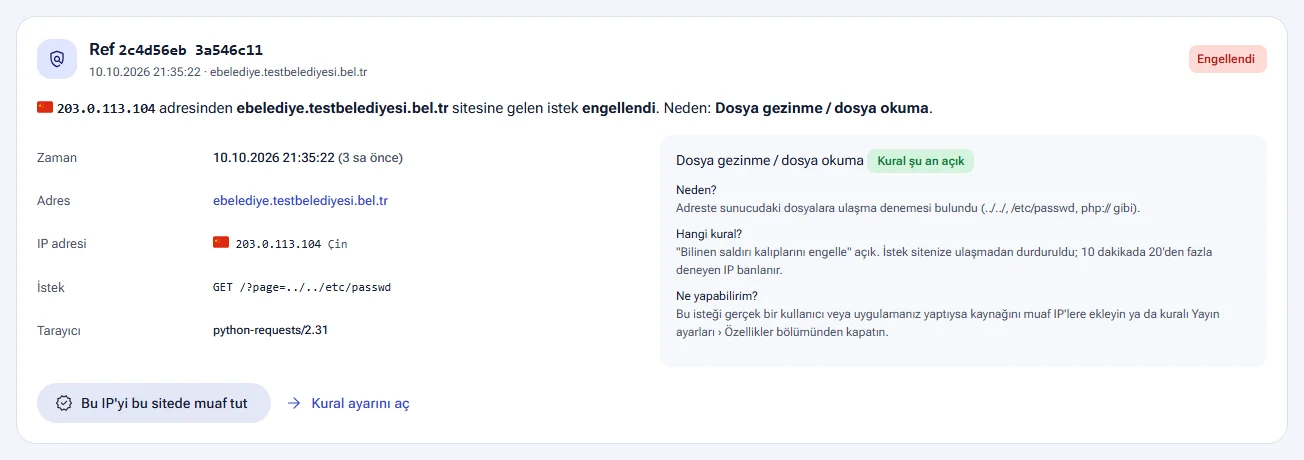
Below the result is the Other events from this IP on the same site table. The table shows the 24 hours before and after the event. This tells you whether the visitor was caught by a single wrong request or keeps trying to attack. You can only find events for sites you have access to.
If the code is not found, the panel still shows when the code was created. There are three possible reasons for this:
- The visitor saw the “site is not responding right now” page or the maintenance page. These pages are not security events.
- The record has not reached the panel yet. Events arrive within a few minutes.
- The code came from another organization's site.
The Exempt this IP on this site button stops all rules from catching the IP on that site. First check the Other events from this IP on the same site table. Exempt only addresses you trust.
False block assistant
The False block assistant section on the host's Security page finds real visitors caught by attack rules. Once an hour, NetSSL reviews the events of the last 7 days. A suggestion appears when an attack rule stopped visitors on the same page who came from many different networks, used a normal browser and showed no other signs of attack. An appeal from a blocked visitor also creates a suggestion. Typical examples are ../ in file links or quoted text in a search box.
Each suggestion carries a High probability or Possible tag. The suggestion shows this information:
- The number of distinct visitors and networks, and the number of requests
- The share of traffic from Türkiye and the share of normal browsers
- Whether there are other signs of attack, and the number of appeals
- The part that matched the rule, and sample requests
You resolve a suggestion with one of two buttons. The Skip this rule on this page button adds an exception. You choose its scope: This address only or All pages starting with this address. The Real attack, do not show button closes the suggestion. The Analyze now button starts the review without waiting for the hourly run. A new high-probability suggestion triggers an email and a webhook (waf.falsepositive) notification.
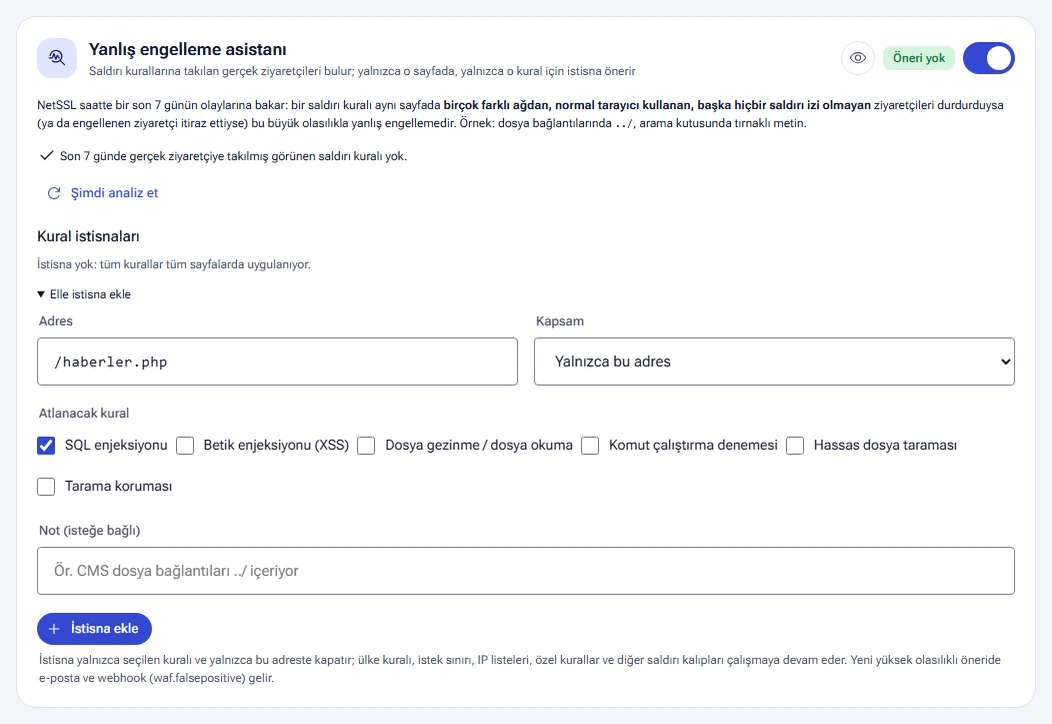
Adding an exception manually
- In the Recent events table, click the False block? link below the caught request. The form opens with the address and rule already filled in. You can also open the Add exception manually row directly.
- Check the Address and Scope fields.
- In the Rule to skip row, tick the rule: SQL injection, Script injection (XSS), Path traversal / file read, Command execution attempt, Sensitive file scan or Scan protection.
- If you like, write a Note (e.g. CMS file links contain
../). - Click Add exception.
An exception turns off only the selected rule, and only at that address. The country rule, request limit, IP lists, custom rules and other attack patterns keep working. The Rule exceptions table lists the exceptions with their address, rule, note, the user who added them and the date. You can add up to 30 exceptions per site. If you delete an exception, the rule applies at that address again. You can turn the assistant off with its switch. While it is off, no suggestions arrive, but the exceptions you added keep working.
Visitor appeals
When NetSSL blocks a visitor permanently, an Appeal button can appear on the block page. The visitor fills in the form, the appeal arrives in the panel and you get an email. You can allow the IP for a set time, reject the appeal or just write a reply. The visitor is told about your decision by email. Appeals are on the Citizens and compliance → Appeals page.
The page the visitor sees
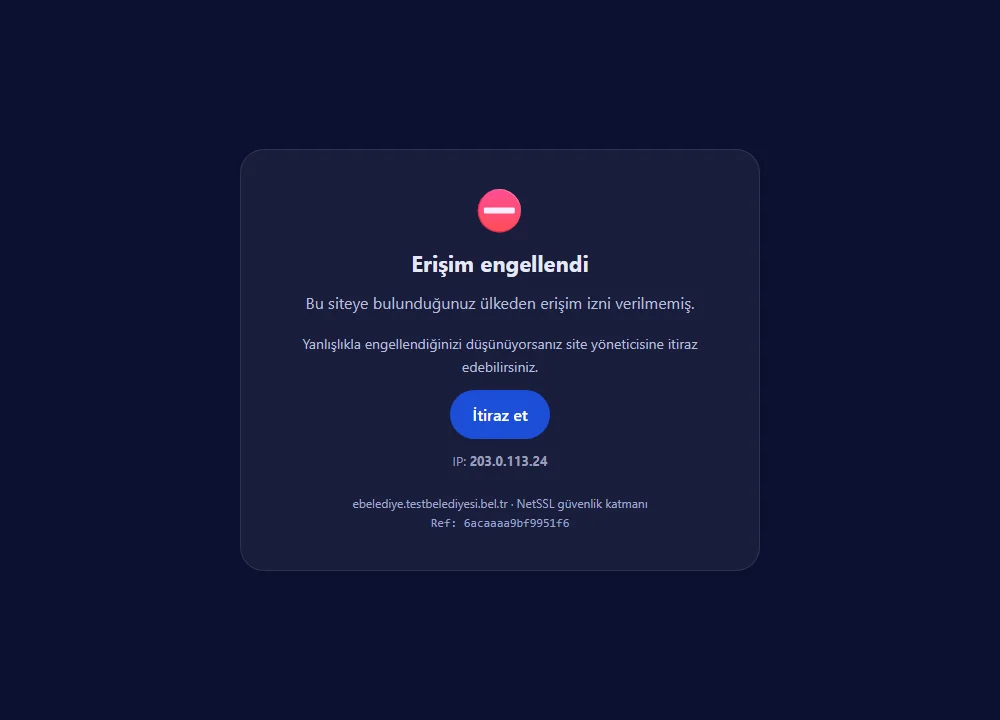
The button appears on permanent blocks. These include the country rule, IP blacklist, Tor and VPN, data center, USOM list, shared threat list, attack patterns, virtual patching, scanning, custom rules, blocked files, dangerous file uploads and form spam. The button does not appear for temporary limits. Too many requests, form submissions and login attempts are temporary limits. The visitor can get in again after waiting a while.
Appeal form
When the visitor clicks the button, the appeal form opens. The top of the form shows the block details: the site, the time, the reason, the visitor's IP address and the reference code. The visitor enters their name, email address, an optional phone number and what they were trying to do. They tick the KVKK consent box and pass Google's “I'm not a robot” check.
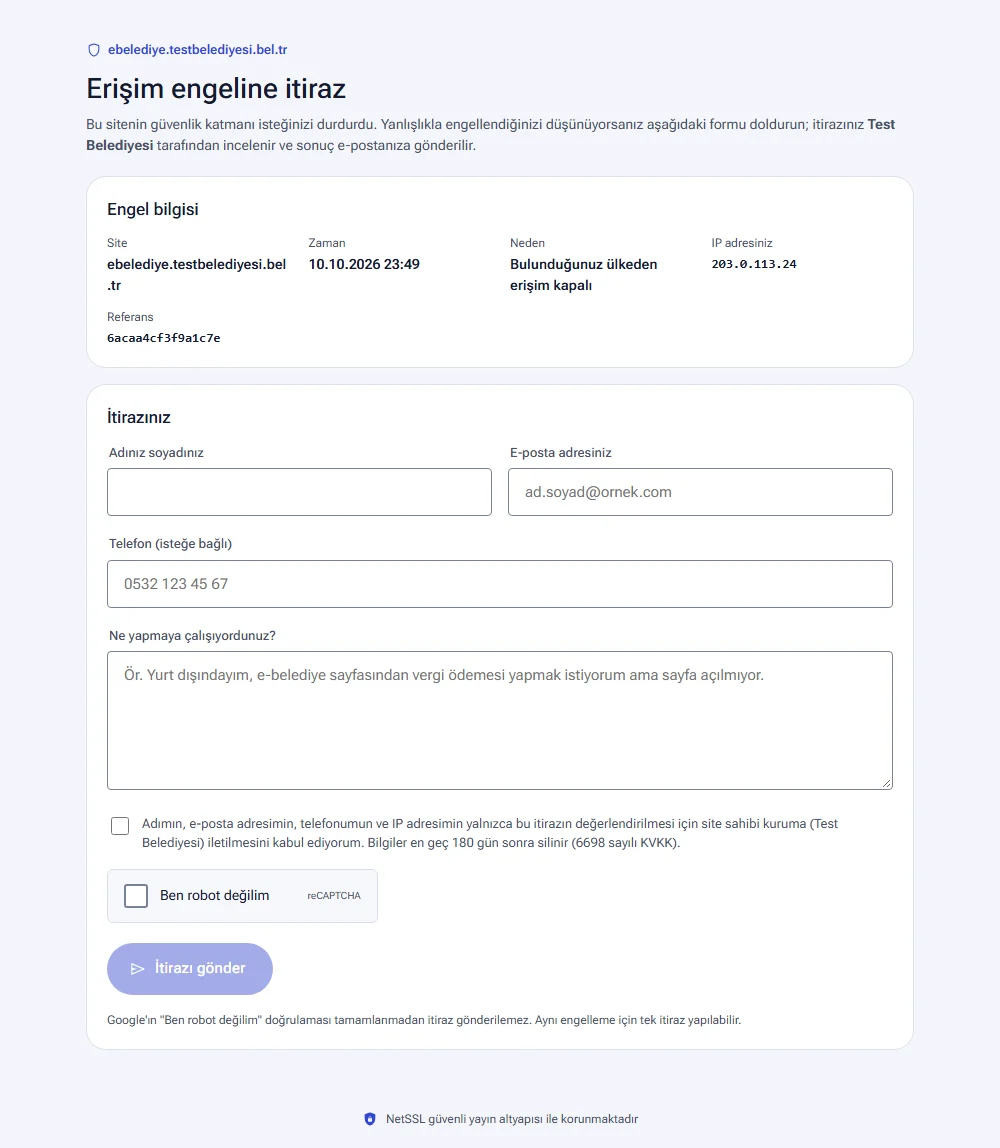
- The visitor receives a “Your appeal has been received” email. The link in the email opens the status page of the appeal.
- Each block allows one appeal. The same IP can send at most 3 appeals per day.
- The appeal link on the block page is valid for 7 days.
- Appeals and the personal data in them are deleted after 180 days.
Replying to appeals in the panel

- On the Appeals page, find the Appeal form card. Turn on the Show “Appeal” button on the block page switch. The setting applies to all your sites, and only the organization administrator can change it.
- When a new appeal arrives, the users who receive the site's notifications get an email. If webhook, Telegram and SMS are enabled, notifications come through them too.
- Read the appeal in the Awaiting reply list. The card shows the visitor's message, the site, the block reason, the IP address, the block time, the request and the browser. The Reference link opens the event details.
- Write your explanation in the Reply to visitor field and make your decision.
| Decision | What happens? |
|---|---|
| Allow IP | The IP becomes exempt from all rules on that site, and any ban on it is lifted. The Allow period is 7 days, 30 days, 90 days or unlimited. When the period ends, the permission is removed automatically. |
| Reject | The appeal is rejected. You must write an explanation when you reject it. |
| Reply only | Sends a reply to the visitor without making a decision. |
You need site edit permission to make a decision. The Resolved table lists the decisions of the last 180 days and who made them. The eye icon on the card opens six previews: the block page, the appeal form, the email you receive, the two emails sent to the visitor and the status page.
The appeal form works with Google reCAPTCHA verification. If this verification is not configured on the NetSSL side, the form cannot open, and the Appeals page shows a warning about it. In that case, let the NetSSL support team know.
Incident report (USOM / CSIRT)
The Incident report (USOM / CSIRT) card at the bottom of the Security events page produces a ready-made report for an attack period. You can attach the report to a USOM notification or send it to your organization's CSIRT or to senior management.
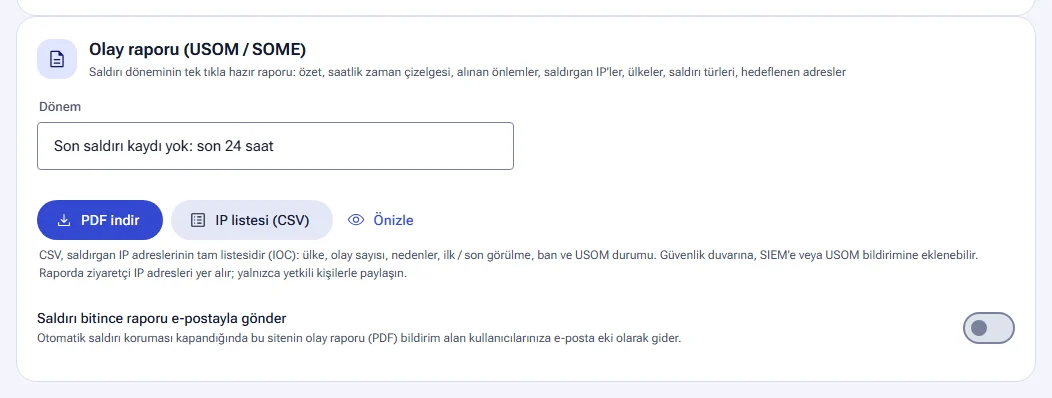
- Select the period in the Period list. The first option is the latest attack record. It covers the time from when automatic attack protection switched on until it switched off. If there is no record, it uses the last 24 hours. The other options are Last 24 hours, Last 7 days and Select date range…. A date range can be at most 31 days.
- Click Download PDF. The Preview button opens the report in a new tab without downloading it.
- To get the attacking addresses separately, click IP list (CSV).
The PDF report contains these sections:
- Incident summary
- Hourly timeline (blocked, verification-requested and banned requests)
- Measures taken and actions performed in the panel
- Attack sources (the 40 most frequently recorded IPs)
- Country distribution and attack types
- Targeted addresses
- Indicators (IOC) and reporting
The CSV file is the full list of attacking IP addresses (IOC). Each row shows the country, event count, reasons, first and last seen times, and the ban and USOM status. You can add the list to your firewall, your SIEM system or your USOM notification.
If the Email the report when the attack ends switch is on, this site's report arrives as a PDF attachment when automatic attack protection switches off. The report goes to your users who receive notifications. The report covering all your sites is on the Organization → Status and reports page. The Reports and status page guide explains that page.
The report and the CSV file contain visitor IP addresses. Share these files only with authorized people.
Frequently asked questions
An IP was banned by mistake. How do I lift the ban?
On the Security events page, click Lift ban in the Currently banned IPs table. The ban is lifted within 1 minute. To keep the IP from being caught again, add it to the IPs exempt from rules list. Standard protection does not ban anyone in normal times. A ban happens only with hundreds of requests per second, or when verification is repeatedly left unsolved during an attack.
The reference code a visitor gave me cannot be found. Why?
The visitor most likely saw the “site is not responding right now” page or the maintenance page. These pages do not create security events. If the code was created in the last few minutes, the record may not have arrived yet. Search again in a few minutes.
A visitor sees a 403 error, but there is no record in the events. Where is the problem?
A 403 error can come from the country rule, the blacklist, the office hours rule or the “only these IPs” restriction. These appear on the Security events page. If the page has no record, the 403 error most likely comes from your site's own application.
Why does the event list not show every request?
The Recent events table is sampled and keeps at most 60 entries per minute during an attack. The counters and charts, however, count every request. For the full IP list, use the IP list (CSV) file in the incident report.
Does a false block exception leave my site unprotected?
No. The exception turns off only the rule you choose, and only at that address. Other attack patterns, the country rule, the request limit and the IP lists keep working at that address.