
What do these screens do?
This guide explains the settings that protect your site's login points and the points where data is submitted. Some of the settings are on the host's Security page. Admin logins, Password-protected pages, Form spam protection and API protection are separate pages in the host menu. You turn on and configure each protection per site.
| Protection | Where? | What does it do? |
|---|---|---|
| Login page protection | Security page | Stops password guessing (brute force) attacks. |
| Admin logins | Separate page | Notifies you of successful logins to the admin panel. |
| Office hours rule | Security page | Closes the site or some sections outside office hours. |
| Admin panel lock | Security page | Opens admin pages only to the organization network or with an email code. |
| Password-protected pages | Separate page | Opens pages with a shared password or an email code. |
| Form and file upload protection | Security page | Stops dangerous file uploads and repeated form submissions. |
| Form spam protection | Separate page | Stops betting, gambling and advertising messages. |
| API protection | Separate page | Sets request limits and rules for API addresses. |
| API and integration paths | Security page | Exempts application addresses from browser verification. |
When should you use it?
- Your login page receives hundreds of password attempts from the same IP.
- You want to notice early when an administrator's password is stolen.
- You want the WordPress or Joomla admin panel never to open from outside the organization.
- You want to open staff announcements, tender documents or a new site that is being prepared for launch only to authorized people.
- Your contact or complaint form receives betting and advertising messages.
- Your mobile app's API receives too many requests or gets caught by browser verification.
Login page protection
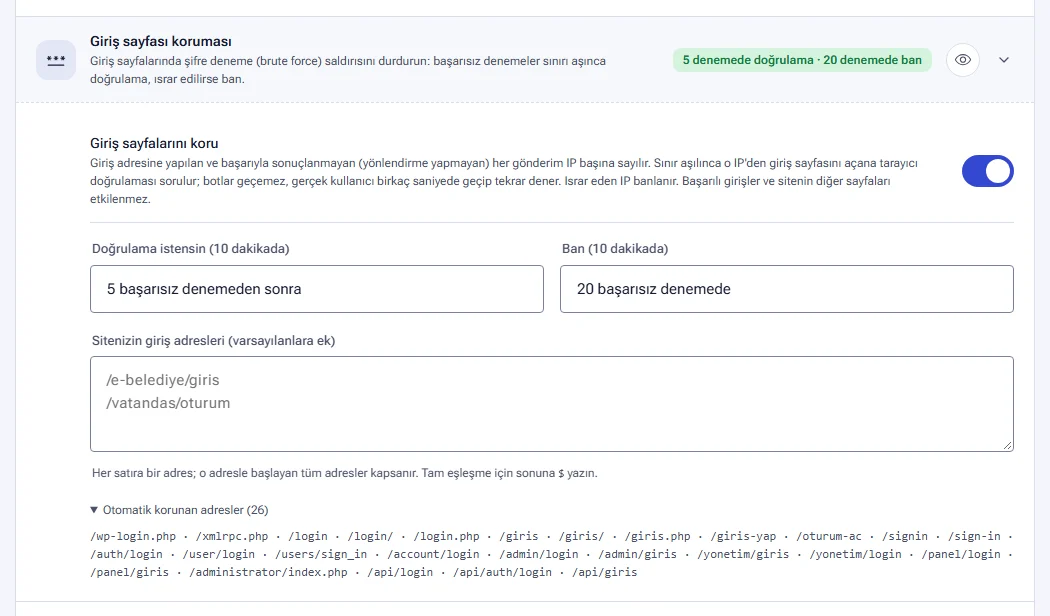
The Login page protection section on the host's Security page stops password guessing attacks. Every unsuccessful submission to the login address is counted per IP. When the limit is exceeded, anyone who opens the login page from that IP is asked for browser verification. Bots cannot pass the verification. A real user passes it in a few seconds and tries again. An IP that keeps trying is banned. Successful logins and the site's other pages are not affected.
| Setting | Options |
|---|---|
| Require verification (within 10 minutes) | After 3, 5, 10 or 20 failed attempts. The default is 5. |
| Ban (within 10 minutes) | At 10, 20, 50 or 100 failed attempts. The default is 20. |
| Your site's login addresses (in addition to the defaults) | You write one address per line. All addresses that start with that address are covered. For an exact match, add $ at the end. |
NetSSL protects common login addresses automatically. /wp-login.php, /xmlrpc.php, /login, /giris, /administrator/index.php and /api/login are some of them. The full list appears in the Automatically protected addresses row.
- Open the Login page protection section on the host's Security page.
- Keep the Protect login pages switch on.
- Choose the verification and ban limits.
- If your site's own login address is not on the list, add it (for example
/e-belediye/giris). - Click the Save and apply button. The change takes effect within a few seconds.
Caught requests appear on the Security events page with the reason “Login page protection”. If people often log in from inside the organization, add the organization network to the IPs exempt from rules list or raise the limit.
Admin logins
The Admin logins page in the host menu monitors successful logins to your site's admin panel. If a login comes from a network or country that has not been seen before, you are notified at once. This way you notice an administrator account with a stolen password before the attacker can do damage. The username and password in the form are not read or stored.
Login alert
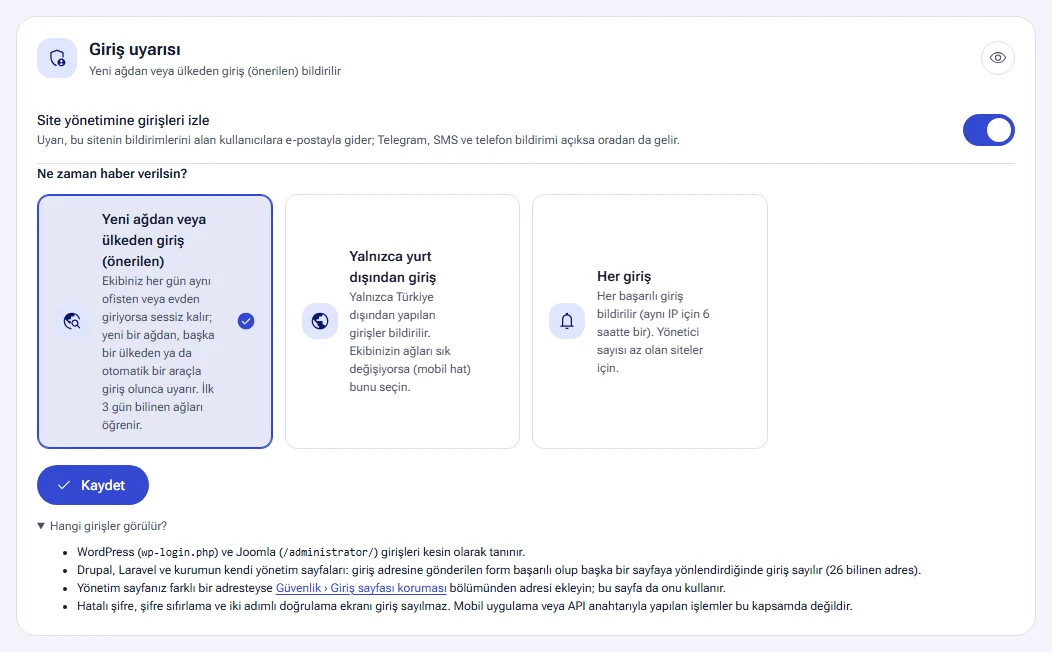
When the Monitor logins to site admin switch is on, the alert goes by email to the users who receive the site's notifications. If Telegram, SMS and push notifications are on, the alert also arrives through them. The Notifications and integrations guide explains the notification channels.
| When should you be notified? | What happens? |
|---|---|
| Login from a new network or country (recommended) | It stays silent if your team logs in from the same place every day. It alerts you when a login comes from a new network, from another country or through an automated tool. It learns the known networks during the first 3 days. |
| Only logins from abroad | It reports only logins made from outside Türkiye. It suits teams whose network changes often (mobile connections). |
| Every login | It reports every successful login. You get at most one alert every 6 hours for the same IP. |
The Which logins are seen? row explains the scope:
- WordPress (
wp-login.php) and Joomla (/administrator/) logins are recognized with certainty. - On Drupal, Laravel and the organization's own admin pages, a login counts when the login form succeeds and redirects to another page.
- If your admin page is at a different address, add the address to the Login page protection section. This page uses that list too.
- Wrong passwords, password resets and the two-factor authentication screen do not count as logins. Actions done through a mobile app or with an API key are out of scope.
Recent logins and known networks
The Recent logins table shows the last 100 successful logins. Records are kept for 1 year. Each row shows the time, IP, country, device, login address and alert reason. Two buttons appear next to a login with an alert:
- It's me: The login is marked as yours or your team's. That network is added to the known networks.
- Not me: The IP is blocked on this site and the network is removed from the known networks. Then change the site's administrator passwords.
The Known networks table lists the networks used to log in to the admin panel in the last 180 days. Logins from these networks do not trigger a “New network” alert. The eye icon at the top right of the card previews the email and the push notification you will receive.
Office hours rule
The Office hours rule section on the host's Security page closes the whole site or some sections outside office hours. For example, the staff admin panel can open only on weekdays between 08:00 and 18:00.
- Turn on the Use the office hours rule switch.
- Select the days in the Office days row.
- Enter the Office hours start and Office hours end times.
- From the Outside office hours list, choose Block access or Require browser verification.
- Write the paths in the Only for these sections field (for example
/yonetim). If you leave the field empty, the rule applies to the whole site. - Click the Save and apply button.
Admin panel lock
Attackers try a site's admin login more than anything else. When the Admin panel lock is on, the paths you choose never open from outside the organization. So no one can even try a password. If you want, staff who work outside the organization can sign in with an email code.
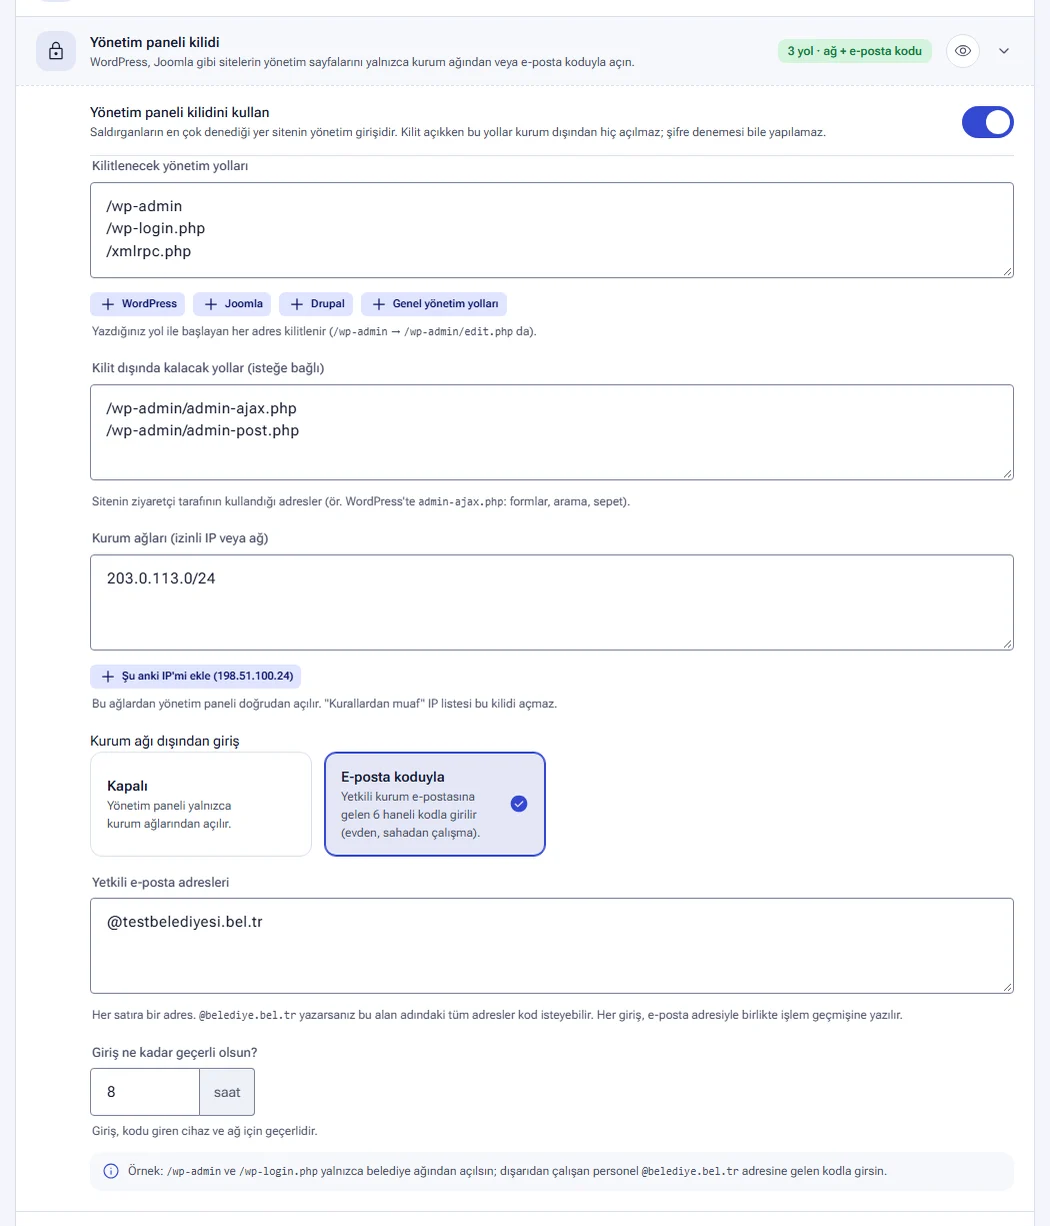
- Open the Admin panel lock section on the host's Security page and turn on the Use the admin panel lock switch.
- Write the paths in the Admin paths to lock field. Preset buttons are available: WordPress, Joomla, Drupal and Common admin paths. Every address that starts with a path you write is locked.
- In the Paths to keep outside the lock field, write the addresses that the visitor side of the site uses. In WordPress,
admin-ajax.phpis needed for forms, search and the shopping cart. - Write your organization's IP address or network in the Organization networks field. The Add my current IP button adds the address you are using now. The admin panel opens directly from these networks.
- For Login from outside the organization network, choose Off or With email code.
- For email code sign-in, fill in the Authorized email addresses field and enter the period in How long should a login stay valid? (1–72 hours, default 8 hours).
- Click the Save and apply button.
With email code sign-in, staff outside the organization click the Sign in with email code button on the lock page. A 6-digit code is sent to the authorized address. The code is valid for 10 minutes and can be tried at most 5 times. The sign-in is valid for the device and network where the code was entered. If you write @belediye.bel.tr, every address on that domain can request a code. Each sign-in is written to the action history together with the email address.
Addresses on the IPs exempt from rules list cannot get past the lock. The lock has its own Organization networks list. Requests caught by the lock appear on the Security events page with the reason “Admin panel lock”.
Password-protected pages
The Password-protected pages page in the host menu opens your whole site or the pages you choose only to authorized people. Typical examples are a new site being prepared for launch, staff announcements, tender and council documents and a test environment. The visitor either enters the shared password or signs in with a code sent to an authorized email address. No change to the site is needed. Protected pages do not appear in search engines either.
Protected areas
The Protected areas table lists the areas you define. You can define up to 10 areas per site. Each area has its own password or authorized addresses.
| Column | What does it show? |
|---|---|
| Area | The area's name, protected paths and excluded paths |
| Sign-in | The sign-in method, sign-in duration and the number of networks not asked for a password |
| Last 30 days | Number of sign-ins, number of people using an email code and wrong password attempts |
| Status | Protected or Off |
Each area has an Edit link and an action menu. The menu contains Turn off protection (or Turn on protection), Sign everyone out and Delete. If you turn off protection, the settings are not deleted, but the pages open to everyone.
Add a protected area
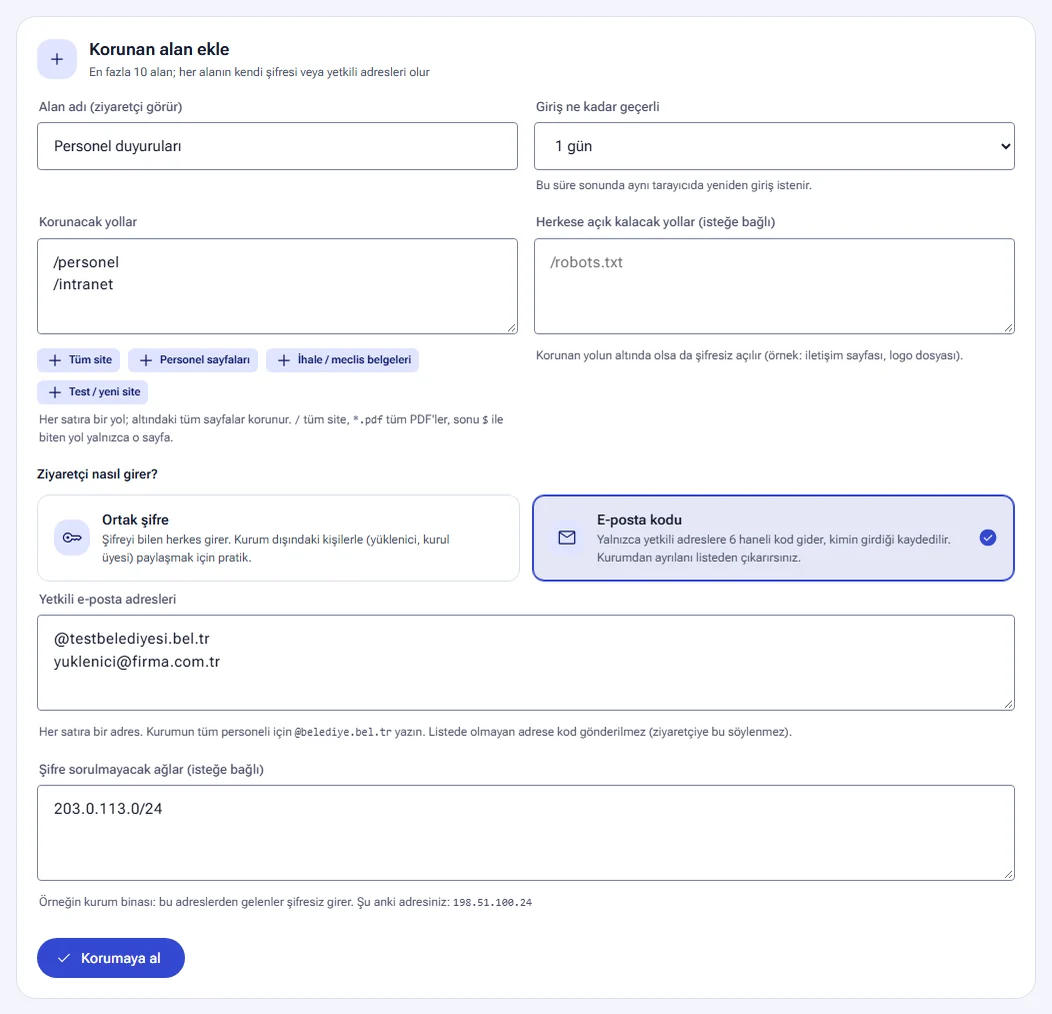
- Write the name the visitor will see in the Area name field (for example Staff announcements).
- Choose the duration from the Sign-in valid for list: 1 hour, 8 hours, 1 day, 3 days, 1 week or 30 days. When the time is up, the same browser is asked to sign in again.
- In the Paths to protect field, write one path per line. Preset buttons are available: Whole site, Staff pages, Tender / council documents and Test / new site.
- If needed, write the addresses that should open without a password in the Paths that stay public field (for example the contact page or the logo file).
- In the How does the visitor sign in? section, choose Shared password or Email code.
- For a shared password, type the password or click the Generate password button. For an email code, fill in the Authorized email addresses field.
- If needed, write the network of your organization's building in the Networks not asked for a password field.
- Click the Protect button.
| Path format | What is protected? |
|---|---|
/ |
The whole site |
/personel |
All pages that start with /personel |
*.pdf |
All PDF files on the site |
/duyuru.html$ |
Only that page |
| Topic | Shared password | Email code |
|---|---|---|
| Who can enter? | Anyone who knows the password | Only the addresses and domains on the list |
| Best for | People outside the organization, such as contractors and board members | Staff. You remove people who leave the organization from the list. |
| Records | Sign-ins are counted without personal information. | Each sign-in is recorded with the person's email address. |
The shared password must be at least 8 characters long, and easily guessed passwords are not accepted. The password is not stored in NetSSL. Only a verification hash is kept. The password is shown once when you save it. If you change the password, everyone who has signed in is signed out. The email code has 6 digits, is valid for 10 minutes and can be tried at most 5 times. No code is sent to an address that is not on the list, and the visitor is not told about this.
The page the visitor sees
A visitor who opens a protected page sees a “This page is protected” page. The page shows the area's name. With a shared password, a password box appears. With an email code, a Sign in with email code button appears. If your organization has an error page design, the sign-in page uses that design. The Announcements and error pages guide explains the design.
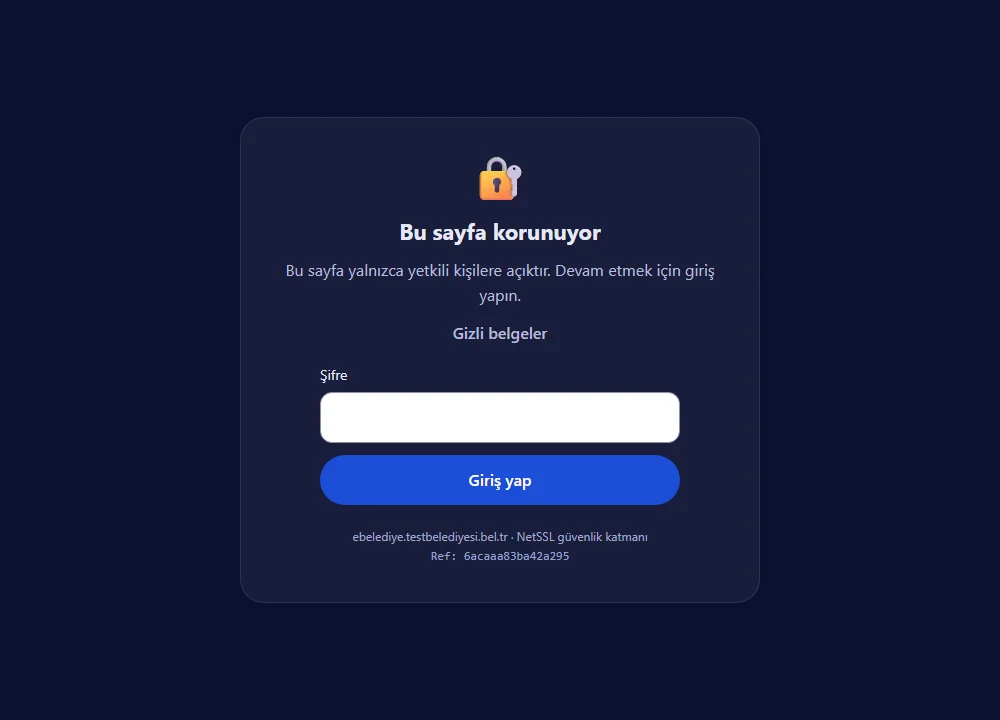
The eye icon on the Protected areas card previews every state of this page: the password prompt, a wrong password, email code sign-in, the code screen and the code email.
Email code sign-ins
This table lists sign-ins made with an email code by date, area, email and IP. Records are kept for 1 year. Sign-ins with a shared password are counted without personal information.
The shared password is not shown again. Share it with authorized people through a secure channel. If you suspect the password has spread, enter a new password or use the Sign everyone out command.
Form and file upload protection
The Form and file upload protection section on the host's Security page consists of two protections. Only form submissions (POST) are inspected. JSON requests and page loads are not affected.
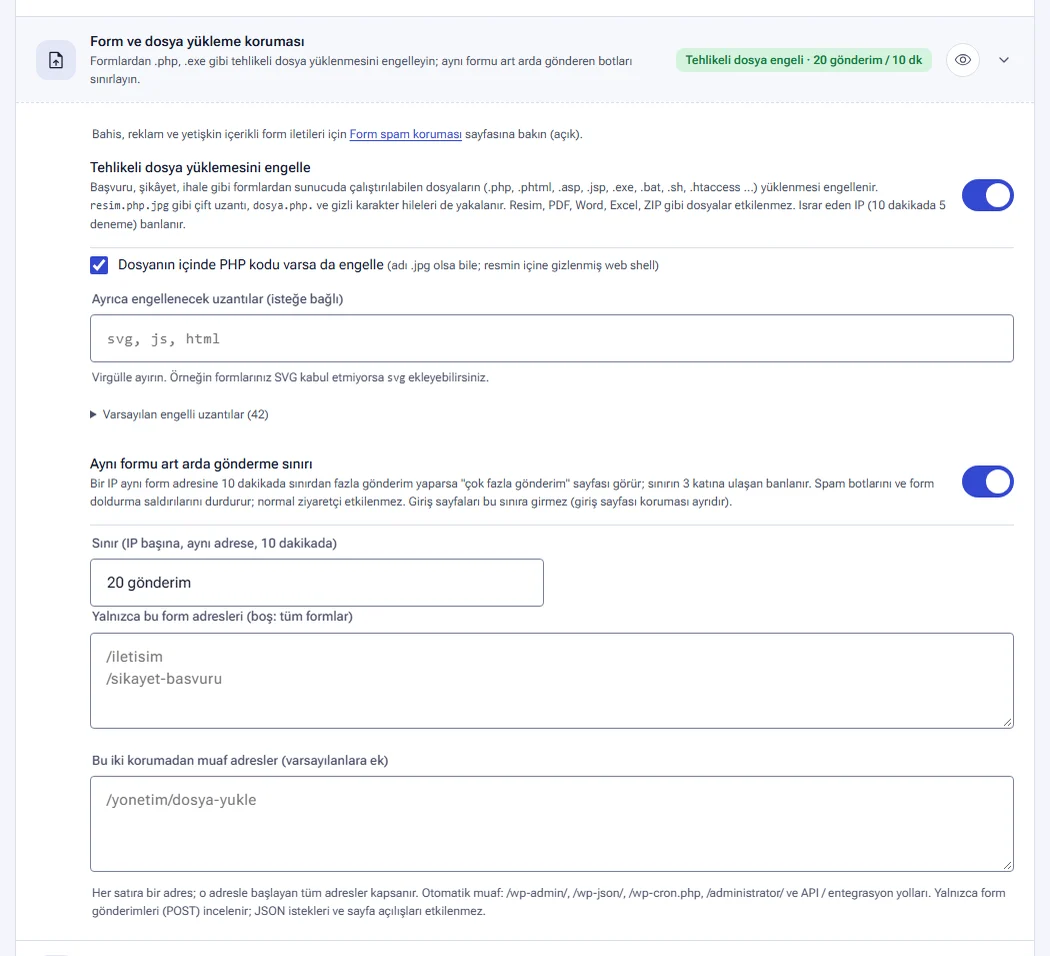
Block dangerous file uploads
This protection blocks uploads of files that can run on the server through application, complaint and tender forms. The default list has 42 extensions (for example .php, .phtml, .asp, .jsp, .exe, .bat, .sh, .htaccess). Double extension tricks such as resim.php.jpg and hidden character tricks are caught too. Image, PDF, Word, Excel and ZIP files are not affected. An IP that tries 5 times in 10 minutes is banned.
- The Also block if the file contains PHP code option catches web shell files hidden inside images.
- You add more extensions, separated by commas, in the Additional extensions to block field. If your forms do not accept SVG, you can add
svg.
Repeated form submission limit
If an IP sends more submissions to the same form address in 10 minutes than the limit allows, it sees a “too many submissions” page. An IP that reaches 3 times the limit is banned. This protection stops spam bots and form-filling attacks. Login pages are not covered by this limit.
- Limit (per IP, same address, within 10 minutes): 5, 10, 20, 50 or 100 submissions.
- Only these form addresses: If you leave it empty, all forms are covered.
- Addresses exempt from both protections: Here you write addresses such as the admin page where staff upload files.
/wp-admin/,/wp-json/,/wp-cron.php,/administrator/and API paths are already exempt.
Form spam protection
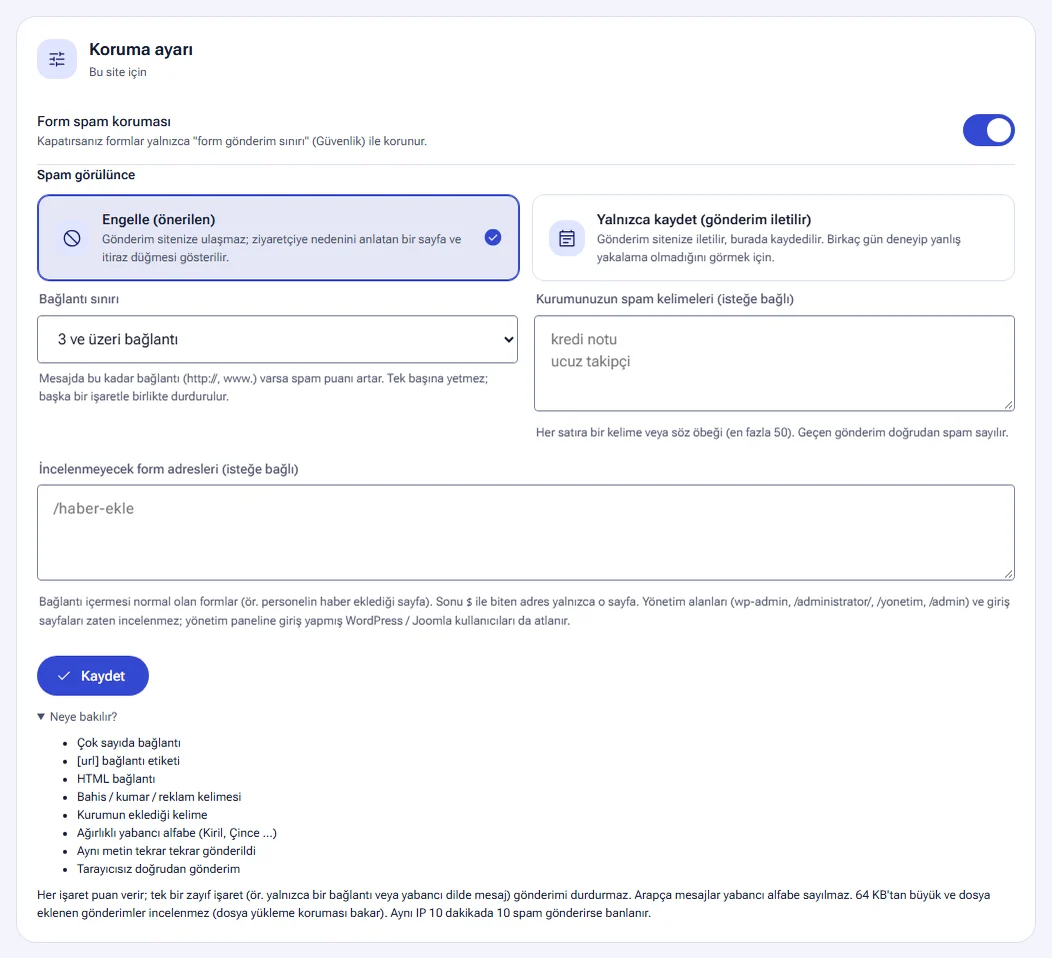
The Form spam protection page in the host menu stops betting, gambling, adult and advertising messages sent to contact, complaint, application and comment forms before they reach the site. You do not need to add an “I'm not a robot” box to your site. The visitor does not notice anything. Form content is not stored in NetSSL. Only the reason a submission was counted as spam is recorded.
The Last 30 days card shows how many submissions were stopped and how many were only logged. The card also has the Why it was counted as spam and Forms with the most spam lists.
- On the Protection setting card, keep the Form spam protection switch on.
- In the When spam is detected section, choose the behavior (see the table).
- From the Link limit list, choose 2, 3, 5 or 10 links.
- If needed, write one word per line in the Your organization's spam words field (up to 50). A submission that contains one of these words is counted as spam directly.
- Write the addresses of forms where links are normal in the Form addresses not checked field (for example the page where staff add news).
- Click the Save button.
| When spam is detected | What happens? |
|---|---|
| Block (recommended) | The submission does not reach your site. The visitor sees a “Form not sent” page. If the appeal form is on, the page shows an Appeal button. |
| Log only (submission goes through) | The submission is passed to your site and logged in the panel. Use it for a few days to check that there are no false catches. |
The What is checked? row lists the spam signals: many links, the [url] tag, HTML links, betting and advertising words, words added by the organization, text mostly in a foreign alphabet (Cyrillic, Chinese ...), the same text sent again and again, and direct submission without a browser. Each signal adds points. A single weak signal does not stop a submission. Arabic messages do not count as a foreign alphabet. Submissions larger than 64 KB and submissions with attached files are not checked. Admin areas, login pages and logged-in WordPress or Joomla administrators are not checked either. If the same IP sends 10 spam messages in 10 minutes, it is banned.
The Recent spam submissions table shows the last 50 submissions with the time, IP, form address and reason. Message content is not stored. If a real message was stopped, click the It was a real message: exempt this form button. That form address is then removed from spam checks.
If you are turning on the protection for the first time, run it in Log only mode for a few days. If the recent spam submissions list shows no false catches, switch to Block mode.
API protection
The API protection page in the host menu protects your mobile app, e-municipality integration, WordPress REST and GraphQL addresses against abuse. You write a separate rule for each API address. API paths are exempt from browser verification, but these rules still run on them. A client that breaks a rule gets a clear JSON error response with a reference code.
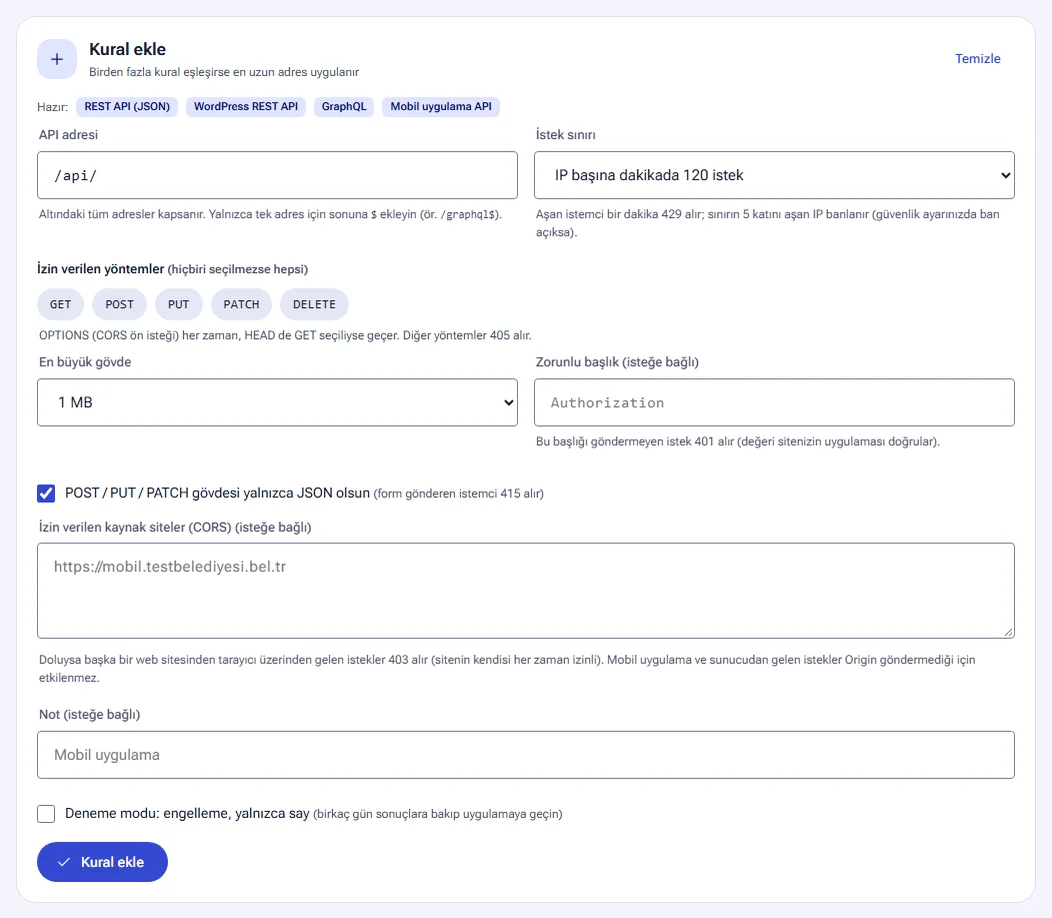
Add rule
- On the Add rule card, choose one of the templates or write the address in the API address field (for example
/api/). All addresses under it are covered. To cover a single address only, add$at the end (for example/graphql$). - Set the Request limit, Allowed methods, Maximum body size and Required header settings.
- If needed, tick the POST / PUT / PATCH body must be JSON only box and fill in the Allowed origin sites (CORS) field.
- If you want, write a Note (for example Mobile app).
- If you are not sure, tick the Test mode: don't block, only count box.
- Click the Add rule button.
| Template | Address | Methods | Maximum body size | Request limit | JSON only |
|---|---|---|---|---|---|
| REST API (JSON) | /api/ |
GET, POST, PUT, PATCH, DELETE | 1 MB | 120 per minute | Yes |
| WordPress REST API | /wp-json/ |
All | No limit | 300 per minute | No |
| GraphQL | /graphql |
GET, POST | 256 KB | 120 per minute | Yes |
| Mobile app API | /mobil/api/ |
GET, POST | 1 MB | 60 per minute | Yes |
| Setting | What does a client that breaks the rule get? |
|---|---|
| Request limit (30–1200 requests per minute per IP) | It gets 429 for one minute. An IP that goes over 5 times the limit is banned (if ban is on in your security settings). |
| Allowed methods | Other methods get 405. OPTIONS always passes. HEAD also passes if GET is selected. If none is selected, all methods pass. |
| JSON only | A client that sends form data gets 415. |
| Maximum body size (64 KB–20 MB) | A body that is too large gets 413. |
| Allowed origin sites (CORS) | A browser request from another site gets 403. The site itself is always allowed. Mobile apps and server requests are not affected because they do not send an Origin header. |
| Required header (for example Authorization) | A request without the header gets 401. Your site's application checks the header's value. |
API rules
The API rules card lists the rules you have defined. You can write up to 20 rules per site. If more than one rule matches, the rule with the longest address applies. Each rule's status appears as Enforced, Test: counting only or Off. The card shows the request count for the last 7 days, the number of stopped requests and their breakdown by reason.
- Edit opens the rule in the form.
- Switch to test mode and Switch to enforcing move the rule between test and enforcement.
- Turn off / Turn on pauses the rule temporarily and resumes it.
- Delete removes the rule. Only standard protection then applies to the address.
The switch at the top right of the card turns API protection on or off for the whole site. The eye icon previews the 429 and 405 responses the client gets. If your API and integration paths list has API addresses without a rule, they appear as suggestions at the bottom of the card.
API and integration paths
Mobile app, e-signature and integration requests do not come from a browser, so they cannot pass verification. The API and integration paths section on the host's Security page exempts these addresses from verification. In the host menu, the short name of the section is API paths.
- In the Paths exempt from verification field, write one path per line.
/api/covers every address that starts with it.*.xmlcovers every address that ends with that extension. - If you want, click the Add common API paths button. It adds the
/api/,/rest/,/graphql,/ws/,/socket.io/and/webhookpaths. - Click the Save and apply button.
On exempt paths, no browser verification is asked and standard protection does not ban anyone. IP lists, the country rule and the request limit still apply. To set special limits for these paths, use the API protection rules above.
Frequently asked questions
Our staff get caught by verification on the login page. What should we do?
A real user can pass the verification in a few seconds and try again. If people often log in from inside the organization, add the organization network to the IPs exempt from rules list or raise the Login page protection limit. The Bot and access rules guide explains the IP lists.
Our mobile app or integration does not work. Why?
Clients that are not browsers cannot pass verification. Write the app's addresses in the API and integration paths section (for example /api/, /ws/, *.asmx). If the integration comes from a fixed IP, you can also add that IP to the IPs exempt from rules list.
We turned on the admin panel lock. How will staff who work from home sign in?
For Login from outside the organization network, choose With email code and write your organization's domain in the Authorized email addresses field. Staff click the button on the lock page and enter the code sent to their organization email.
Do we need to create user accounts for password-protected pages?
No. A shared password or an authorized email address is enough. The visitor does not need a NetSSL account.
Form spam protection stopped a real message. What should I do?
In the Recent spam submissions table, click the It was a real message: exempt this form button on the relevant row. The visitor can also reach you with the Appeal button on the block page. The Security events guide explains appeals.