
Why is it needed?
Connections to your target server come from the NetSSL server. Because of this, your server records the IP address of NetSSL in its logs, not the visitor's. The same happens with services such as Cloudflare. Without this setting, these problems occur:
- In the server logs (IIS, Apache, nginx), all visitors appear to come from a single IP.
- IP-based rules in your application (login attempt limit, IP block) apply to everyone at once.
- Visitors cannot be told apart in the application's own logs and reports.
NetSSL's own visitor logs and security events already show the real IP. The setting in this guide is only for your own server's logs and your application.
When should you use it?
- Right after you connect the site to NetSSL.
- If all visitors appear with the same IP in your application or server logs.
- If your application thinks it runs over http. This causes dropped sessions or redirect loops.
Headers that NetSSL sends
| Header | Content |
|---|---|
X-Real-IP |
The visitor's IP address. It holds a single value and is the recommended header. |
X-Forwarded-For |
The visitor's IP address (standard header). Fake values sent by the visitor are removed. |
CF-Connecting-IP |
The same IP. It is sent for applications and plugins written for Cloudflare. |
True-Client-IP |
The same IP. It is sent for applications compatible with Akamai / Cloudflare Enterprise. |
X-Forwarded-Proto |
https (the protocol the visitor connected with) |
You need to do only one thing. Tell your server or application to read this header only when it comes from the NetSSL server.
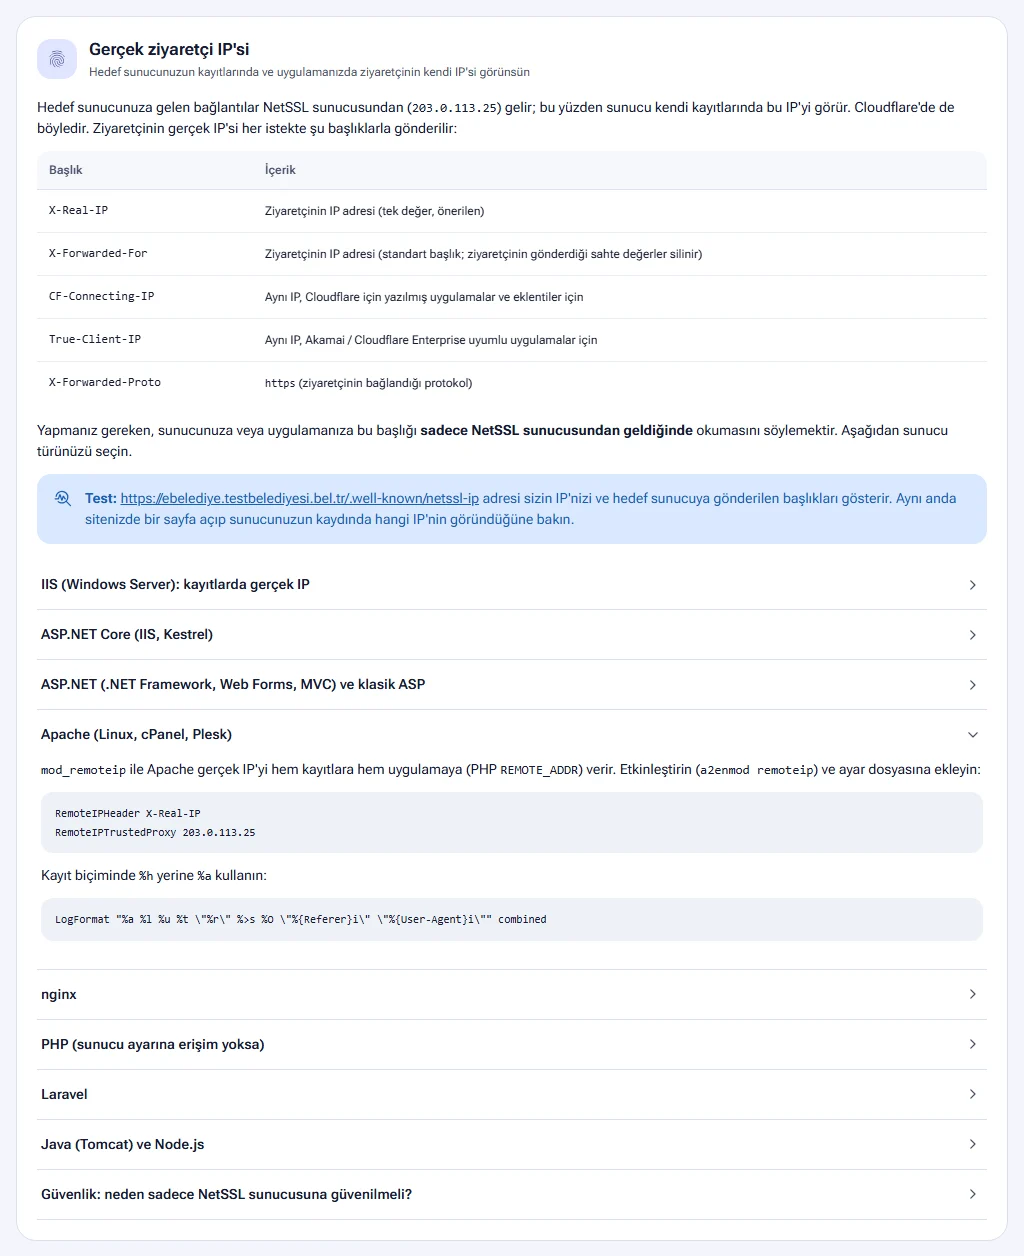
The Real visitor IP section on the Account → Help page gives you the settings below, already filled in with the IP address of your NetSSL server. Copy the lines from there. In the examples in this guide, the NetSSL address is 203.0.113.25. If your account has more than one NetSSL server, the panel lists all the addresses. Add all of them.
Find your NetSSL address
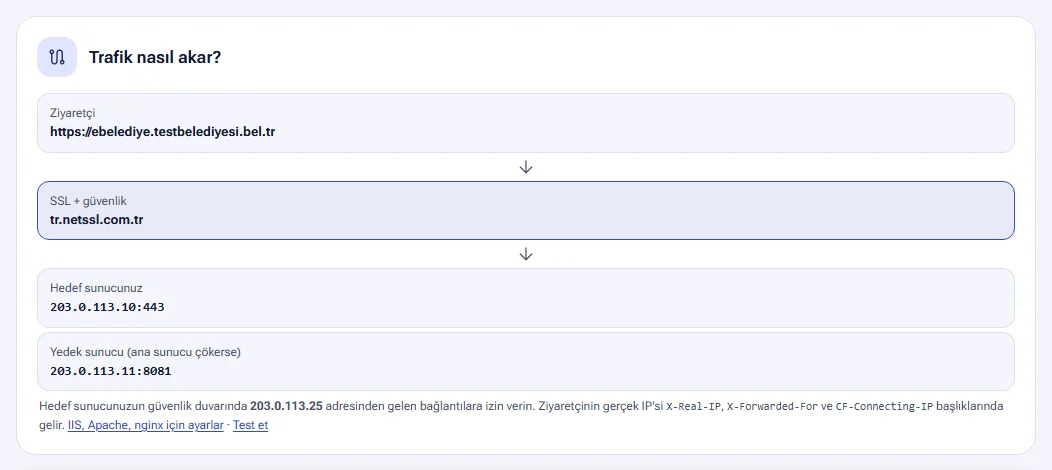
On the host's Publishing settings page, the How does traffic flow? box on the right shows the path of the traffic. The path goes from the visitor to NetSSL (SSL + security) and from there to your target server. If a backup server is set up, it appears too.
Below the box you see the NetSSL address that you need to allow in your firewall. The Settings for IIS, Apache, nginx link opens the ready-made settings in the help center. The Test link opens the test address described below.
Settings by server type
IIS (Windows Server): real IP in the logs
On IIS 8.5 and later, you add an extra column to the log file.
- Open IIS Manager → site → Logging → Select Fields → Add Field.
- Enter Request Header as Source type, X-Forwarded-For as Source and GercekIP as Field name.
You can apply the same setting to all sites with a single command in an administrator command prompt:
%windir%\system32\inetsrv\appcmd.exe set config -section:system.applicationHost/sites /+"siteDefaults.logFile.customFields.[logFieldName='GercekIP',sourceName='X-Forwarded-For',sourceType='RequestHeader']" /commit:apphostThe c-ip column in the logs keeps the NetSSL IP. The real IP appears in the GercekIP column.
ASP.NET Core (IIS, Kestrel)
In Program.cs, add these lines before the other middleware:
using Microsoft.AspNetCore.HttpOverrides;
using System.Net;

builder.Services.Configure<ForwardedHeadersOptions>(o =>
{
    o.ForwardedHeaders = ForwardedHeaders.XForwardedFor | ForwardedHeaders.XForwardedProto;
    o.KnownProxies.Add(IPAddress.Parse("203.0.113.25"));
});

var app = builder.Build();
app.UseForwardedHeaders();
After that, HttpContext.Connection.RemoteIpAddress returns the real IP.
ASP.NET (.NET Framework, Web Forms, MVC) and classic ASP
Where you read the IP, use the header only for requests that come from NetSSL:
string ip = Request.ServerVariables["REMOTE_ADDR"];
if (ip == "203.0.113.25")
{
    ip = Request.ServerVariables["HTTP_X_REAL_IP"] ?? ip;
}
Apache (Linux, cPanel, Plesk)
The mod_remoteip module passes the real IP both to the logs and to the application (PHP REMOTE_ADDR).
- Enable the module:
a2enmod remoteip. - Add these lines to the configuration file:
RemoteIPHeader X-Real-IP
RemoteIPTrustedProxy 203.0.113.25- In the log format, use
%ainstead of%h:
LogFormat "%a %l %u %t \"%r\" %>s %O \"%{Referer}i\" \"%{User-Agent}i\"" combined- Restart Apache.
nginx
Add these lines to the http or server block:
set_real_ip_from 203.0.113.25;
real_ip_header X-Real-IP;
After this, $remote_addr, the logs and the REMOTE_ADDR passed to the application show the real IP.
PHP (if you have no access to the server settings)
Add this at the very start of the application. For example, the start of index.php, config.php or, for WordPress, wp-config.php is a good place.
<?php
if ($_SERVER['REMOTE_ADDR'] === '203.0.113.25' && !empty($_SERVER['HTTP_X_REAL_IP'])) {
    $_SERVER['REMOTE_ADDR'] = $_SERVER['HTTP_X_REAL_IP'];
}
Laravel
On Laravel 11 and later, add this to the bootstrap/app.php file:
->withMiddleware(function (Middleware $middleware) {
    $middleware->trustProxies(at: ['203.0.113.25']);
})
On Laravel 10 and earlier, write this line in the app/Http/Middleware/TrustProxies.php file:
protected $proxies = ['203.0.113.25'];Java (Tomcat)
In server.xml, add this under <Host>:
<Valve className="org.apache.catalina.valves.RemoteIpValve" internalProxies="203\.0\.113\.25" remoteIpHeader="x-forwarded-for" protocolHeader="x-forwarded-proto" />Node.js (Express)
app.set('trust proxy', ['203.0.113.25']);Test the setting
- In a browser, open the
/.well-known/netssl-ipaddress of your site. Example:https://ebelediye.testbelediyesi.bel.tr/.well-known/netssl-ip. - The page shows your IP address and the headers sent to the target server.
- At the same time, open a page on your site.
- Check which IP appears in your server's log. If it matches the IP on the test page, the setting is correct.
While the host is live, you can also open the test address with the Test link in the How does traffic flow? box.
Why trust only NetSSL?
Anyone can send these headers. If your target server is directly open to the internet, someone can bypass NetSSL and send a fake X-Real-IP. That is why all the settings above trust only the IP address of NetSSL. NetSSL also removes these headers when a visitor sends them and writes its own value.
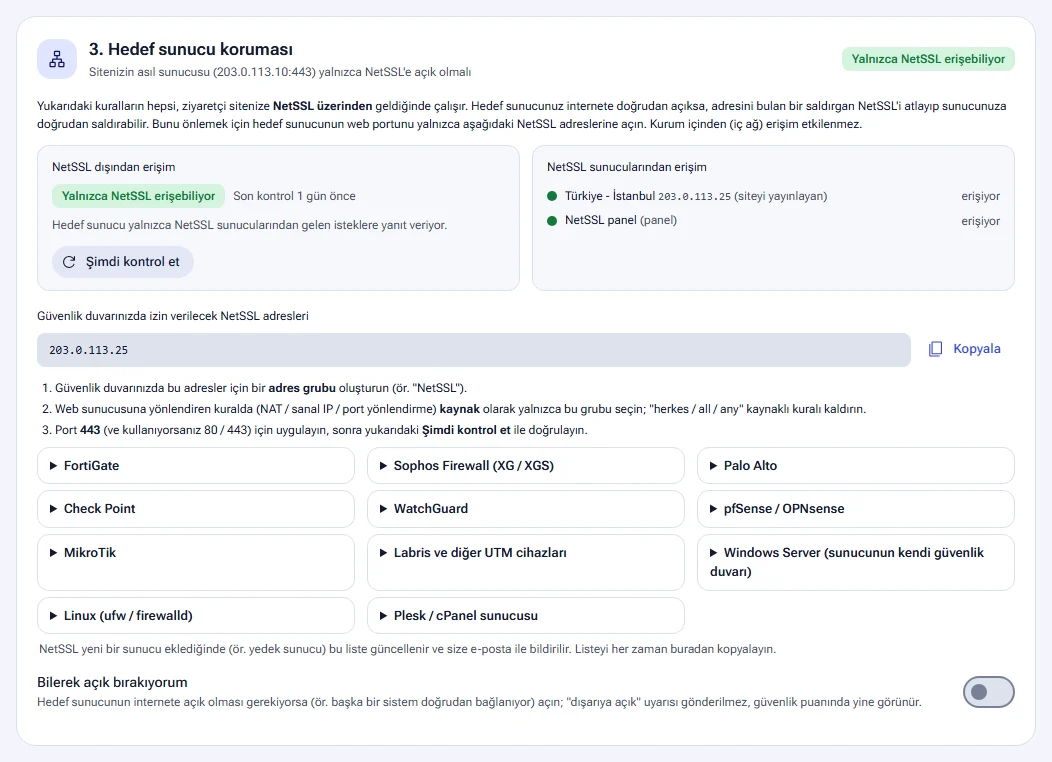
The safest way is to open the web ports in your target server's firewall only to NetSSL addresses. The Target server protection section on the host's Security page checks this for you:
- The Access from outside NetSSL box shows whether your server is open to the outside. The result is Only NetSSL can access, Directly accessible from outside or On the internal network (no outside access). The Check now button runs the check again.
- The Access from NetSSL servers box shows whether the NetSSL servers can reach your site.
- Get the NetSSL addresses to allow in your firewall list with the Copy button. Step-by-step instructions are there for FortiGate, Sophos, Palo Alto, Check Point, WatchGuard, pfSense / OPNsense, MikroTik, Labris and other UTM devices, Windows Server, Linux and Plesk / cPanel.
- When NetSSL adds a new server, the list is updated and you get an email about it.
This check is also part of the security score. If someone can reach the server by bypassing NetSSL, the score is at most 60. Details: Using the panel.
Some plugins written for Cloudflare also check that the connection comes from a Cloudflare IP. These plugins do not use the CF-Connecting-IP header that NetSSL sends. In that case, use the general setting above.
X-Forwarded-Proto and https
If NetSSL connects to your target server over http, your application may think it runs over http. As a result, you may see a mixed content warning on the page, dropped sessions at login or endless redirects. NetSSL sends the X-Forwarded-Proto: https header with every request. Make your application trust this header. In frameworks such as Laravel, WordPress and ASP.NET, this setting is called “trusted proxy”. The ASP.NET Core, Laravel and Tomcat settings above cover this header too. Solutions by symptom are in the Troubleshooting guide.
Frequently asked questions
Which header should I use?
X-Real-IP is recommended because it holds a single value. If your application expects the standard header, use X-Forwarded-For. Both carry the same IP.
I made the setting, but the logs still show the NetSSL IP.
Check that the IP in your setting is the same as the NetSSL address in the panel. Then restart the web server or the application pool. In IIS, the c-ip column always keeps the NetSSL IP. The real IP is in the GercekIP column. Compare the result with the test address.
Does NetSSL show the real IP in its own logs?
Yes. The panel's visitor logs, the recent visits list and the security events show the visitor's real IP. Details: Law 5651 logs and official requests.
What should I allow in the firewall?
Allow connections to your target server's web port (usually 443 or 80) only from the NetSSL addresses in the panel. This rule does not affect access from inside the organization (from the internal network).