
Automatic Security Warning for External Emails
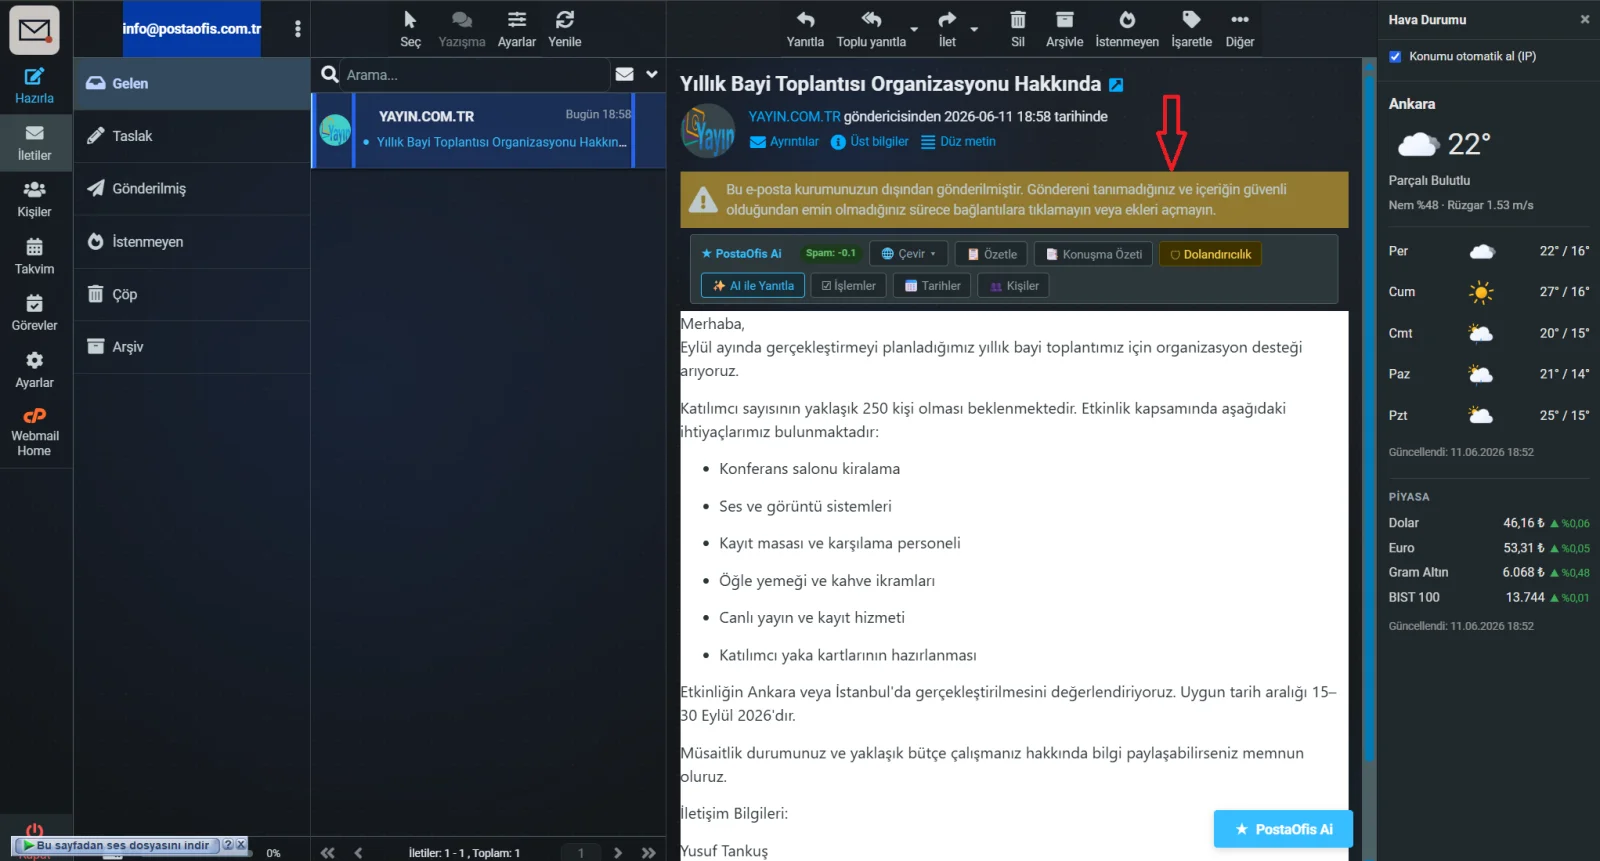
An automatic warning is added to the top (or bottom) of every email that comes from outside your organization. It warns users about fake and phishing emails — and it appears not only in webmail but also in Outlook, on phones and in every other email app.
What Does This Tool Do?
Email Security Warning automatically adds a warning banner to emails from outside your organization. The banner gives whoever opens the email a clear message: "This message came from outside. Be careful."
What is it used for?
- Protection against phishing attacks — attackers often use fake addresses that imitate familiar organizations. The warning banner makes users stop and ask themselves, "Did this really come from inside?"
- User awareness — staff treat links and attachments in external emails with more caution.
- Corporate security policy — for municipalities and other organizations, an external email warning is a basic cybersecurity measure.
Emails from your own domain (from inside your organization) are not affected by this warning. The warning is added automatically only to emails from external sources. That way your internal correspondence stays clean, and attention goes only to what comes from outside.
The Key Feature: Visible Everywhere
The biggest strength of this warning is that it is added to the email content on the server side. In other words, the warning is written into the message body before the email reaches you. As a result:
Webmail
It appears in the webmail interface you open in your browser.
Outlook & Desktop
It also appears in desktop programs such as Outlook and Thunderbird.
Phone & Tablet
It appears in mobile clients such as iPhone/Android Mail and the Gmail app.
All Users
Whoever opens the email, on whatever device, sees the warning.
Many security warnings depend on the settings of a single program — for example, a rule set up only in Outlook doesn't protect a user who checks email on their phone. Because this system writes the warning directly into the message, the warning is always there, no matter which device or app the email is opened with. You set it up in one place, and it works for everyone.
Below is an example of how an external email looks in webmail:
Where Do I Find the Tool?
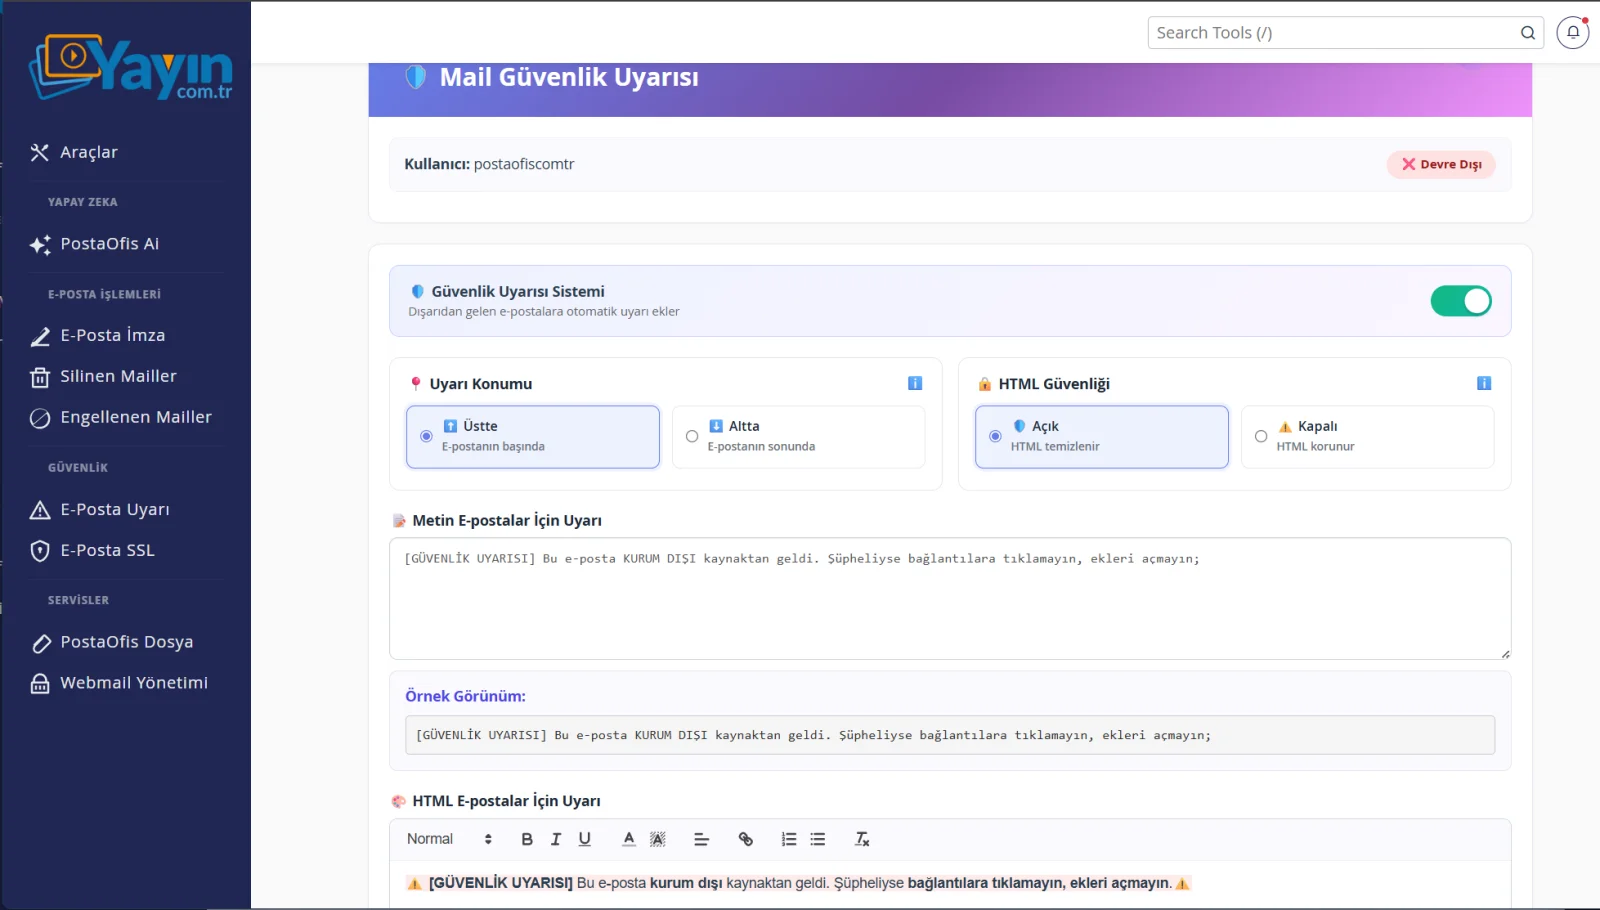
In the panel, go to SECURITY → Email Warning in the left menu. The Email Security Warning screen opens.
Security Warning System (On / Off)
The Security Warning System switch at the top of the page is the main on/off switch for the whole system.
🟢 Active
An automatic warning is added to emails from outside. The settings sections open up and can be edited.
🔴 Disabled
No warning is added to any email. Your settings are kept, and you can turn the system back on whenever you like.
Settings
📍 Warning Position
Choose where in the email the warning is added:
| Option | Description |
|---|---|
| ⬆️ Top | The warning appears at the very top of the email. It's the first thing users see as soon as they open it (recommended). |
| ⬇️ Bottom | The warning appears at the very end of the email. |
The Top position is usually more effective, because users see the warning before they read the content or click any links. That makes them more likely to act with caution.
🔒 HTML Security
Determines how potentially harmful code elements in HTML emails are handled:
| Option | Description |
|---|---|
| 🛡️ On | HTML is sanitized — harmful HTML/JS elements are stripped out. There may be small differences in appearance, but functionality is preserved (recommended). |
| ⚠️ Off | HTML is preserved — the incoming email's HTML is left as it is. The appearance is fully kept, but the security layer is disabled. |
Harmful emails sometimes carry malicious HTML/JavaScript hidden inside them. The "On" option adds an extra layer of protection by removing these elements. Any minor differences in appearance are insignificant compared with the security it provides.
📝 Customizing the Warning Text
The warning text is entirely up to you; you can edit it to suit your organization. There are two separate fields:
- Warning for Plain-Text Emails — a simple warning added to plain-text emails. The Preview below it shows you instantly how it will look.
- Warning for HTML Emails — use the rich text editor to design a colorful, bold, eye-catching warning banner.
If you leave the text fields empty, the system uses its built-in default warning text. So the system works even if you don't fill in the boxes; you only need to edit them if you want to write your own text.
When you have finished with your settings, click the 💾 Save Settings button.
Step by Step: Enabling the Security Warning
Open the Page
In the panel, go to SECURITY → Email Warning.
Activate the System
Turn on the Security Warning System switch. The settings sections become visible.
Choose the Position
Decide whether the warning appears at the Top or the Bottom. Top is recommended.
Leave HTML Security On
Keep the HTML Security setting On for extra protection.
Edit the Text (Optional)
If you like, customize the plain-text and HTML warnings for your organization; if you leave them empty, the default text is used.
Save
Click the 💾 Save Settings button. From then on, every email from outside your organization is marked with the warning banner.
Important Notes
Internal correspondence is not affected: The warning is added only to external emails; emails from your own domain are left untouched.
Visible in every client: All users see the warning, both in clients such as Outlook and Gmail and in the web interface.
Attachments are not changed: The settings apply only to the body text of the email; attachments are left untouched.
Frequently Asked Questions
| Question | Answer |
|---|---|
| Does the warning only appear in webmail? | No. Because it is added to the content of the email, it also appears in Outlook, on phones and in every other email app. |
| Is the warning also added to emails from my own colleagues? | No. Emails from your own domain (from inside your organization) are not affected; only external emails are marked. |
| Can I change the warning text? | Yes. You can fully customize the plain-text and HTML warnings for your organization. |
| Does the warning break the email or affect my attachments? | No. Only a warning banner is added to the body text; attachments and the email's functionality are preserved. |
| Does the email look different when HTML Security is "On"? | There may be very small differences in appearance, but the content and functionality are preserved. Keeping it on is recommended for security. |
| Can I turn the warning off temporarily? | Yes. Just turn off the main switch; your settings are not deleted, and you can turn it back on whenever you like. |