
Add Your First Camera
Register your IP camera on the platform and go live within minutes. You can connect your camera using either RTSP or RTMP.
The Media Services Page
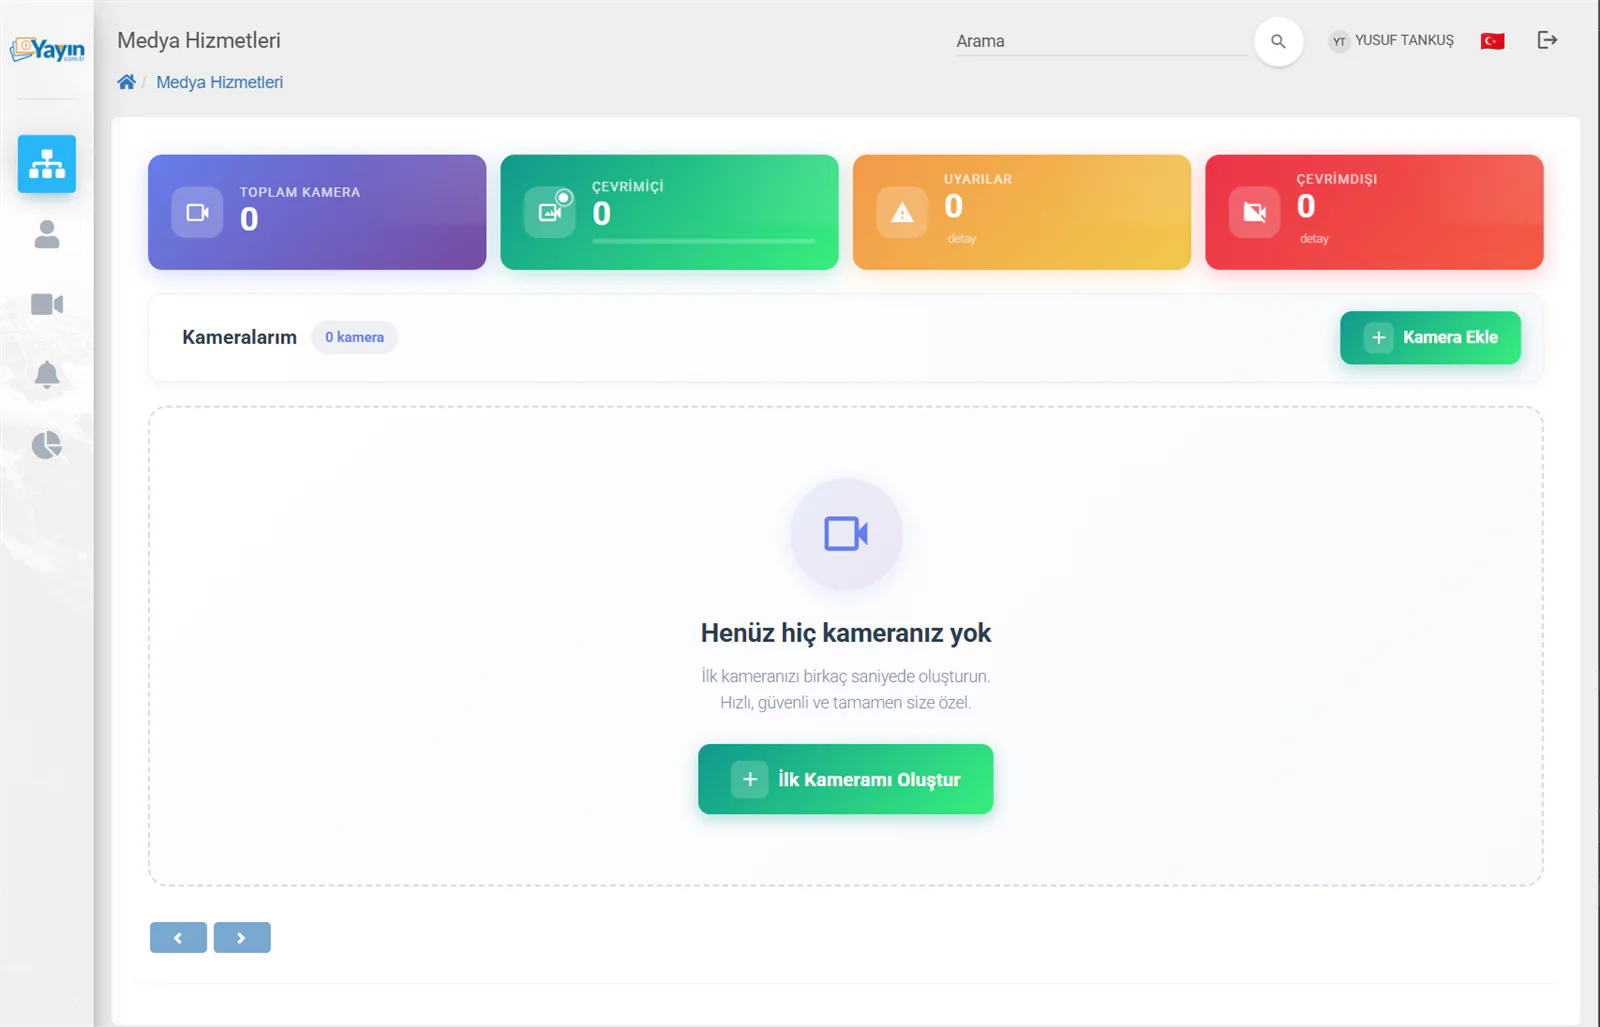
When you sign in to the panel, the Media Services page opens. It shows the overall status of your cameras:
| Card | Description |
|---|---|
| Total Cameras | The total number of cameras registered to your account |
| Online | The number of cameras currently streaming |
| Warnings | Cameras with a codec or bitrate warning |
| Offline | Cameras that have lost connection or are switched off |
If you have not added a camera yet, the screen shows a "You do not have any cameras yet" message and a "Create My First Camera" button.
Creating a New Camera
There are two ways to add a camera:
- Click the green + Add Camera button at the top right
- or click the + Create My First Camera button in the middle of the page
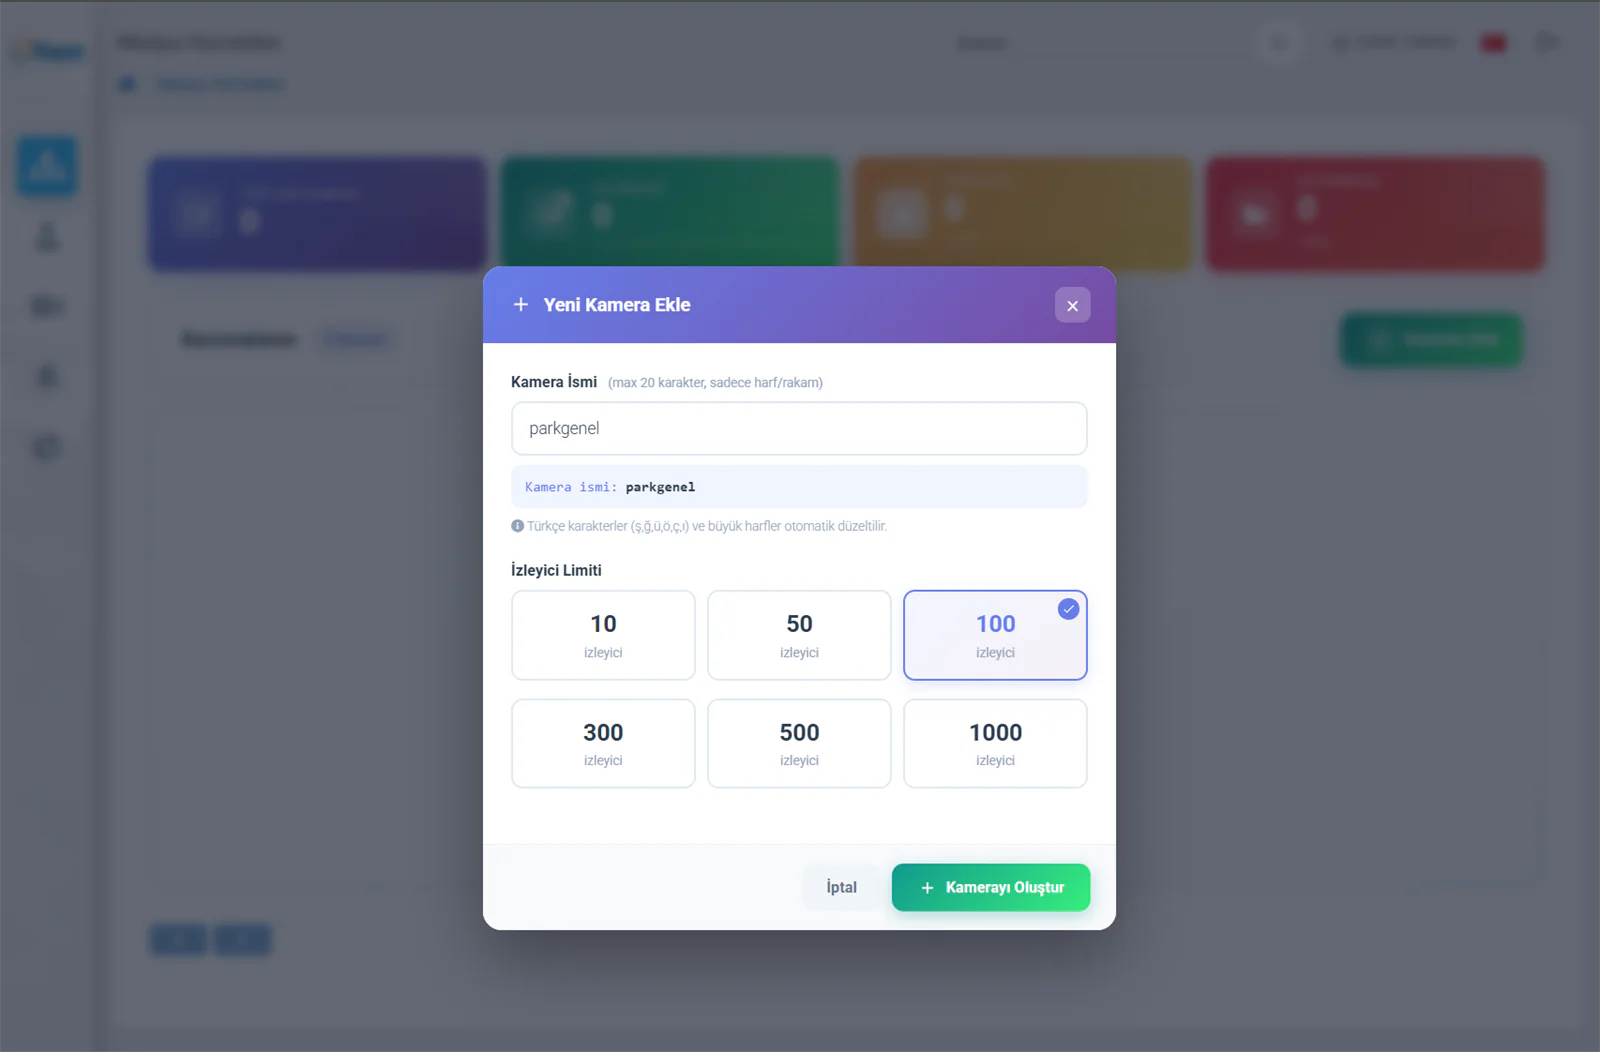
You need to provide two pieces of information in the dialog that opens:
Camera Name
Choose a unique name for your camera.
| Rule | Description |
|---|---|
| Maximum length | 20 characters |
| Allowed characters | Letters and numbers only |
| Turkish characters | ş, ğ, ü, ö, ç, ı are converted automatically to s, g, u, o, c, i |
| Capital letters | Converted automatically to lower case |
Give your camera a name that describes its location or purpose — for example parkgeneral, seafrontcam, lobbycam1. This name is later used in your stream link.
Viewer Limit
Set how many people can watch your camera at the same time:
| Limit | Suitable For |
|---|---|
| 10 | Testing or personal use |
| 50 | Small businesses |
| 100 | Medium-sized projects (recommended) |
| 300 | Municipal and corporate streams |
| 500 | High-traffic websites |
| 1000 | Large-scale broadcasts |
This limit sets the maximum number of people who can watch your camera simultaneously. Once the limit is reached, additional viewers cannot join the stream. It can be changed later as your needs change.
Once you have entered the details, click the + Create Camera button.
After the Camera Is Created
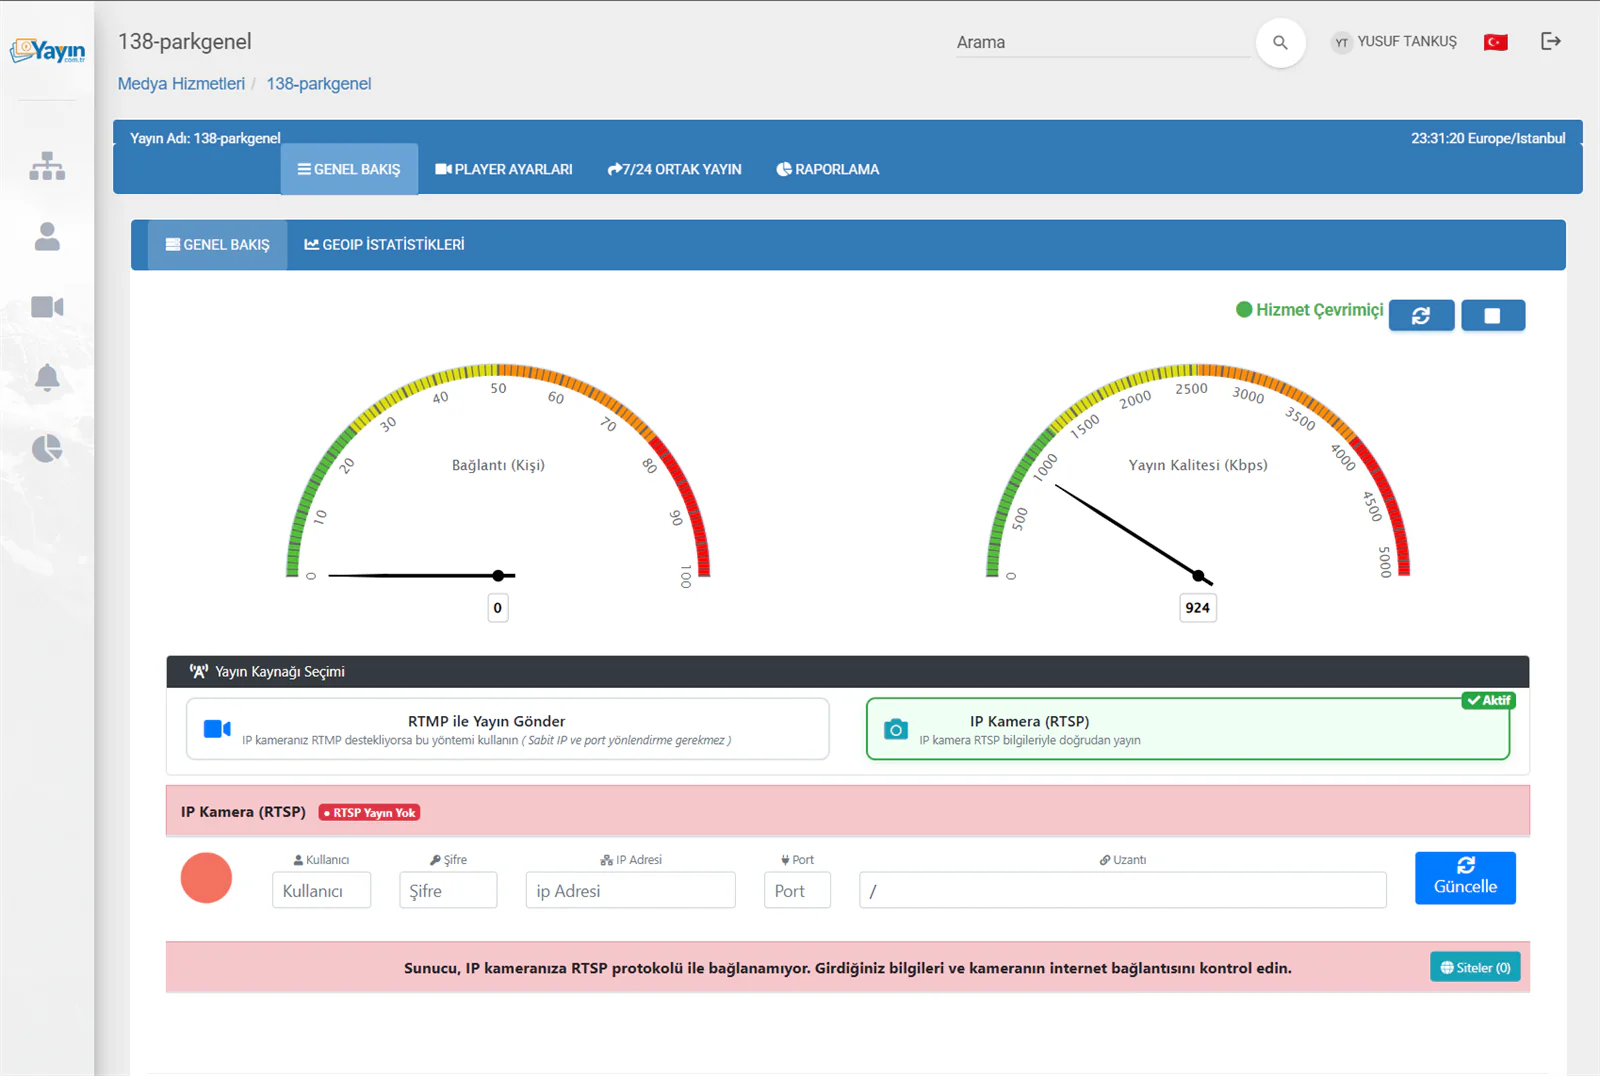
Once the camera is created you are taken automatically to its management page, where you will find:
Top Information Bar
The blue bar displays your camera details:
- Stream name: your account number and camera name (for example
parkgeneral) - Tabs: Overview, Player Settings, 24/7 Multistreaming, Reporting
- Clock: server time and time zone (Europe/Istanbul)
Status Indicators
Two indicators let you follow your camera's live status:
| Indicator | Description |
|---|---|
| Connections (People) | Live viewer count — how many people are watching your camera right now |
| Stream Quality (Kbps) | Your camera's live data transfer rate (bitrate) |
Choosing the Stream Source
There are two ways to connect your camera to the platform:
📡 IP Camera (RTSP)
Streams directly using your IP camera's RTSP details. Requires a static IP and port forwarding. This is the most commonly used method.
📺 Send Stream via RTMP
Use this method if your IP camera supports RTMP. No static IP or port forwarding is needed — the camera pushes its own stream to the server.
Connecting a Camera via RTSP
After selecting the IP Camera (RTSP) option, enter your camera connection details:
Username
The username you use to sign in to your camera's web interface. It is usually admin by default.
Password
The password for your camera's web interface.
IP Address
Your camera's static external IP address. If you have a dynamic IP, you will need to use a DDNS service.
Port
Your camera's RTSP port. 554 is used by default, though it may differ if you have set up port forwarding on your router.
Path
The RTSP path, which varies by camera brand. Common brand paths are listed in the table below.
RTSP Paths for Common Camera Brands
| Brand | Path (Main Stream) | Path (Sub Stream) |
|---|---|---|
| Dahua | /cam/realmonitor?channel=1&subtype=0 |
/cam/realmonitor?channel=1&subtype=1 |
| Hikvision | /Streaming/Channels/101 |
/Streaming/Channels/102 |
| Uniview | /media/video1 |
/media/video2 |
| Reolink | /h264Preview_01_main |
/h264Preview_01_sub |
| Axis | /axis-media/media.amp |
— |
| Samsung | /profile2/media.smp |
— |
For the RTSP method you need to forward your camera's RTSP port on your router (port forwarding), and you also need a static external IP address. You can request a static IP from your internet service provider.
Once you have entered the details, click Update. If the connection succeeds, the status indicator turns green and your camera goes live.
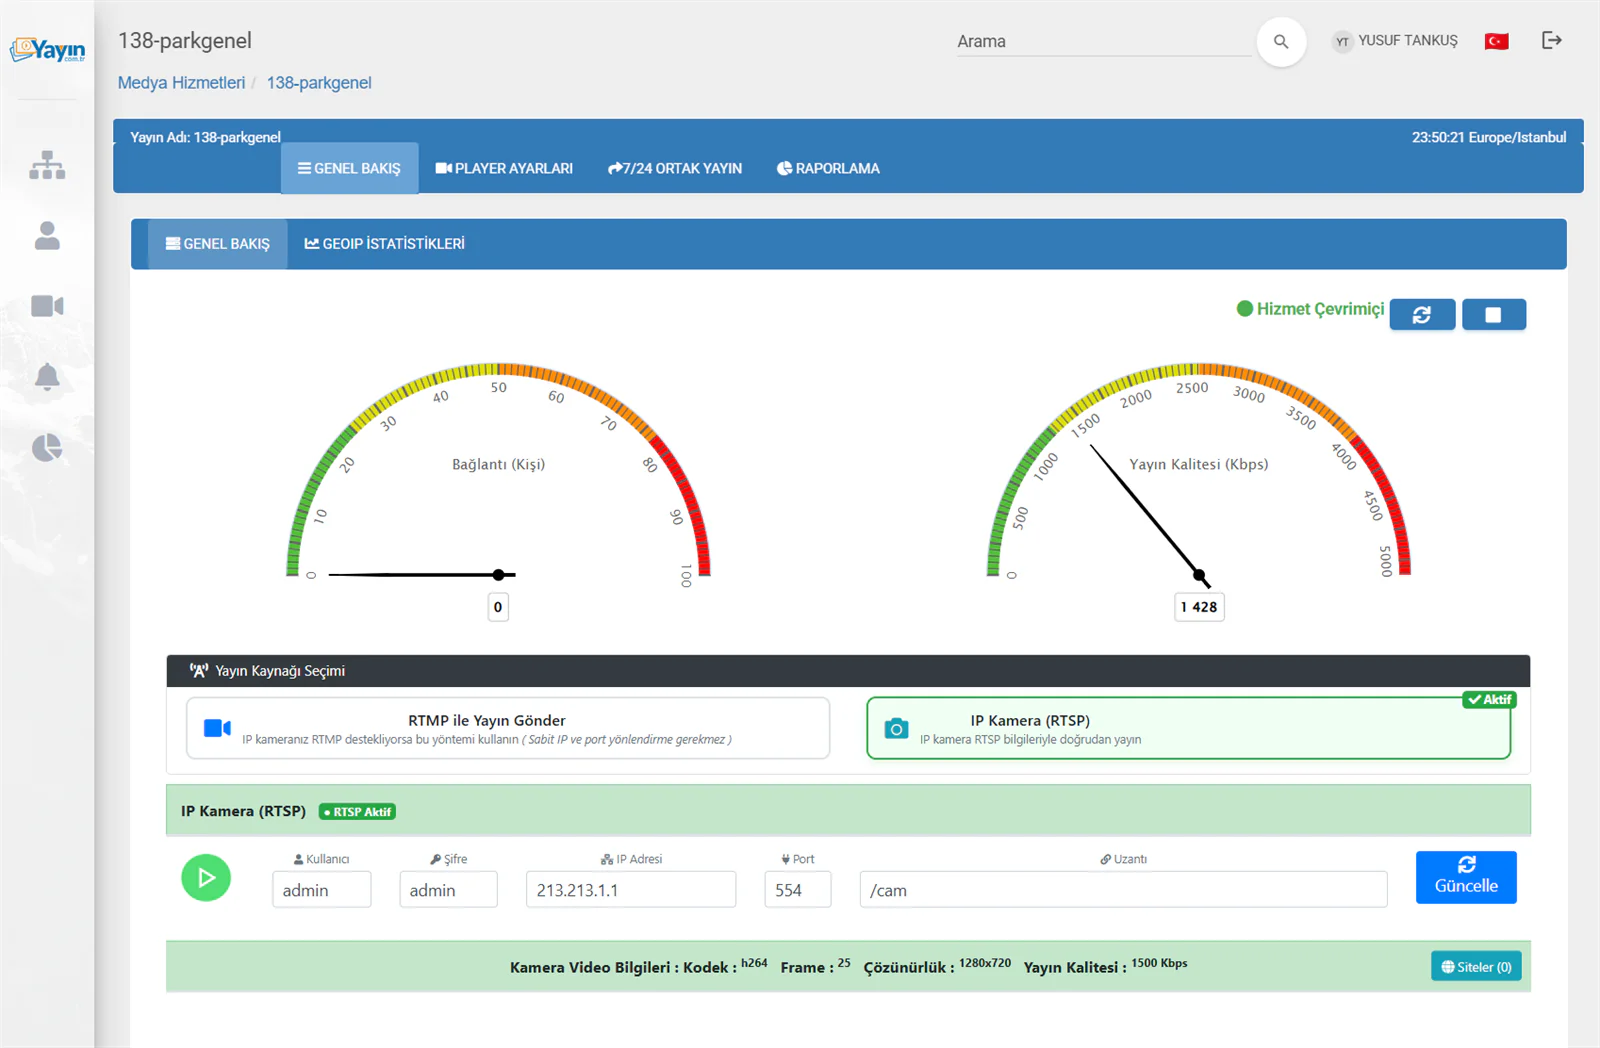
When the connection succeeds, your stream details appear in the green information bar at the bottom:
| Detail | Description |
|---|---|
| Codec | Video codec type (H.264 recommended) |
| Frame | Frames per second (FPS) |
| Resolution | Video resolution (for example 1280x720) |
| Stream Quality | Bitrate value (Kbps) |
For the best results, configure your camera as follows: video codec H.264, audio codec AAC, bitrate under 2500 Kbps, resolution 1280x720 or 1920x1080.
AI-Assisted RTSP Connection Test
The RTSP Connection Test is an AI-assisted diagnostic tool you will not find on competing platforms. It automatically tests your camera's connection in 5 stages, pinpoints exactly where the problem lies, and offers a plain-language explanation and a suggested fix for each issue. You can understand and resolve the problem within seconds, without needing technical expertise.
Click the turquoise 🔄 Test button in the IP Camera (RTSP) section to open the RTSP Connection Test dialog. The system checks the connection process to your camera automatically in 5 stages and shows the result of each stage in real time.
Test Stages
| # | Stage | What Is Tested | Description |
|---|---|---|---|
| 1 | Port Connection | Port access | Whether a TCP connection can be established to the given IP and port |
| 2 | Username & Password | Authentication | Whether the camera accepts the username and password you entered |
| 3 | RTSP Path | RTSP path | Whether the path you entered is valid on the camera |
| 4 | Video Stream | Video stream | Whether the video stream can be pulled from the camera successfully |
| 5 | Codec Details | Codec analysis | Analysing the video codec, resolution, FPS and bitrate values |
Each stage can be shown in one of the following states:
| Icon | State | Description |
|---|---|---|
| ✅ Green | Passed | The test passed, no problem found |
| ❌ Red | Failed | A problem was detected — details and a suggested fix are shown |
| ⚠️ Amber | Warning | The connection works, but there is room for improvement |
| ⬜ Grey | Skipped | This stage was not tested because an earlier stage failed |
The tests run in sequence. If a stage fails, the remaining stages are skipped automatically because they cannot be tested anyway. If the port connection cannot be established, for example, the username and password cannot be checked. This makes the true source of the problem completely clear.
Scenario 1: All Tests Passed ✅
If the camera connection works without issues, every stage is marked with a green tick and the codec details are listed underneath.
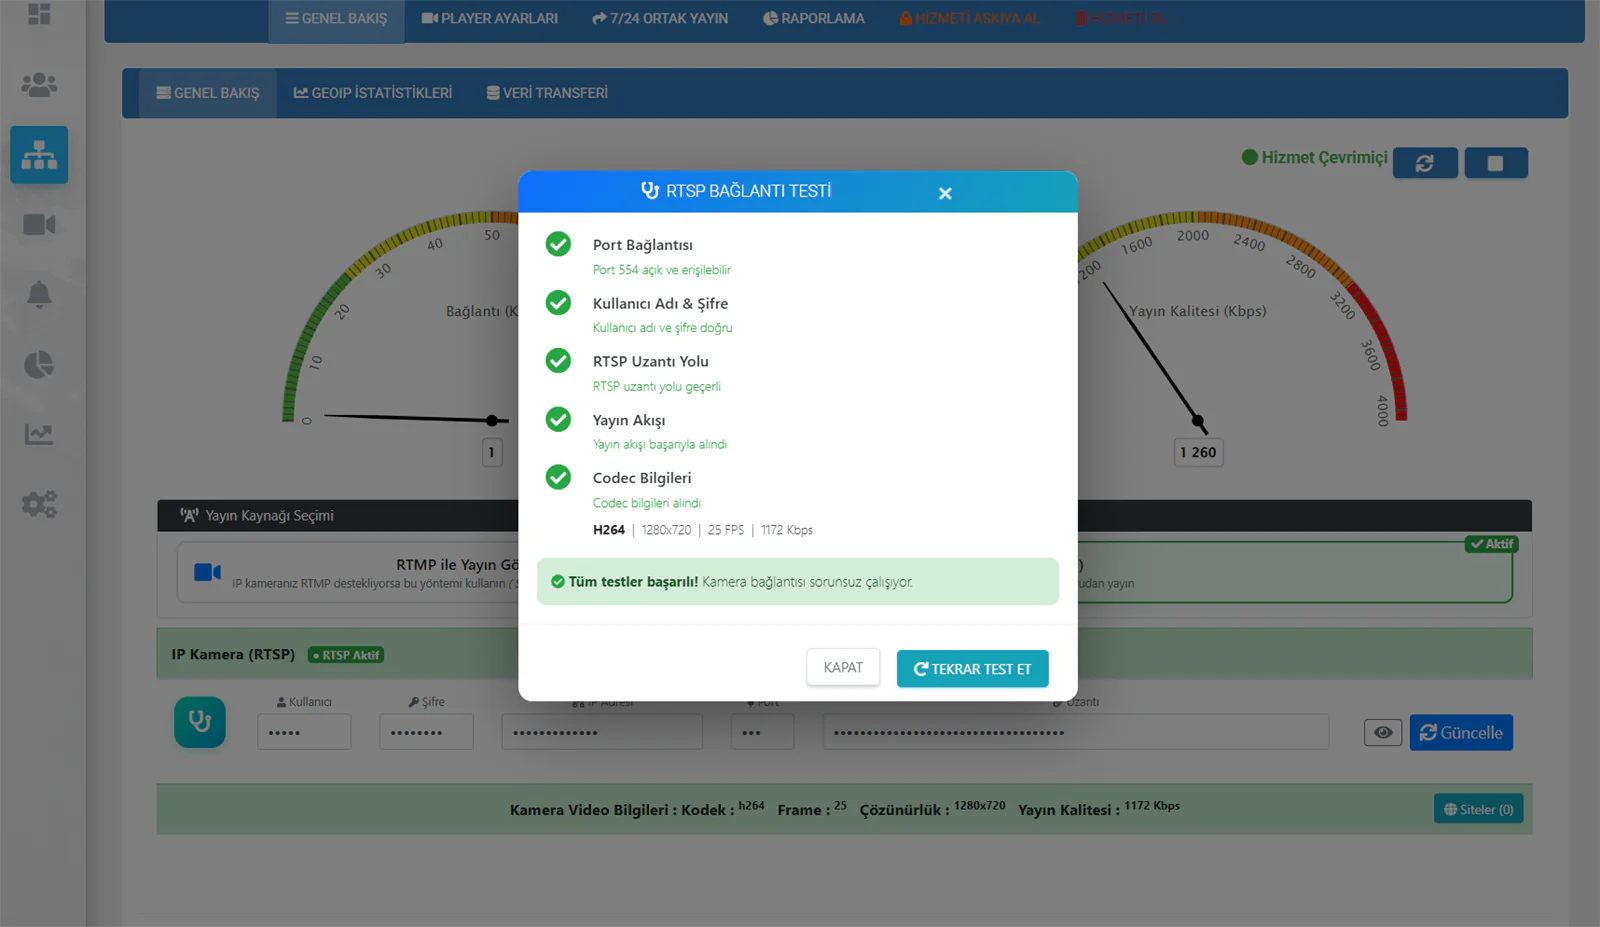
The results section shows a green banner reading "All tests passed! The camera connection is working without issues." The codec details are summarised too: codec type (H264), resolution (1280x720), FPS (25) and bitrate (1172 Kbps).
Scenario 2: Port Connection Failed ❌
If the port is closed or unreachable, the error is detected at the first stage and all remaining stages are skipped.
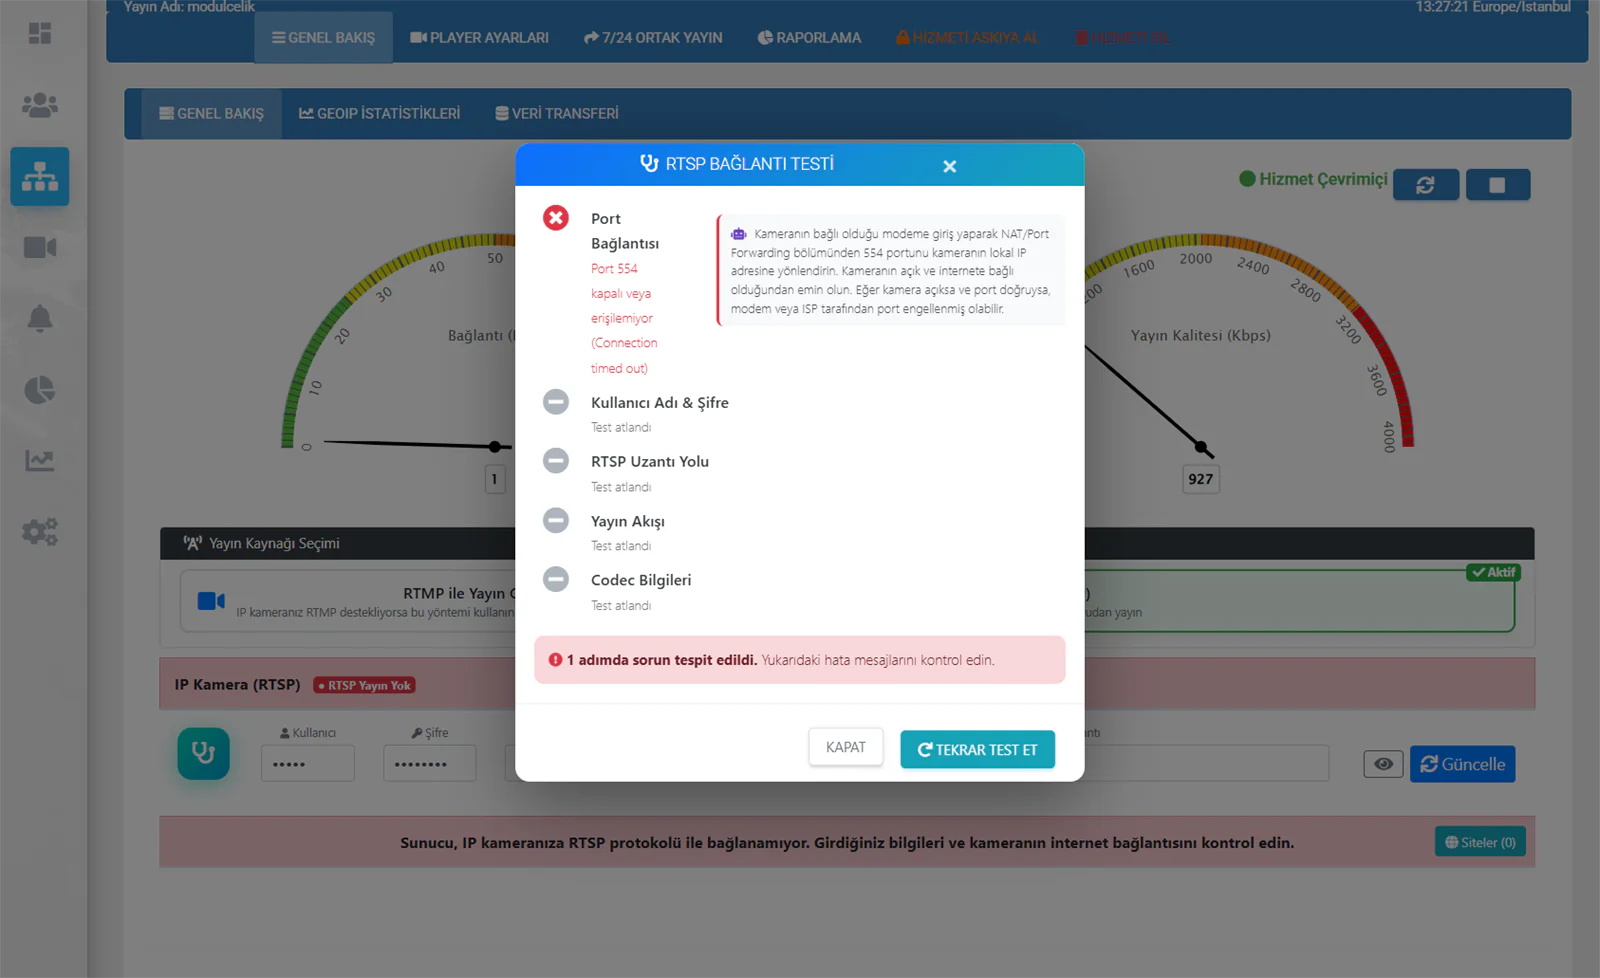
An AI-assisted suggested fix is shown automatically:
| Problem | Suggested Fix |
|---|---|
| Port 554 is closed or unreachable (Connection timed out) | Sign in to the router your camera is connected to and forward port 554 to the camera's local IP address from the NAT/Port Forwarding section. Make sure the camera is switched on and connected to the internet. If the camera is on and the port is correct, the port may be blocked by your router or ISP. |
Scenario 3: Incorrect Username or Password ❌
This scenario appears when the port connection succeeds but authentication is rejected.
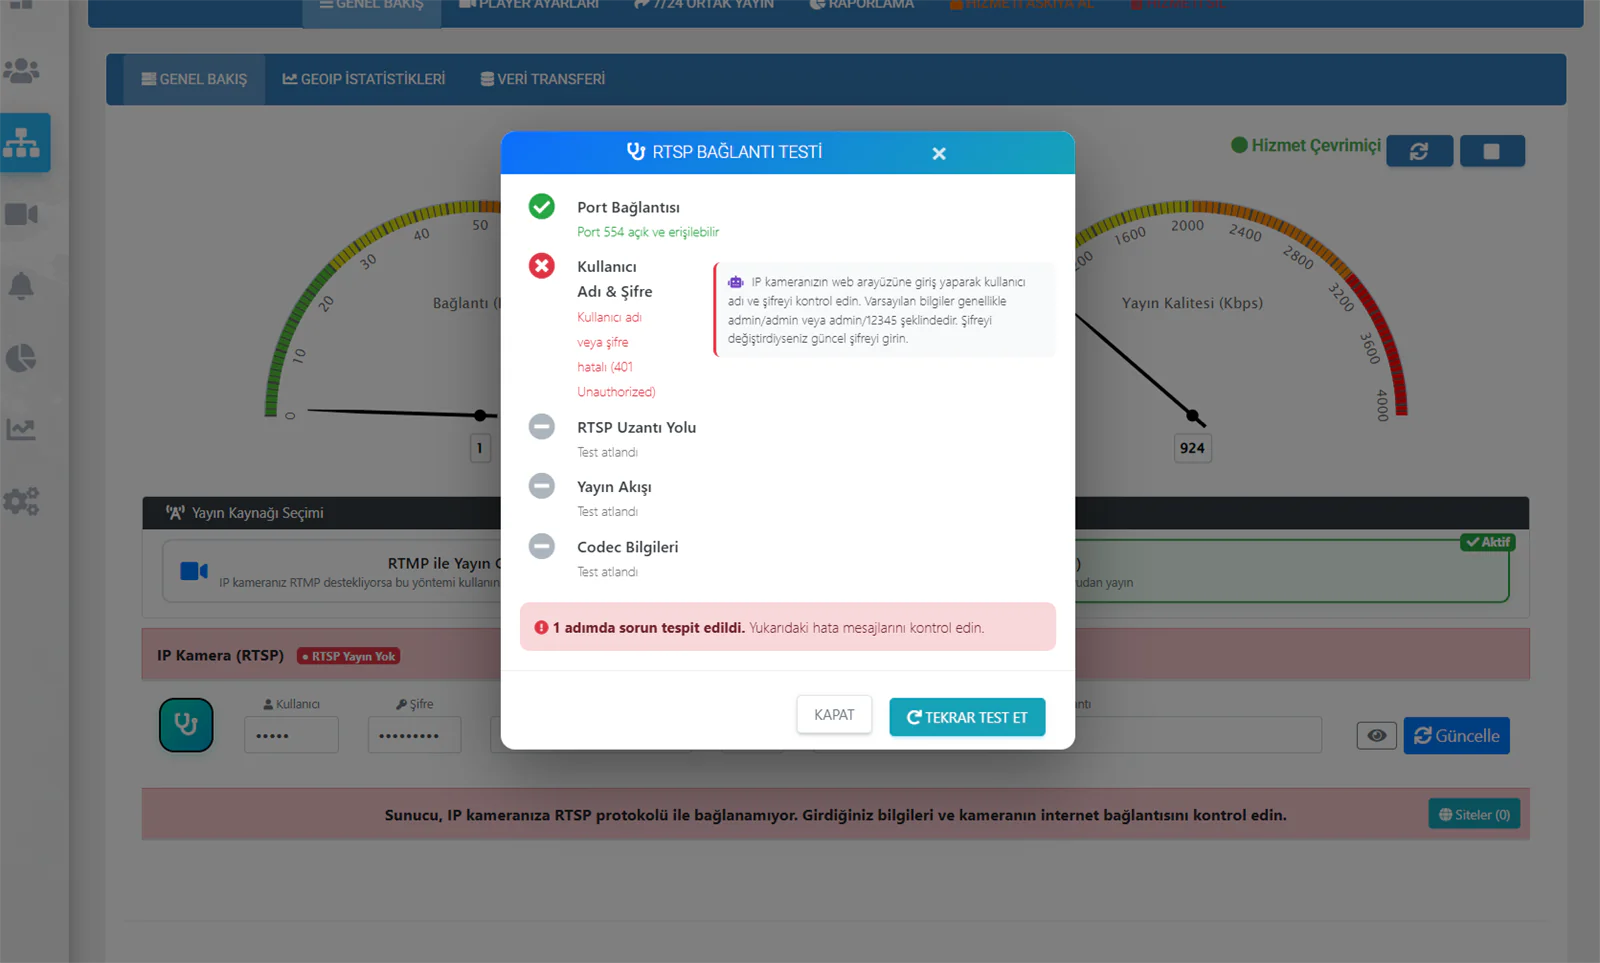
| Problem | Suggested Fix |
|---|---|
| Incorrect username or password (401 Unauthorized) | Sign in to your IP camera's web interface and check the username and password. Default credentials are usually admin/admin or admin/12345. If you have changed the password, enter the current one. |
Because the port connection succeeded it is marked with a green ✅ tick, but due to the password error the remaining stages (RTSP Path, Video Stream, Codec Details) are shown in grey as "Test skipped".
Scenario 4: Connection Successful — Codec Warning ⚠️
If the connection and the video stream work without issues but something in the codec settings could be improved, an amber warning is shown.
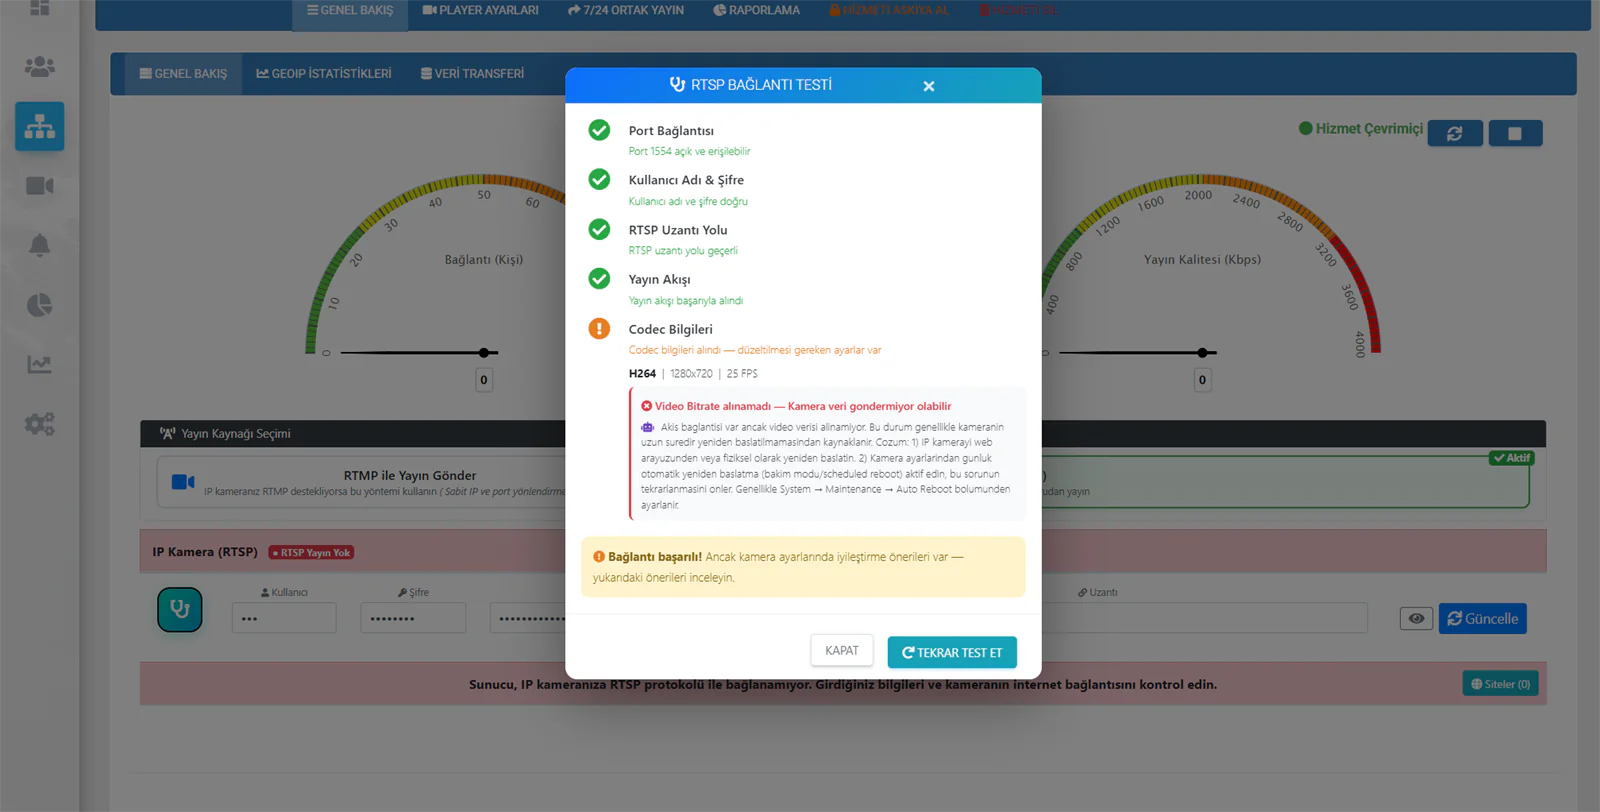
In this scenario the first 4 stages (Port, Username/Password, RTSP Path, Video Stream) pass ✅, but the 5th stage (Codec Details) raises a ⚠️ warning. The details of the problem and a suggested fix are shown automatically underneath:
| Problem | Suggested Fix |
|---|---|
| Video bitrate could not be read — the camera may not be sending data | The stream connection exists but no video data is being received. This is usually caused by the camera not having been restarted for a long time. The fix: 1) Restart the IP camera from its web interface or physically. 2) Enable a daily automatic restart (maintenance mode / scheduled reboot) in the camera settings. |
The results banner is shown in amber: "Connection successful! However, there are suggested improvements to your camera settings — review the recommendations above."
After the Test
| Button | Function |
|---|---|
| CLOSE | Closes the test dialog |
| 🔄 TEST AGAIN | Runs the test again after you have made a change |
Run the test → let it identify the problem → apply the suggested fix → press 🔄 TEST AGAIN → confirm the problem is resolved. You can repeat this loop until every stage is green. Most connection problems can be solved this way without contacting technical support.
Connecting a Camera via RTMP
The RTMP method lets your camera push its stream directly to our server. No static IP address or port forwarding is required — this makes it ideal for users on a dynamic IP or those who cannot change their router settings.
How Does RTMP Work?
📡 RTSP (the server pulls)
Our server connects to your camera's IP address and pulls the video. A static IP and port forwarding are required.
📺 RTMP (the camera pushes)
Your camera sends the video to our server itself. A static IP and port forwarding are not required — an internet connection is enough.
Enabling RTMP Mode
Choose the Stream Source
On the camera management page, click the Send Stream via RTMP option in the Stream Source section.
Copy the RTMP Details
Enter the RTMP connection details generated automatically in the panel into your camera:
RTMP Connection Details
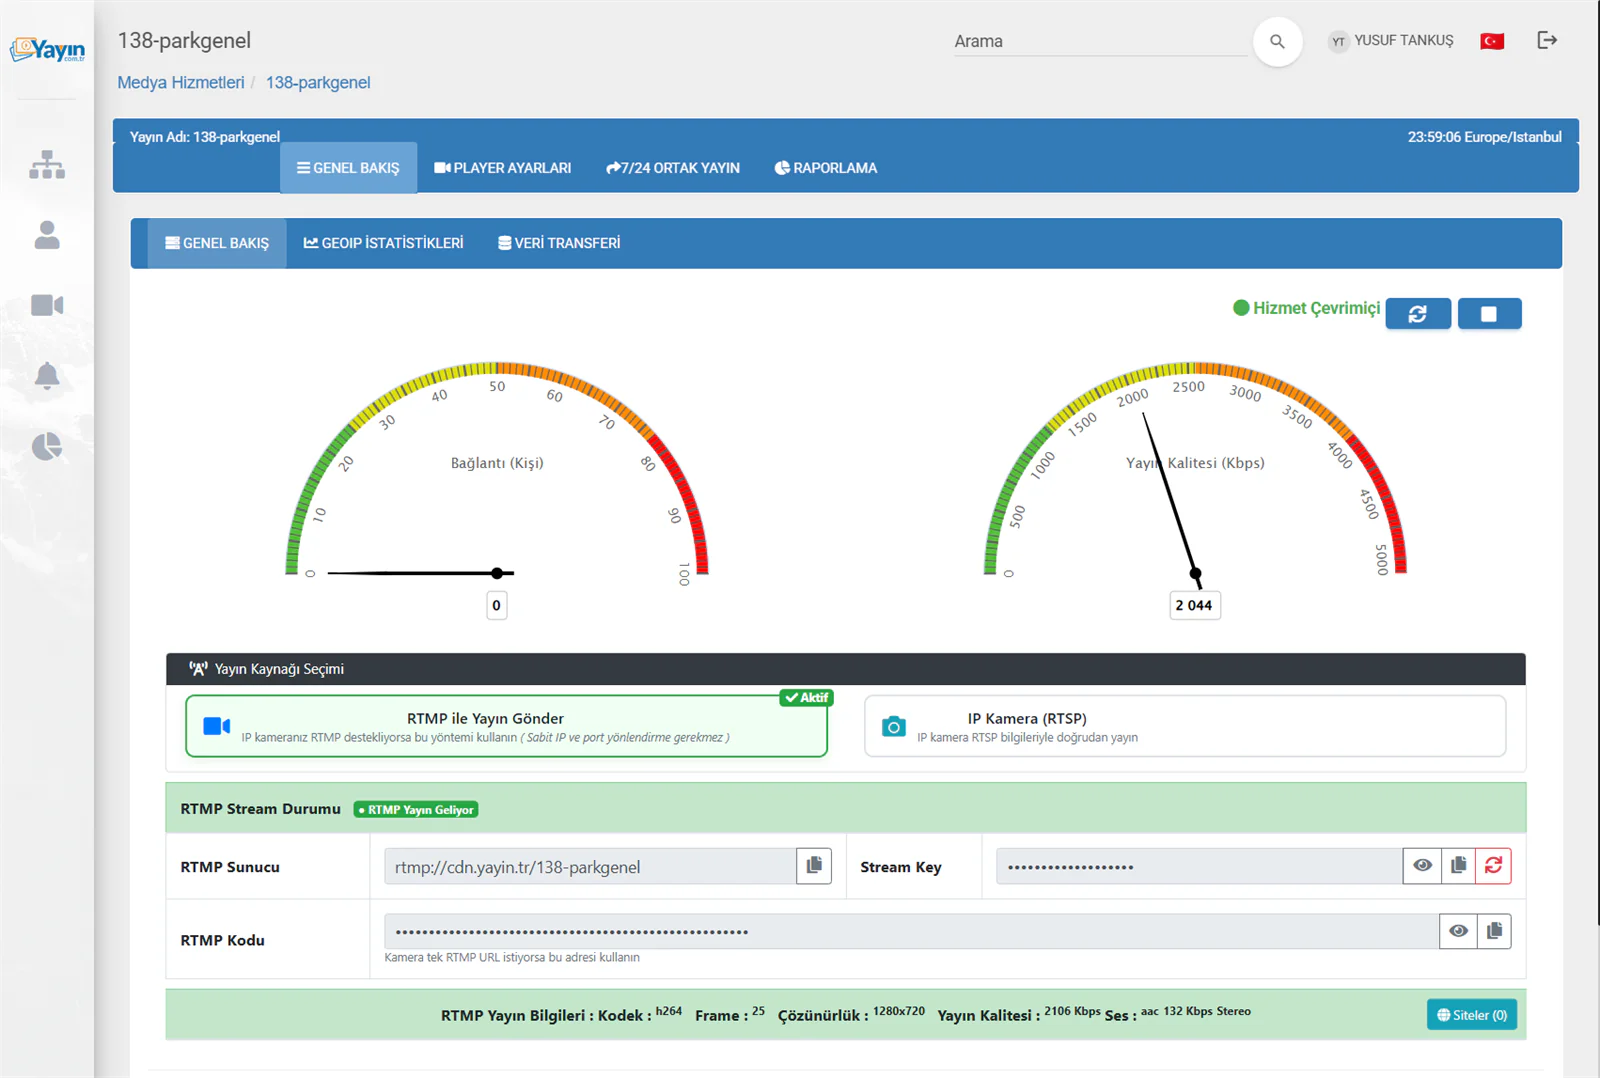
When RTMP mode is enabled, the panel displays the following:
| Field | Description | Icons |
|---|---|---|
| RTMP Server | The streaming server address | 📋 Copy |
| Stream Key | The stream key (shown hidden) | 👁 Show / 📋 Copy / 🔄 Regenerate |
| RTMP Code | The complete RTMP address on one line — use this if your camera expects a single address | 👁 Show / 📋 Copy |
You can regenerate your key whenever you like using the 🔄 Regenerate icon next to the Stream Key field. For security reasons, never share your stream key with anyone. When the key is regenerated the old one stops working, and you will need to enter the new key into your camera.
RTMP Setup on the Camera (Dahua Example)
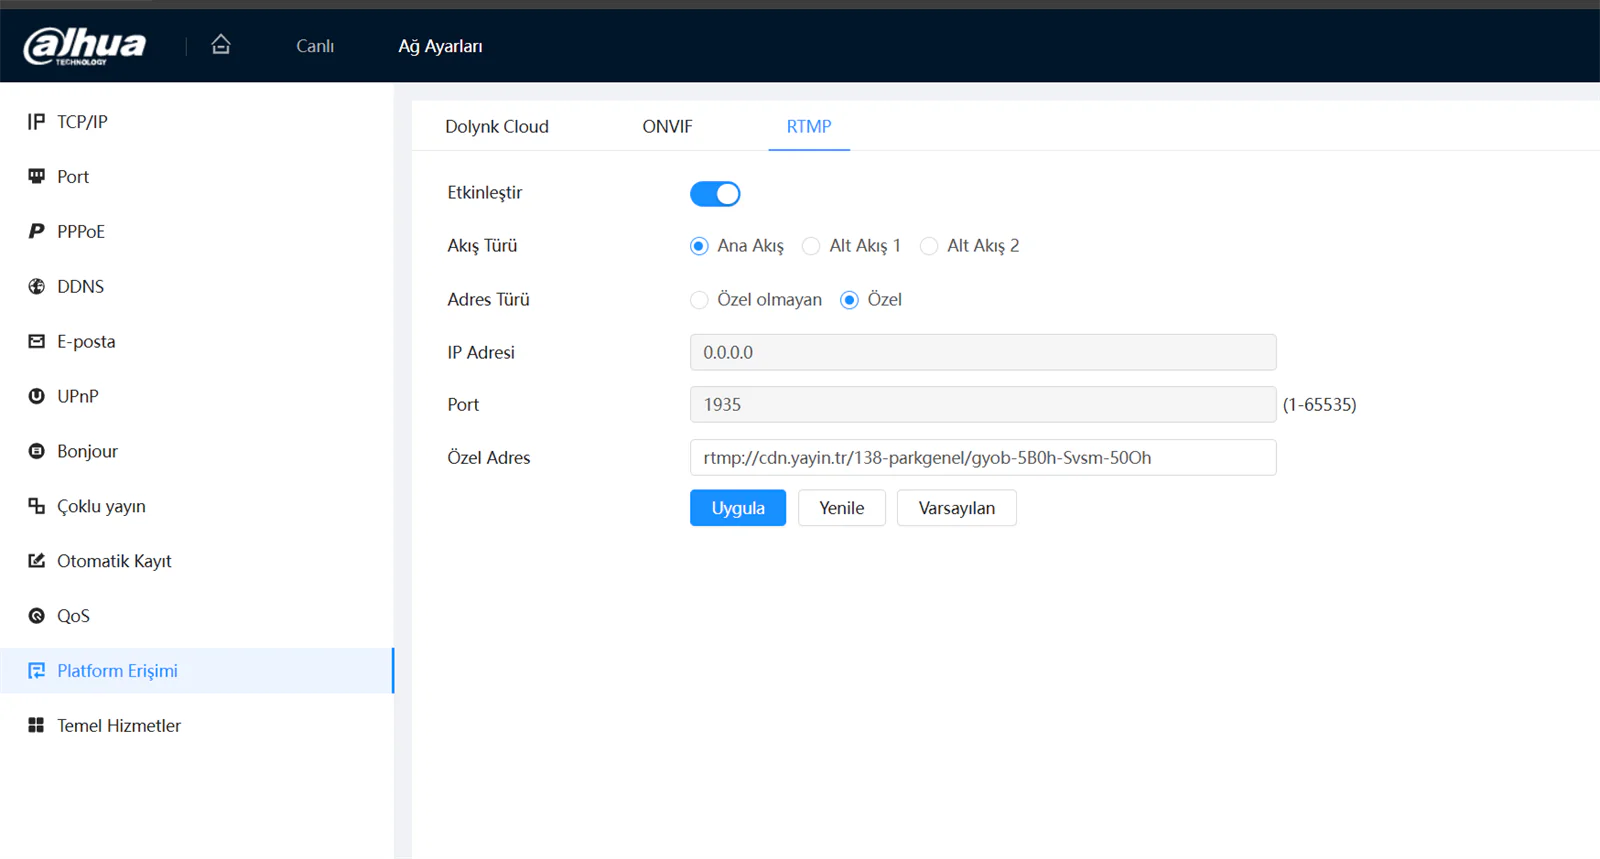
Sign in to your camera's web interface and configure its RTMP settings. A Dahua camera is used as the example below:
Sign In to the Camera Web Interface
Enter your camera's local IP address in your browser to open its web interface (for example 192.168.1.108).
Network Settings → Platform Access → RTMP
From the left-hand menu, go to Network Settings → Platform Access → RTMP.
Configure the RTMP Settings
Enter the following details and click Apply:
| Setting | Value |
|---|---|
| Enable | On (toggle enabled) |
| Stream Type | Main Stream |
| Address Type | Custom |
| IP Address | 0.0.0.0 (do not change) |
| Port | 1935 |
| Custom Address | Paste the entire RTMP Code field you copied from the panel |
Brands such as Hikvision, Uniview and Reolink have a similar RTMP setting. It is usually found under Network Settings → Platform Access or Network → Advanced → RTMP. If your camera does not support RTMP, use the RTSP method instead.
When the RTMP Connection Succeeds
Once your camera starts sending its stream, you will see the following changes in the panel:
- A green "RTMP Stream Incoming" label appears in the RTMP Stream Status field
- The status indicators start showing live values
- Your stream details are listed in the green information bar at the bottom
| Detail | Description | Recommended |
|---|---|---|
| Codec | Video codec | H.264 |
| Frame | Frame rate | 25 FPS |
| Resolution | Video resolution | 1280x720 or 1920x1080 |
| Stream Quality | Video bitrate | 1000–2500 Kbps |
| Audio | Audio codec and bitrate | AAC, 128 Kbps Stereo |
RTSP and RTMP Compared
| Feature | RTSP | RTMP |
|---|---|---|
| Static IP required | ✅ Yes | ❌ No |
| Port forwarding required | ✅ Yes | ❌ No |
| Ease of setup | Moderate | Easy |
| Camera support | All IP cameras | Cameras that support RTMP |
| Connection direction | Server → Camera | Camera → Server |
| Works with a dynamic IP | ❌ No | ✅ Yes |
| AI connection test | ✅ Available | — |
If you have a static IP address and can set up port forwarding on your router, use RTSP — it is more widely supported and more reliable. If you do not have a static IP or cannot access your router settings, use RTMP — your camera pushes the stream directly.
What to Do After Creating a Camera
Player Settings
Add your logo, customise the colours and enable features such as the caption bar and weather.
Embed Code
Get the iframe or JS embed code to place the stream on your website.
Allowed Sites
Restrict the stream by domain so it only plays on the sites you choose.
Common Problems
| Problem | Fix |
|---|---|
| Cannot establish a connection | Click the 🔄 RTSP Connection Test button to find out which stage the problem occurs at. |
| Port closed error | Forward the RTSP port (554) to the camera's local IP in your router settings. |
| Username/password error (401) | Enter the current username and password from the camera's web interface. |
| The image freezes | Lower your camera's bitrate. Under 2500 Kbps is recommended. |
| Connected but no image | Run the Connection Test — a suggested fix is shown at the Codec stage. Restart the camera. |
| No audio | Set your camera's audio codec to AAC. |