
The DVR Recording & Archive System
Record your camera's past streams, replay any moment instantly, download it as an MP4 and build timelapse videos. With a high-performance NVMe infrastructure, your recordings are there the moment you want them — no waiting.
DVR (look-back recording) is not part of the standard live-streaming service. It is activated as a separate add-on for an additional fee. When DVR is not activated, these tabs are visible in the panel but disabled. To order the DVR service, write to destek@yayin.com.tr.
Why Yayin.com.tr DVR?
Many recording systems on the market make you wait minutes — even hours — to reach past recordings. On indoor pitches, in sports facilities and at event broadcasts in particular, waiting 1–2 hours or even a full day to watch a match is a common frustration.
The Yayin.com.tr DVR infrastructure eliminates this problem entirely:
Instant Access
Reach recordings with zero waiting time. Playback starts the very second a viewer picks a moment — no conversion or processing to wait for.
NVMe Datacenter Disks
All recordings are kept on enterprise-class NVMe SSD disks in a RAID 10 configuration — delivering both high read speeds and data safety.
Instant MP4 Download
Select any time range and download it as an MP4 instantly. The file is generated on the server in real time — there is no waiting.
Timelapse
Watch recordings spanning hours or days in fast motion. Ideal for construction monitoring, weather changes and traffic analysis.
The moment a match ends, viewers can watch the recording and download it as an MP4 right away. The hours of waiting common on other platforms simply do not exist here. Thanks to the NVMe RAID 10 disk infrastructure, hundreds of simultaneous archive requests are handled without a hitch.
Accessing the DVR Player
Three sub-tabs sit under the Player Settings tab:
| Tab | Description |
|---|---|
| Live Player | Live-stream player settings (covered in the previous section) |
| DVR Player | Playback player settings for past recordings |
| Disk Archive | Recording management, deletion and downloads |
DVR Player Settings
The DVR Player tab consists of 6 sub-tabs. The Recording Status toggle at the top shows whether recording is active.
Recording can only be switched on or off by an administrator. To change the recording status, contact the support team.
1. Recording Settings
Configure the retention period and the recording schedule in this section.
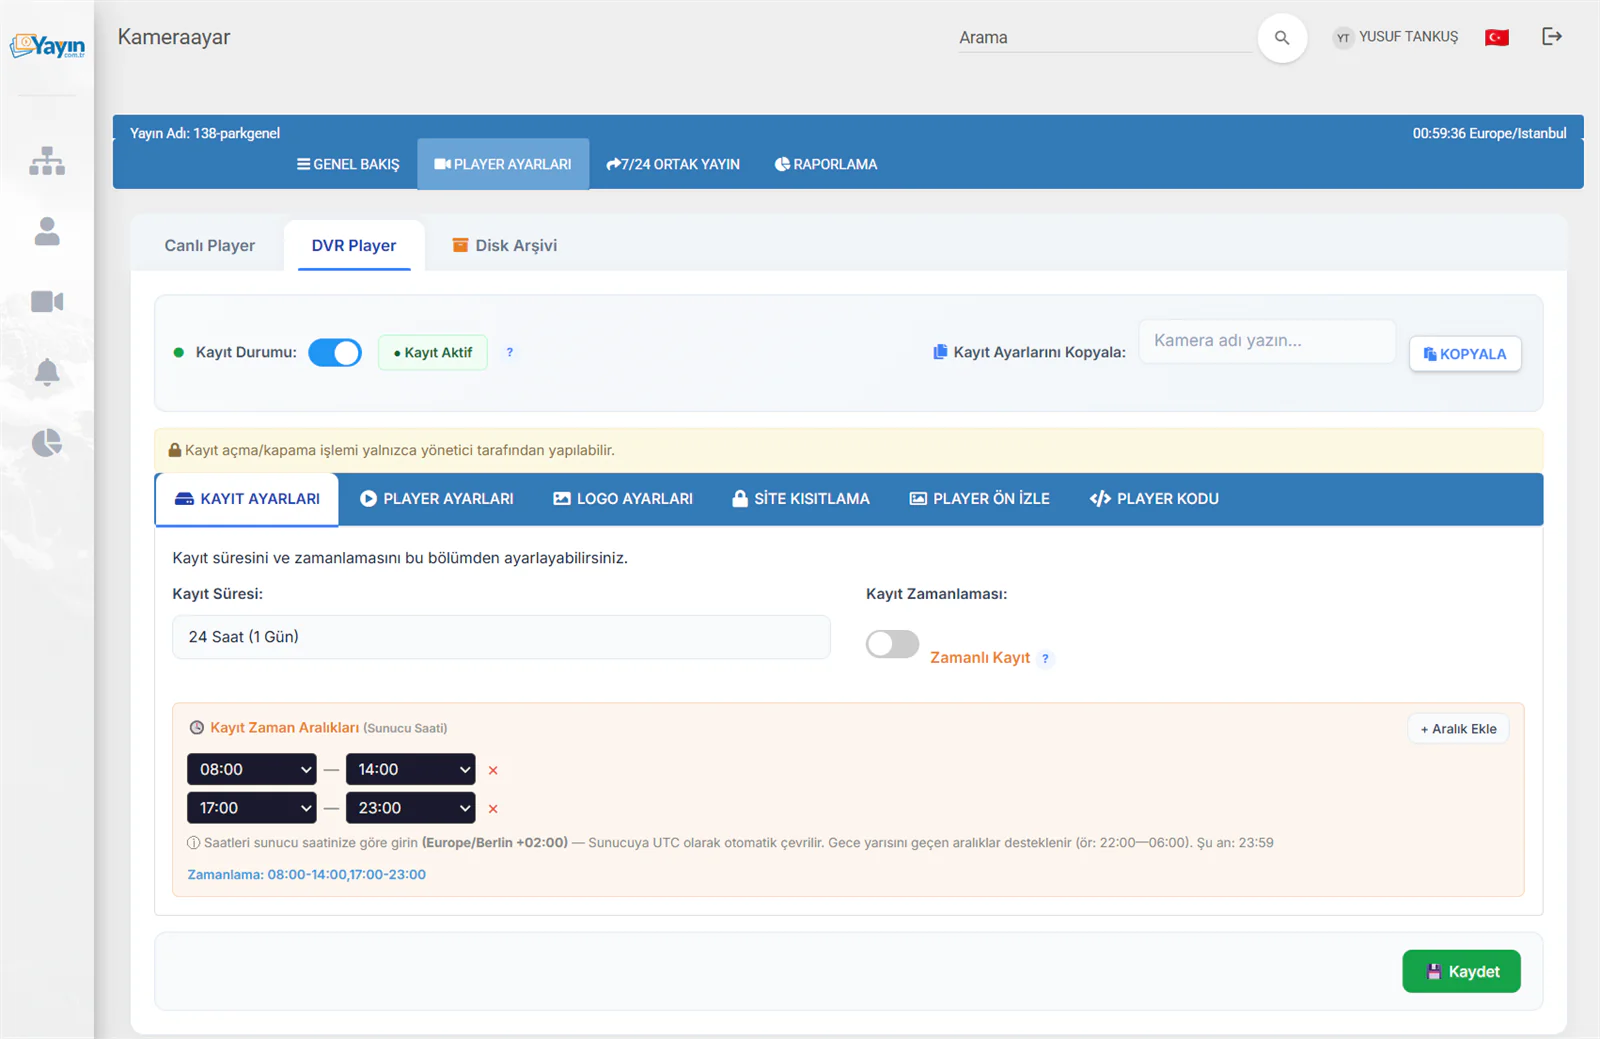
| Setting | Description |
|---|---|
| Retention Period | How far back recordings are kept (e.g. 24 hours / 1 day, 72 hours / 3 days, etc.) |
| Recording Schedule | Whether recording runs continuously or only during set hours |
Scheduled Recording
With the recording schedule enabled, you can record only during specific time ranges. This saves disk space — for example, you can record only during office hours or match hours.
| Field | Description |
|---|---|
| Recording Time Ranges | Pick the start and end times (server time) |
| + Add Range | You can define more than one time range |
Example configuration: 08:00-14:00 and 17:00-23:00 — daytime and evening recording, with nothing recorded overnight.
Ranges that cross midnight are supported too. For example, you can record through the night with a range such as 22:00 — 06:00.
2. Player Settings
Configure the DVR Player's appearance and behaviour in this section.
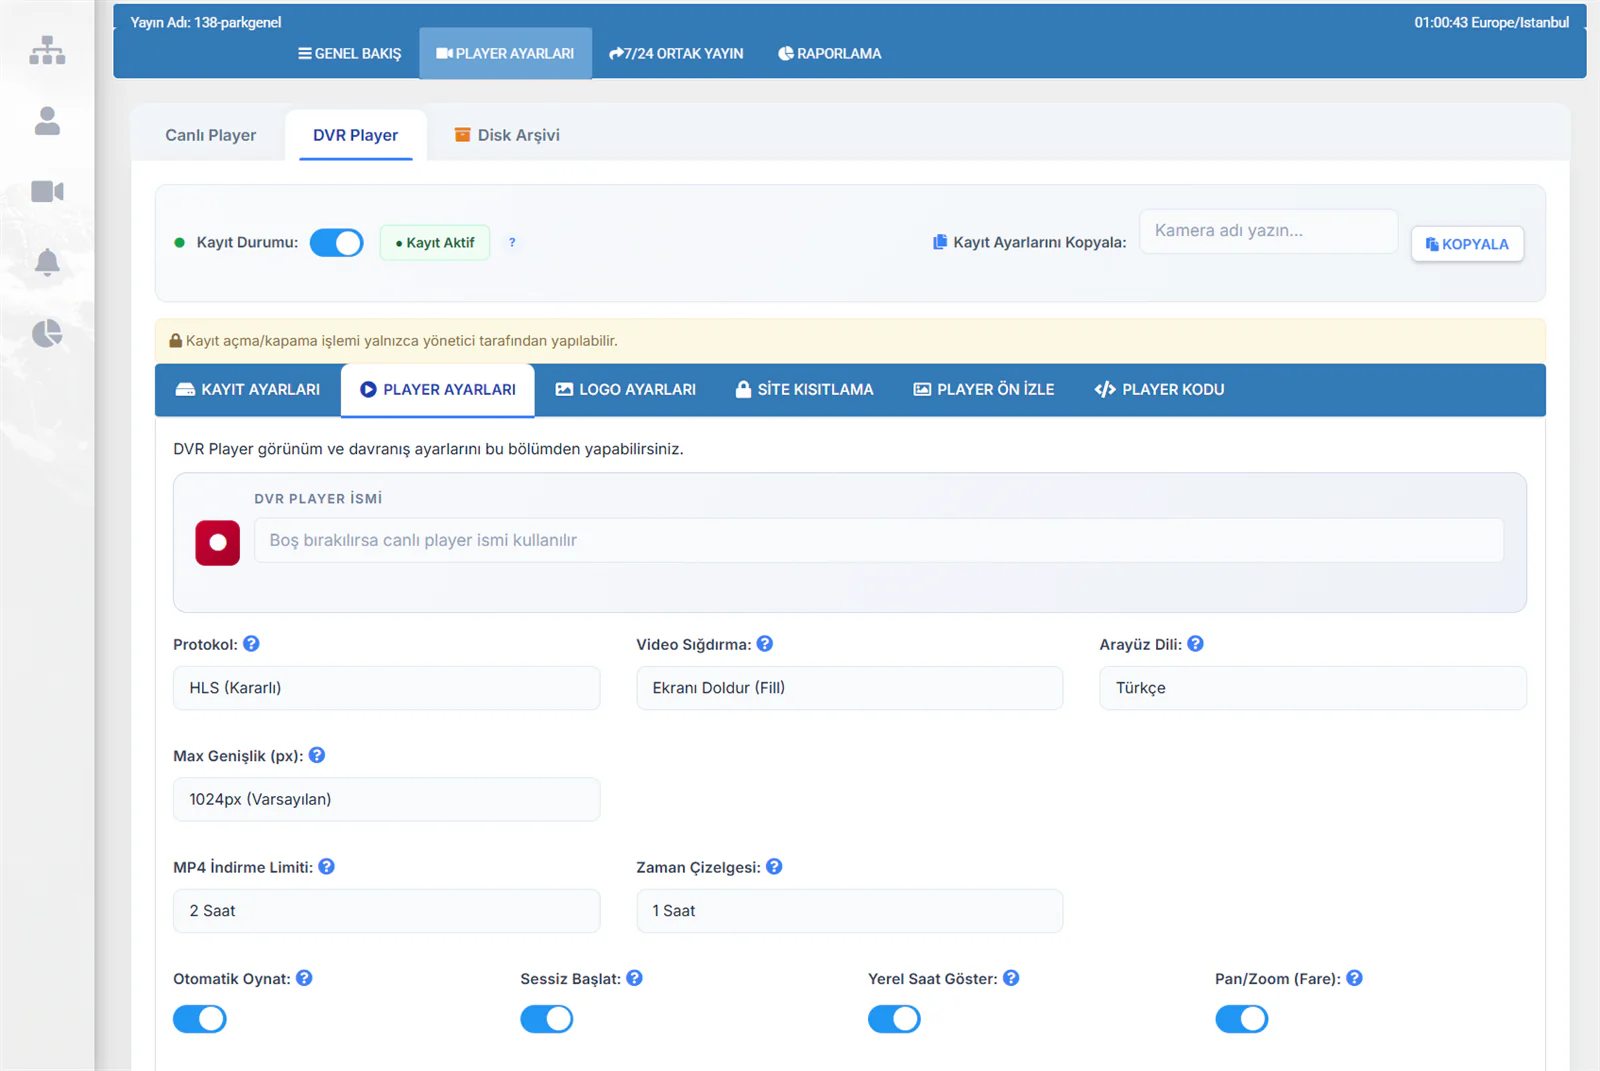
| Setting | Description | Recommended |
|---|---|---|
| DVR Player Name | The name shown in the playback player. If left empty, the live player's name is used. | — |
| Protocol | Video playback protocol | HLS (Stable) |
| Video Fit | How the video is fitted into the player | Fill the Screen (Fill) |
| Interface Language | DVR Player interface language | Turkish |
| Max Width (px) | Maximum player width | 1024px |
MP4 Download and Timeline
| Setting | Description | Recommended |
|---|---|---|
| MP4 Download Limit | The maximum recording length that can be downloaded in one go | 2 hours |
| Timeline | The display range of the time bar beneath the player | 1 hour |
Playback Behaviour
| Setting | Description |
|---|---|
| Autoplay | Start playing automatically when a recording is selected |
| Start Muted | Whether the recording starts with the sound off |
| Show Local Time | Whether the timeline shows the viewer's local time |
| Pan/Zoom (Mouse) | Whether viewers can zoom and pan over the recording with the mouse |
Viewers can zoom into the recording with the mouse wheel and drag to focus on different areas. It is especially handy for inspecting detail in recordings from wide-angle cameras.
3. Logo Settings
Configure the logo shown on the DVR Player in this section.
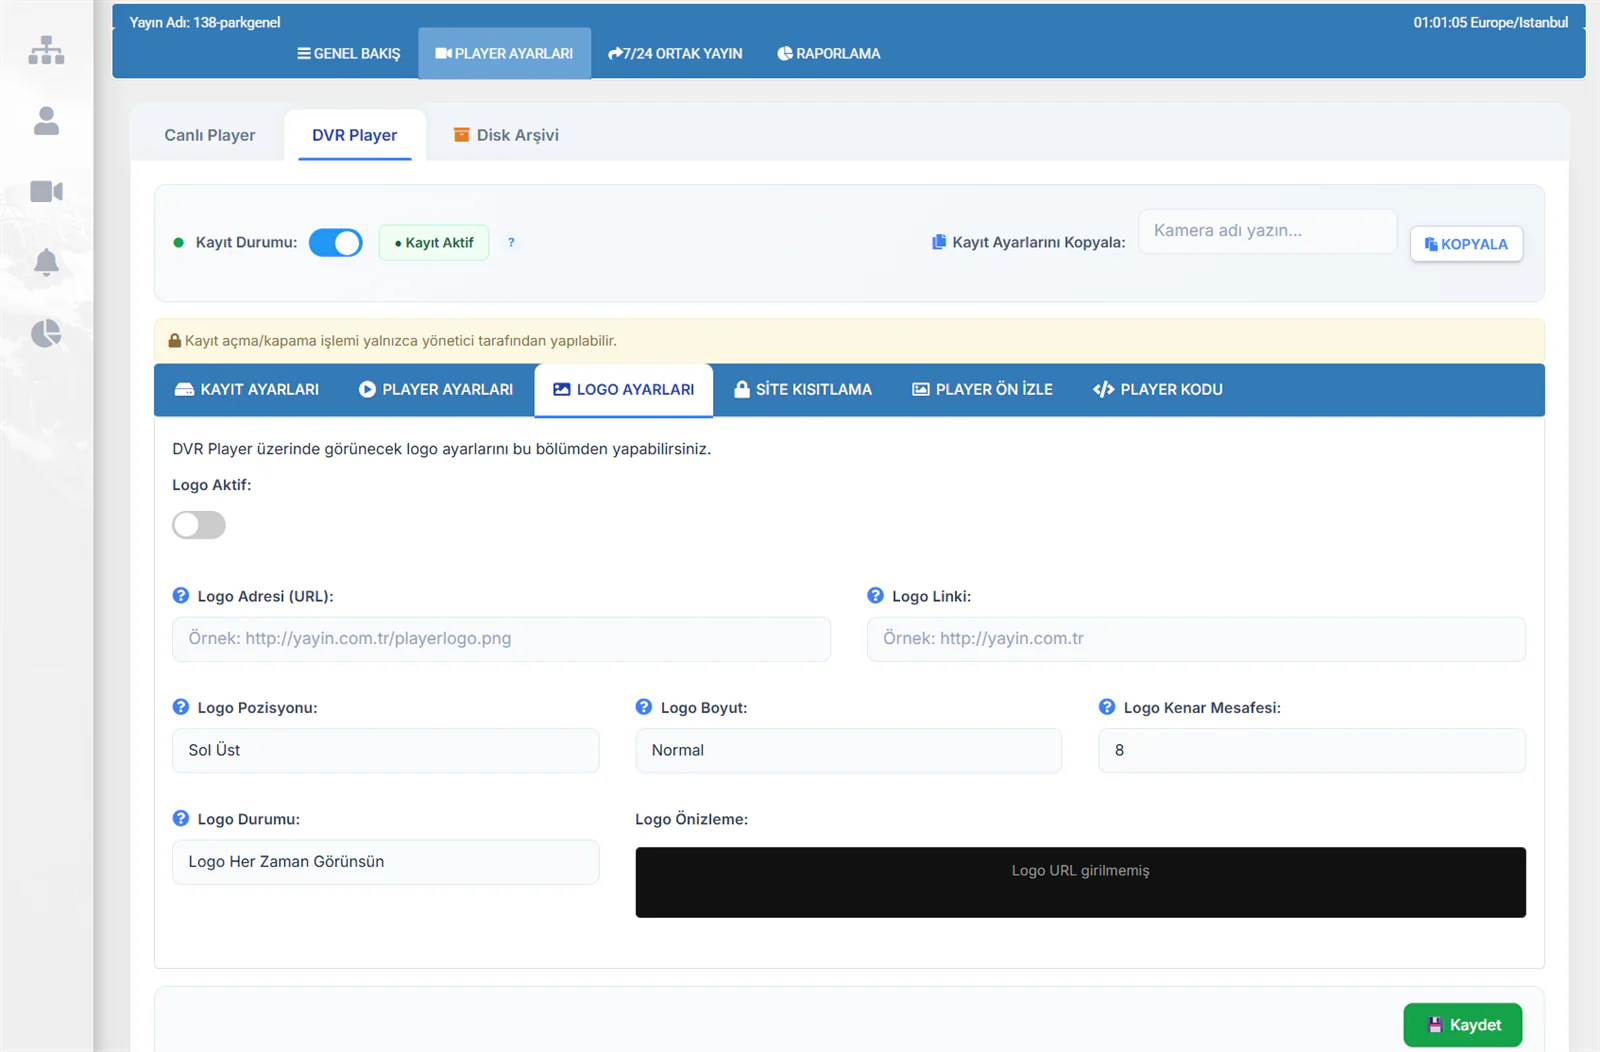
| Setting | Description |
|---|---|
| Logo Enabled | Turns the logo display on or off |
| Logo Address (URL) | The web address of the logo image (PNG with a transparent background recommended) |
| Logo Link | The web address opened when the logo is clicked |
| Logo Position | Top Left, Top Right, Bottom Left, Bottom Right |
| Logo Size | Normal or Small |
| Logo Edge Margin | The gap between the logo and the edge (pixels) |
| Logo Visibility | Always visible, or only in certain states |
| Logo Preview | A preview of how the logo will look |
4. Site Restriction
Define which websites the DVR Player is allowed to run on in this section.
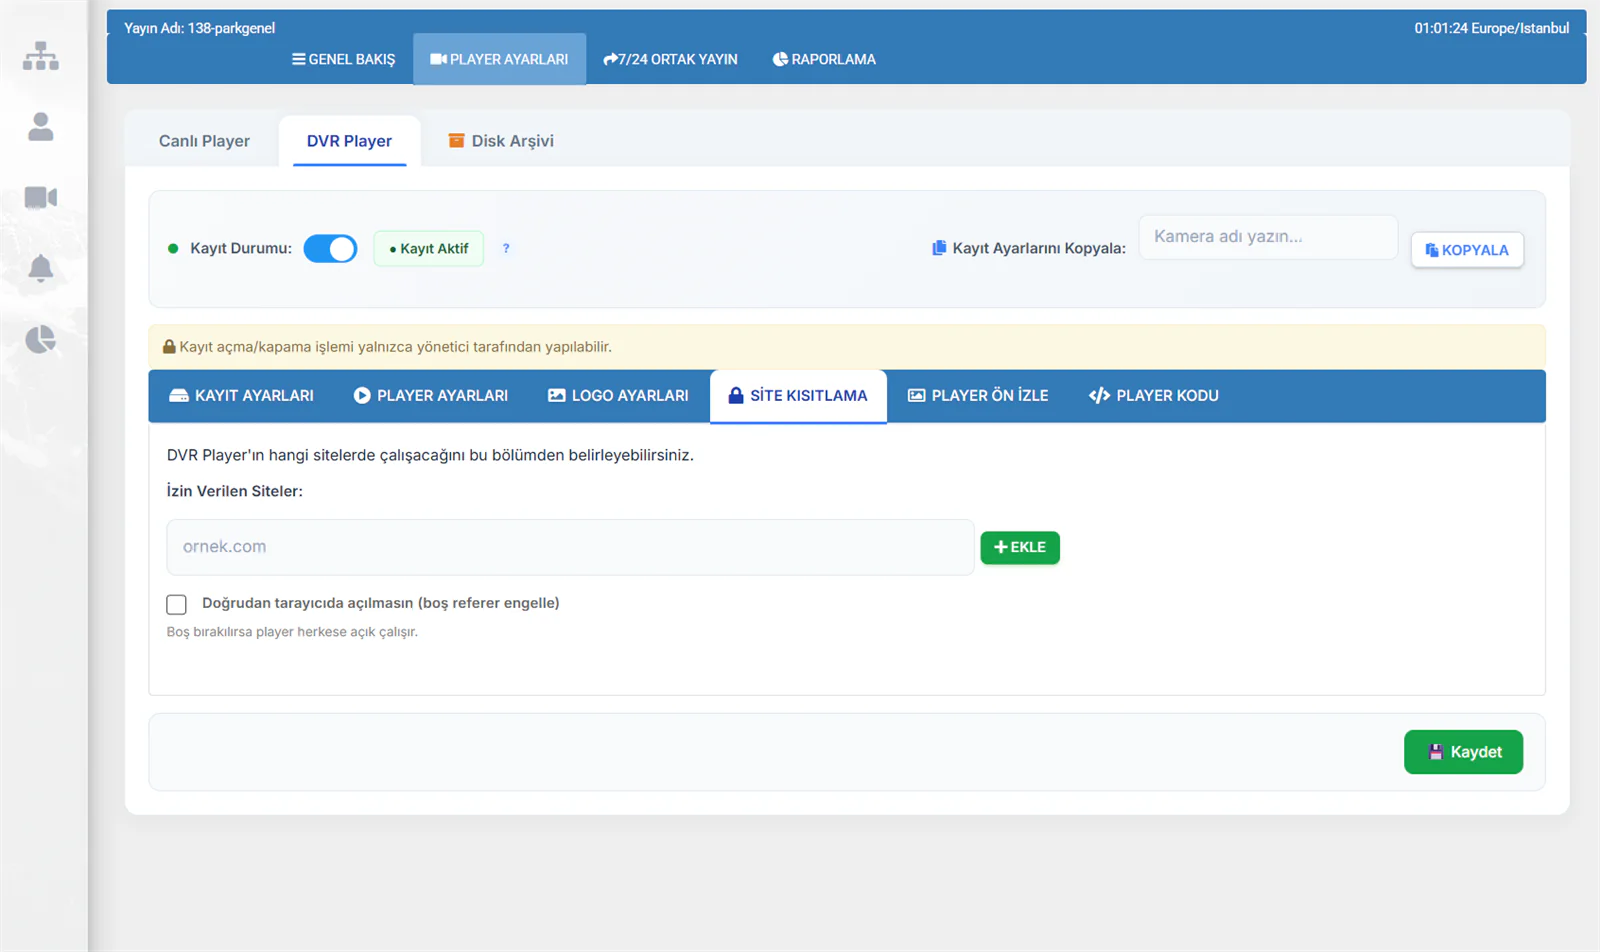
| Setting | Description |
|---|---|
| Allowed Sites | Add the domains the DVR Player may run on |
| Block direct browser access | When checked, the link cannot be opened by pasting it directly into a browser |
If you do not want your recordings shared without permission, make sure site restriction is enabled. Left empty, the DVR Player is publicly accessible.
5. Player Preview
Preview how the DVR Player looks to viewers in this tab. The timeline, controls and all your settings are rendered live.
6. Player Code
Grab the embed codes for adding the DVR Player to your website in this section.
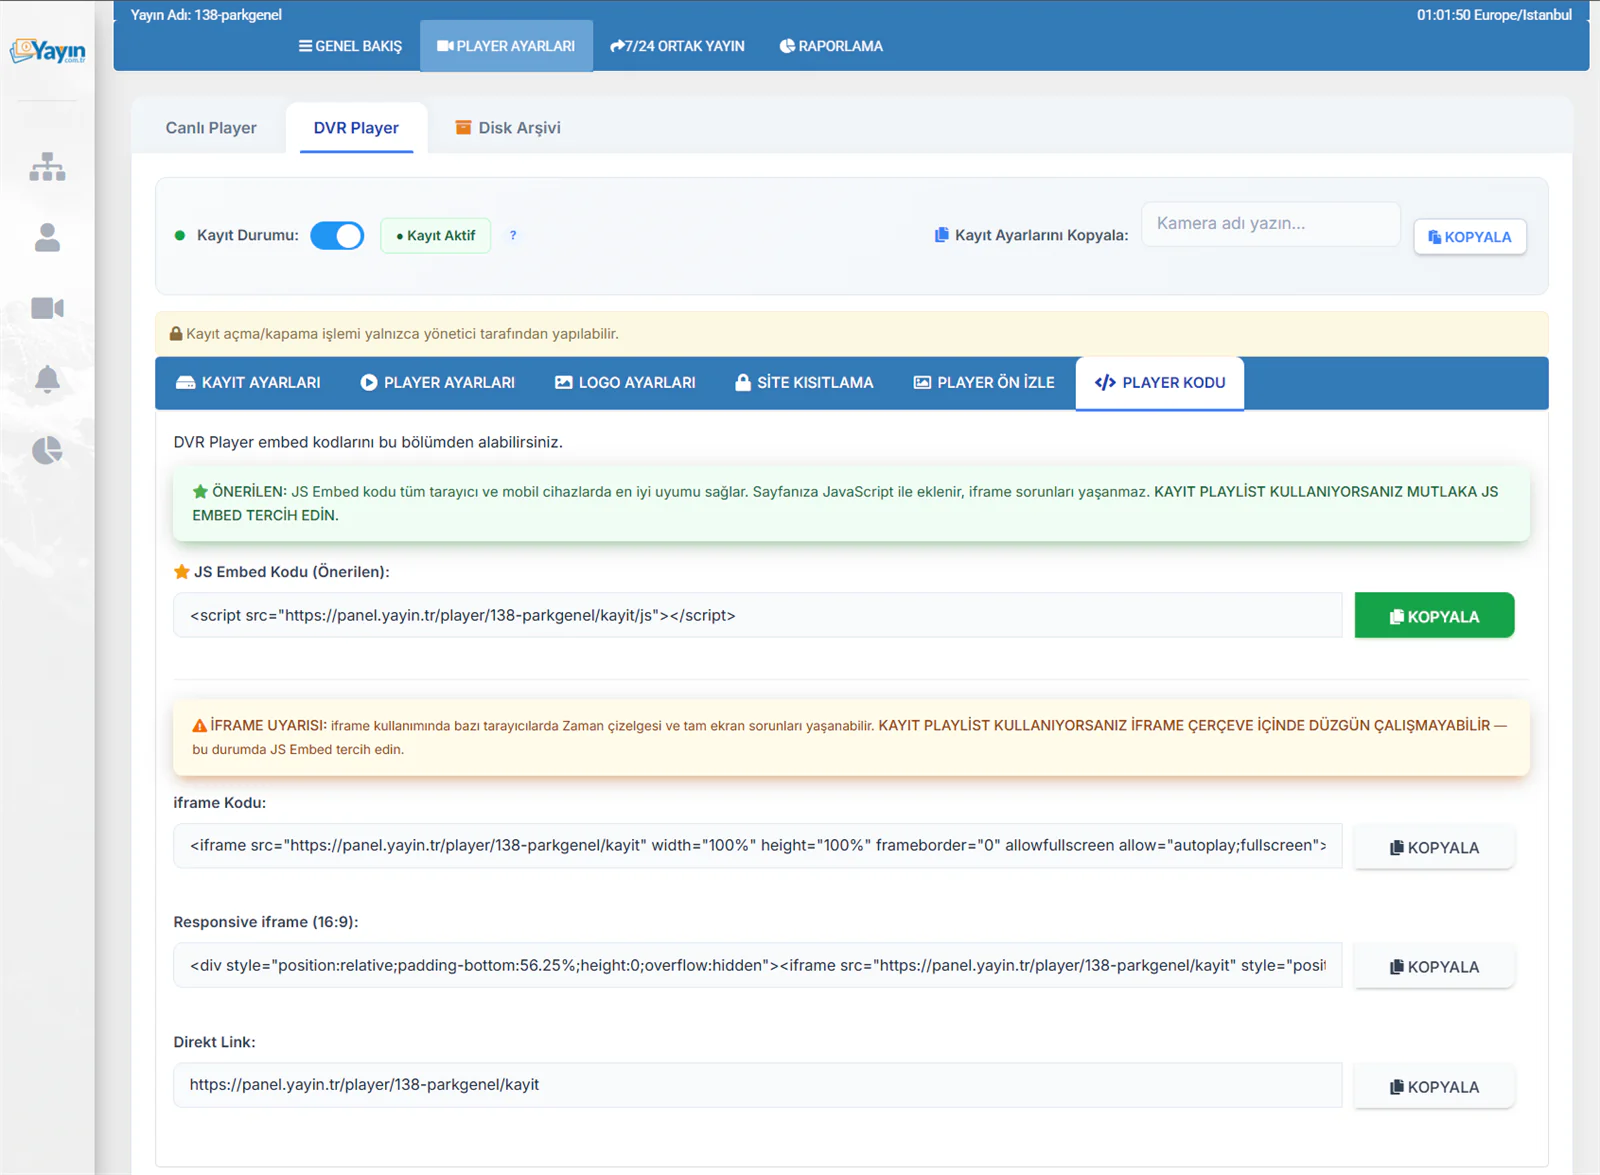
| Code Type | Description |
|---|---|
| JS Embed Code (Recommended) | Integrates into the page via JavaScript — the best fit |
| iframe Code | Standard iframe embed |
| Responsive iframe (16:9) | An iframe that adapts to the screen |
| Direct Link | The DVR Player's direct access address |
The DVR Player's embed code differs from the live player's. Its URL carries a /kayit suffix. You can add the live player and the DVR player to your site separately.
DVR Player Features (Viewer Side)
Your viewers can use the following features in the DVR Player:
Date Picker
Pick any day from the calendar and browse that day's recordings. Recorded hours are highlighted in colour on the timeline.
Rewind / Fast-Forward
Jump to any moment on the timeline. Zoom in with the mouse wheel and position yourself with second-level precision.
MP4 Download
Download any selected time range as an MP4 instantly. No server-side conversion to wait for — thanks to NVMe disks, the download starts immediately.
Timelapse
Watch recordings sped up at 2x, 4x, 8x or 16x. Skim through hours of footage in minutes.
Pan/Zoom
Zoom and pan across the picture with the mouse. Ideal for inspecting detail on wide-angle cameras.
Jump to Live
Return to the live stream with one click while watching a recording. Switch seamlessly between live and playback.
Timelapse Use Cases
The timelapse feature is useful across many industries:
| Use Case | Description |
|---|---|
| Construction Monitoring | Compress days or weeks of construction into minutes and track the progress |
| Weather Changes | Observe how weather conditions shift over the course of a day, at speed |
| Traffic Analysis | Analyse the traffic density of a junction or road hour by hour |
| Event Recap | Watch an event's setup, the event itself and the teardown in fast motion |
| Nature Watching | Capture sunrises, sunsets or seasonal changes in fast motion |
Disk Archive
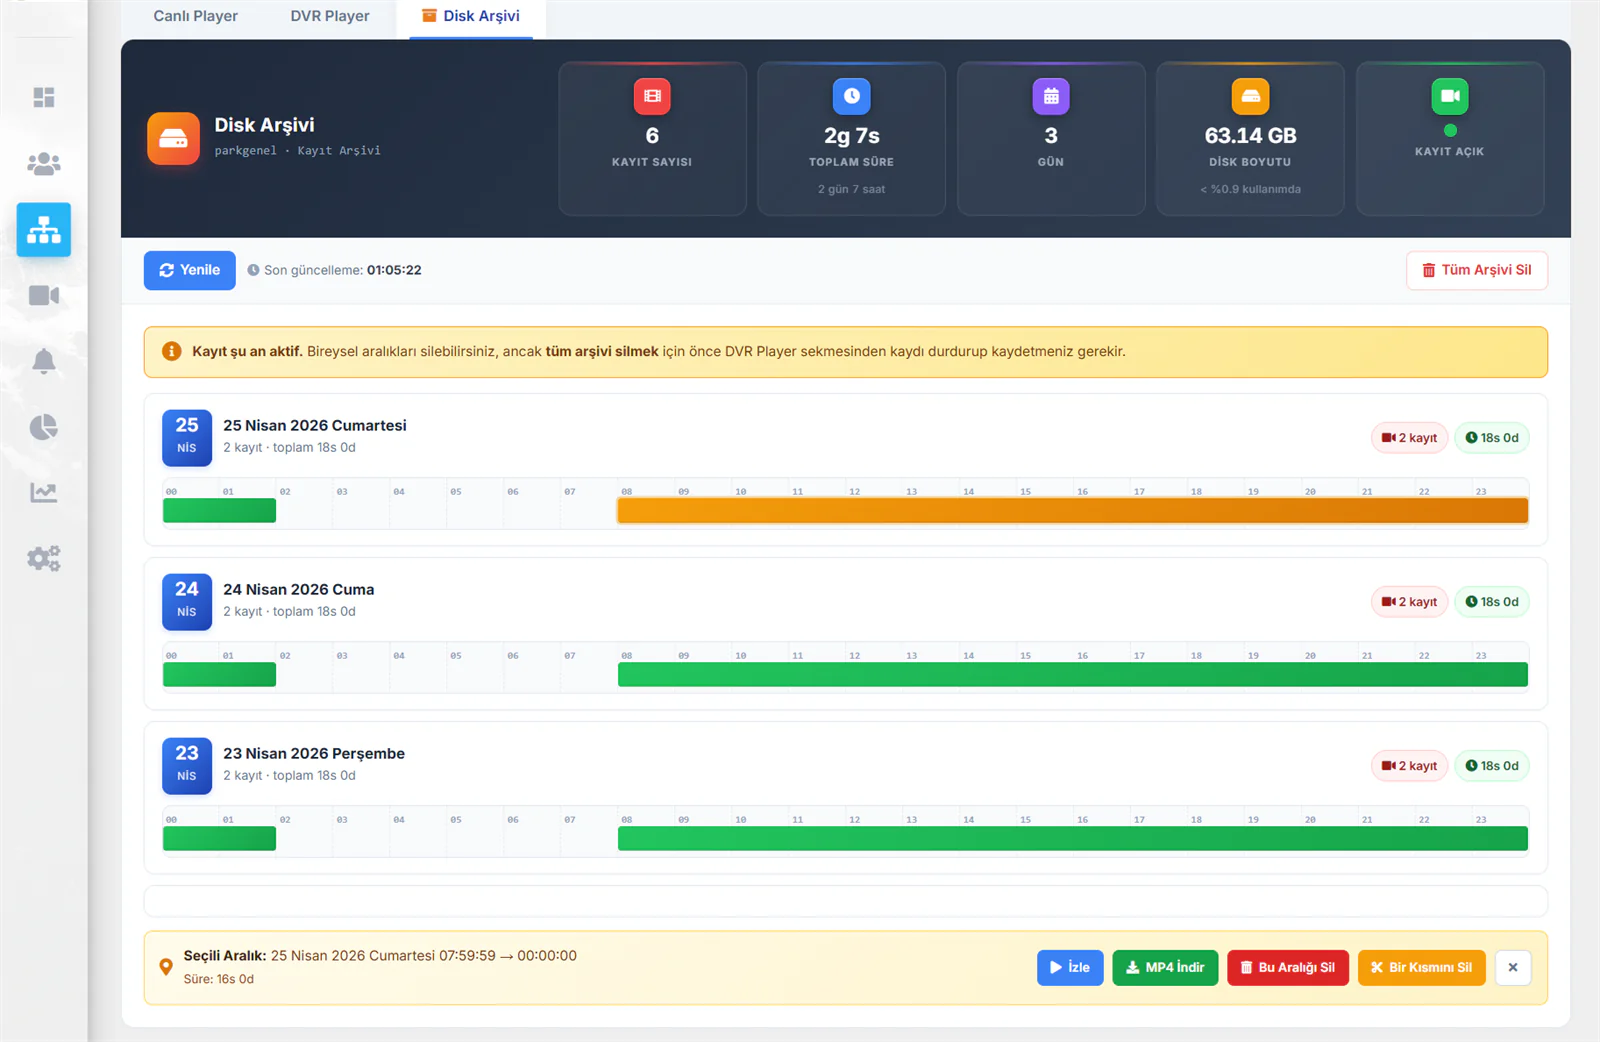
Manage, download and delete your recordings from the Disk Archive tab.
Archive Statistics
A summary of your recordings is displayed at the top of the page:
| Card | Description |
|---|---|
| Recording Count | The total number of recording segments |
| Total Duration | The combined length of all recordings (days, hours) |
| Days | How many days of recordings are stored |
| Disk Size | The total disk usage of the recordings (GB) |
Daily Timeline
A 24-hour timeline is shown for each day. Recorded hours are marked with coloured bars — you can see at a glance which hours contain recordings.
Next to each day you will find:
- The number of recording segments
- That day's total recording time
Recording Operations
When you select a range on the timeline, action buttons appear below:
| Button | Colour | Description |
|---|---|---|
| Watch | 🟢 Green | Plays the selected time range in the recording player |
| Download MP4 | 🔵 Blue | Downloads the selected range as an MP4 file |
| Delete This Range | 🔴 Red | Permanently deletes the recording of the selected time range |
| Delete a Part | 🟠 Orange | Performs a partial deletion by setting a specific start and end time |
Watch — the Recording Player
Clicking Watch opens the recording player in a modal window, where you can examine your recordings in detail.
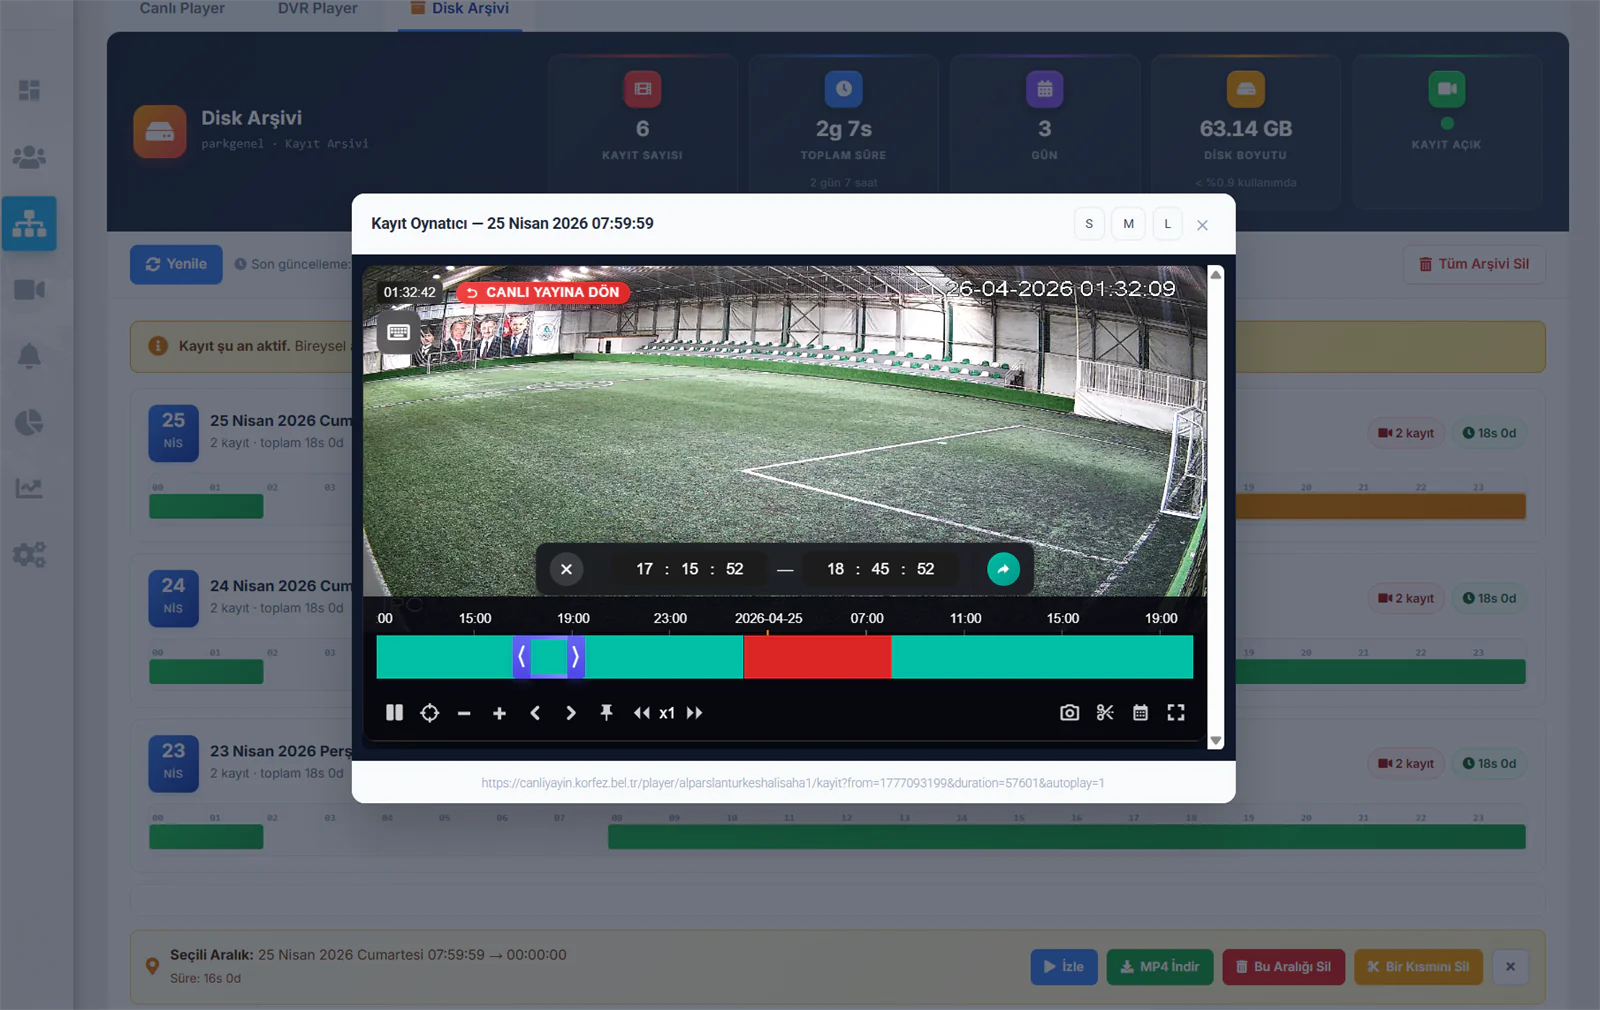
Player Size: Use the S (Small), M (Medium) and L (Large) buttons at the top right to resize the player window.
Top Bar:
- Left: the recording time
- Centre: the BACK TO LIVE button — switch to the live stream with one click
- Right: the current date and time
Time-Range Selection: Use the time picker at the bottom of the player to enter a specific start and end time. You can play the selected range or download it as an MP4.
Timeline: Coloured bars mark the recorded time ranges. Click anywhere on the timeline to jump to that moment.
Control Buttons:
| Button | Function |
|---|---|
| ⏸ | Pause / Play |
| 🎯 | Jump to the live stream |
| ➖ / ➕ | Narrow / widen the timeline |
| ◀ / ▶ | Frame-by-frame back / forward |
| 📌 | Drop a time marker |
| ◀◀ x1 ▶▶ | Playback speed (x1, x2, x4, x8, x16 — timelapse) |
| 📷 | Take an instant screenshot |
| ✂️ | Create a timelapse |
| 📅 | Pick a date from the calendar |
| 🔲 | Full screen |
Raise the playback speed to x2, x4, x8 or x16 and skim through hours of recordings in minutes. Ideal for construction monitoring, traffic analysis and tracking weather changes.
Download MP4
Clicking Download MP4 opens the download window. You can download the whole selected range or just a specific part of it as an MP4.
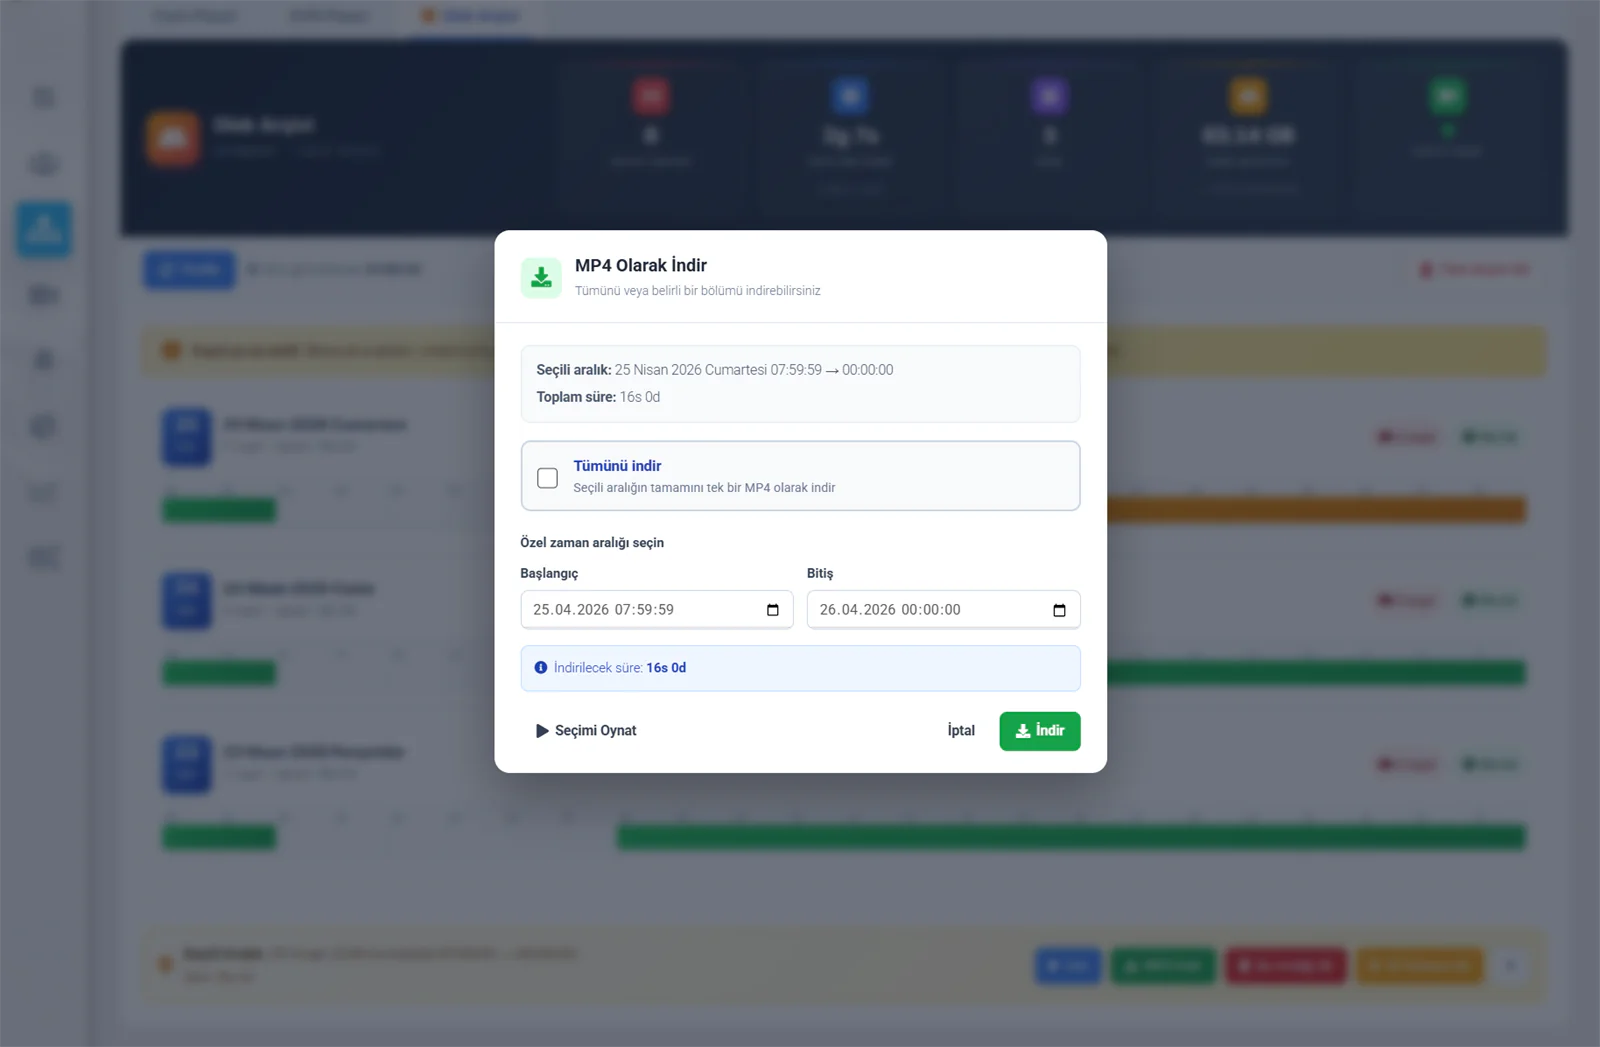
| Field | Description |
|---|---|
| Selected Range | Shows the downloadable recording range and its total duration |
| Download All | Downloads the entire selected range as a single MP4 file |
| Custom Time Range | Set a start and end date/time to download only the part you want |
| Download Duration | The length of recording to be downloaded is calculated automatically from your selection |
| Play Selection | Plays your selected range as a preview before downloading |
The MP4 file is generated on the server in real time, and the download starts almost immediately. Thanks to the NVMe RAID 10 disk infrastructure, even a two-hour match recording downloads without any waiting. The hours-long conversion queues found on other platforms do not exist here.
Delete This Range
Clicking Delete This Range opens a confirmation window.
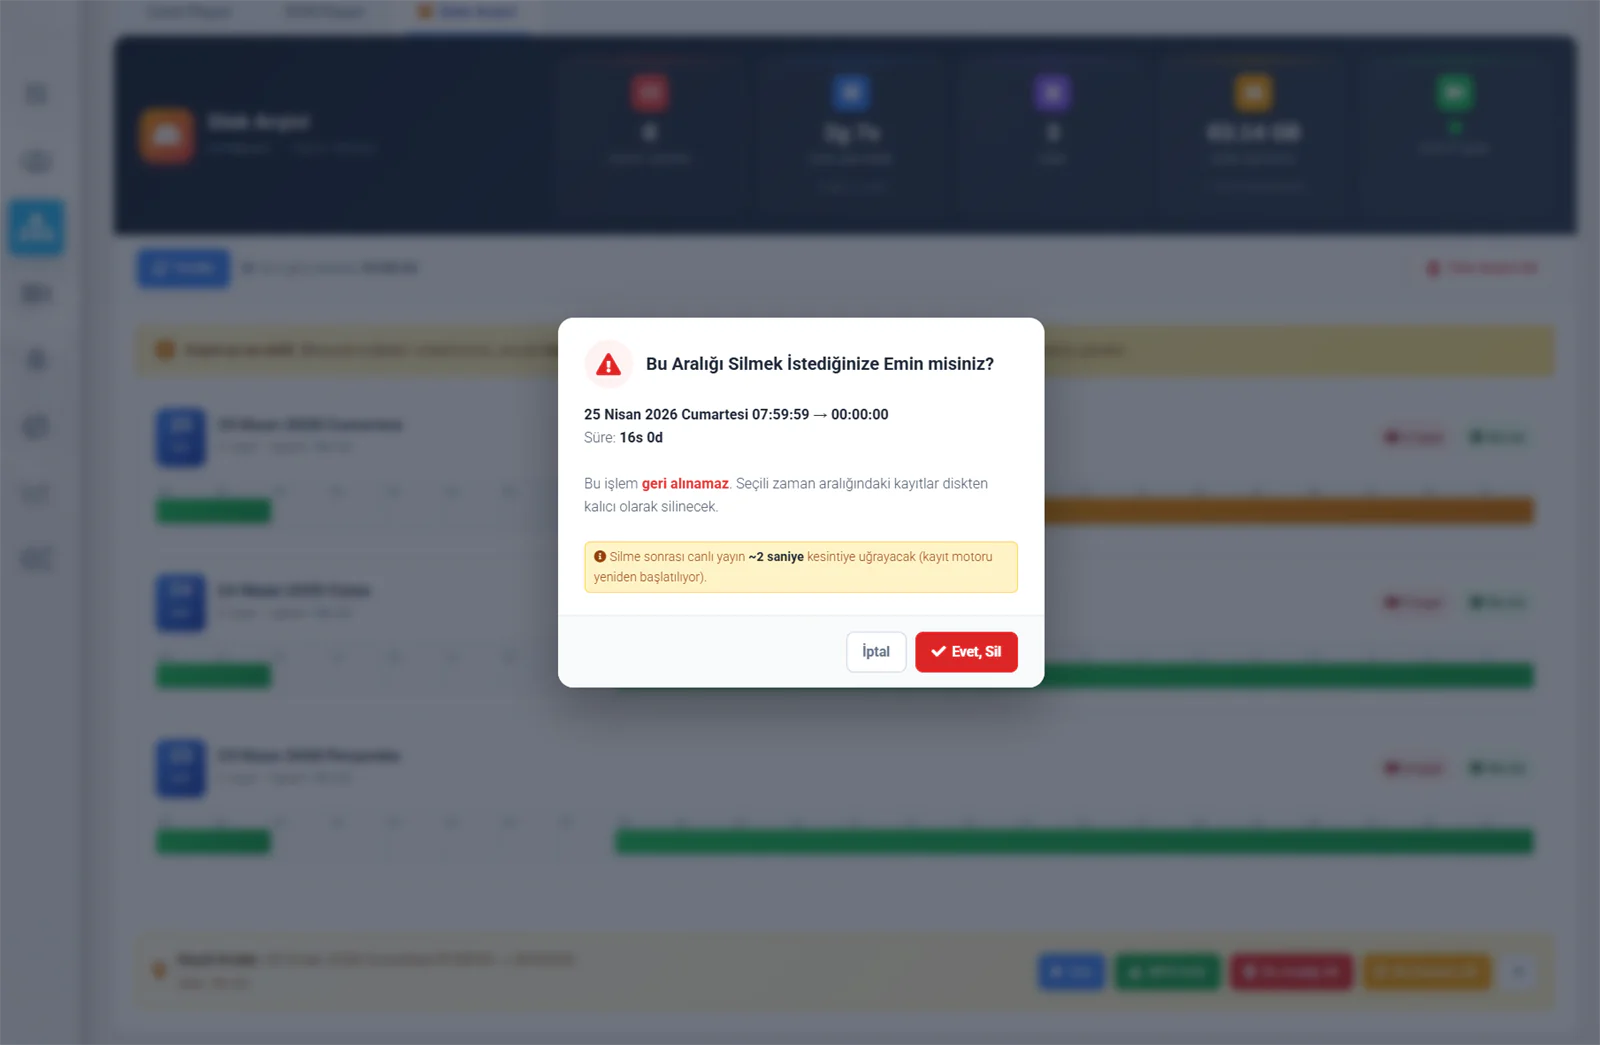
The confirmation window shows the following:
- The recording range to be deleted and its duration
- A "This action cannot be undone" warning — deleted recordings cannot be recovered
- A "~2-second interruption" notice — the recording engine restarts during deletion, causing roughly a 2-second drop in the live stream
Click Yes, Delete to confirm the deletion, or Cancel to back out.
Deleted recordings are permanently removed from disk and can never be recovered. Also note that the live stream will drop for about 2 seconds after a deletion.
Delete a Part
Clicking Delete a Part opens the partial-deletion window. With this feature you delete only a specific section of a recording range — the rest of the recording is preserved.
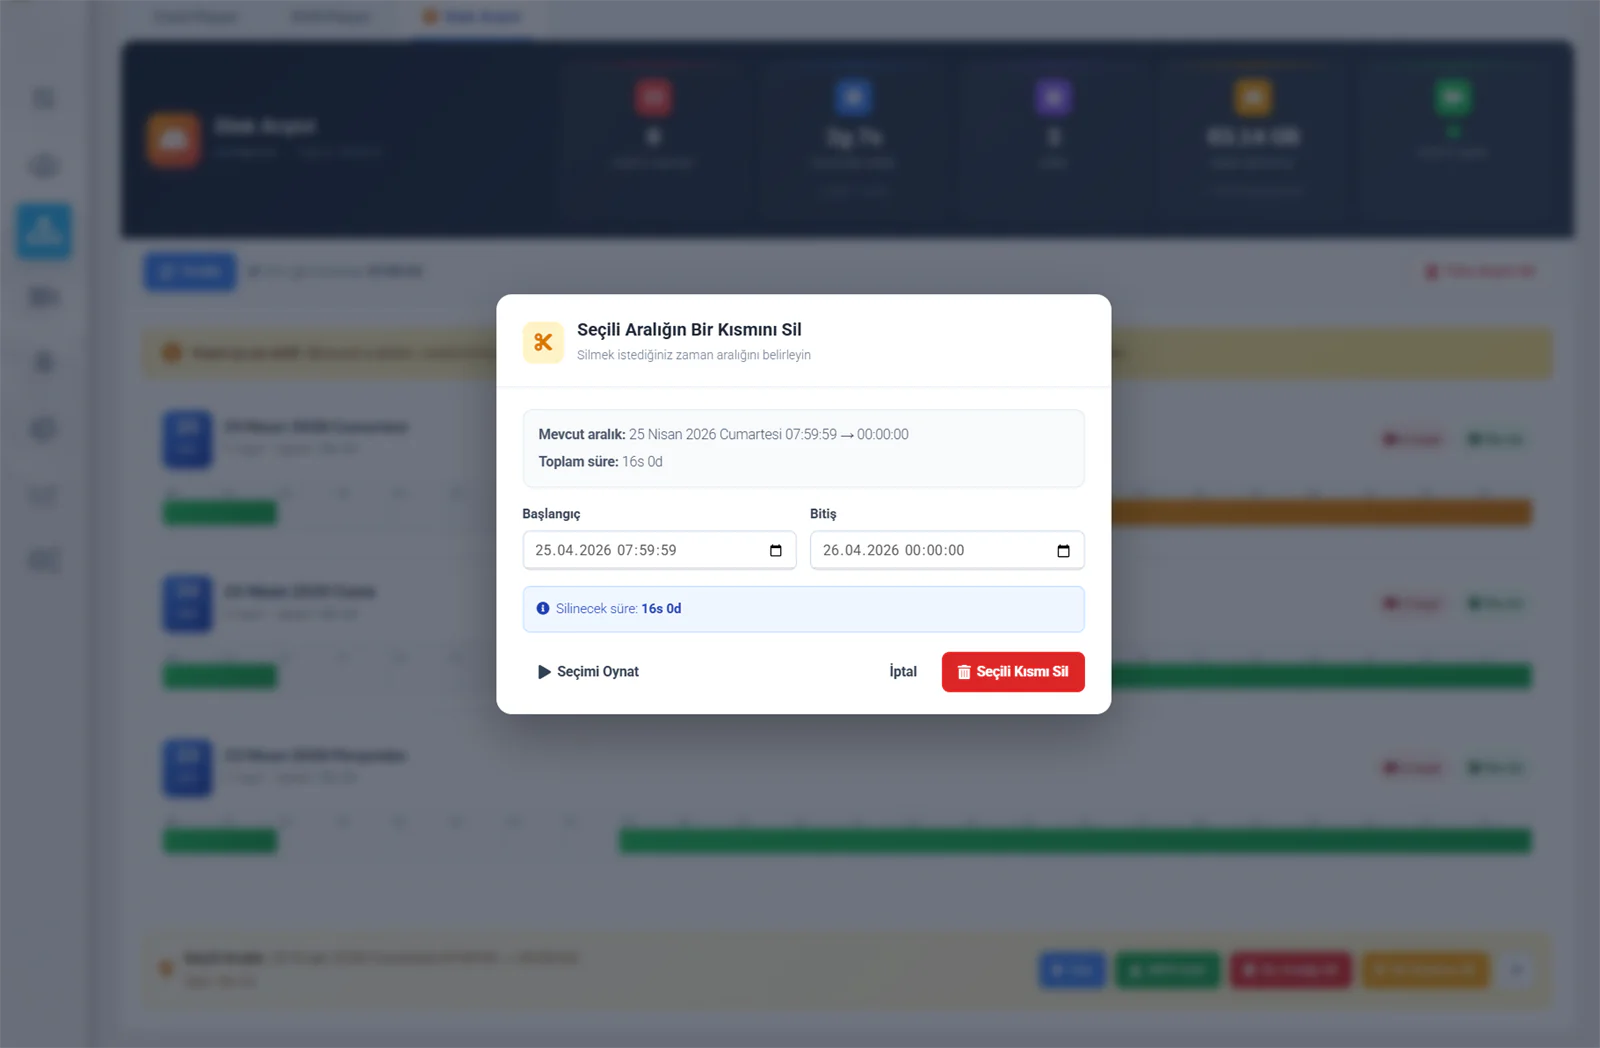
| Field | Description |
|---|---|
| Current Range | The full recording range and its total duration |
| Start | The start date/time of the section you want to delete |
| End | The end date/time of the section you want to delete |
| Duration to Delete | The length of recording to be deleted is calculated automatically from your selection |
| Play Selection | Plays the section you selected as a preview before deleting |
Say you have a recording from 08:00 to 18:00 but only want to delete the 12:00–13:00 lunch break. With partial deletion you remove just that one hour, and the remaining nine hours stay intact. Ideal for saving disk space.
Bulk Deletion
| Button | Description |
|---|---|
| Delete Entire Archive | Permanently deletes all recordings |
To delete the entire archive, first stop recording from the DVR Player tab and save. While recording is active you can only delete individual ranges. Deleted recordings cannot be recovered!
Storage Infrastructure
Other Platforms
Traditional HDD disks, no RAID protection, minutes of waiting to access recordings and hours-long queues for MP4 conversion. A 1–2-hour wait just to watch an indoor-pitch match.
Yayin.com.tr DVR
NVMe SSD enterprise datacenter-class disks in a RAID 10 configuration — speed and data safety at once. Archive access and MP4 downloads are instant, with zero waiting time.
| Feature | Detail |
|---|---|
| Disk Type | NVMe SSD (Datacenter Class) |
| RAID Layout | RAID 10 — high read speed plus protection against disk failure |
| Archive Access | Instant — the selected moment plays without waiting |
| MP4 Download | Generated in real time — there is no waiting |
| Concurrent Access | Hundreds of viewers can access different recordings at the same time |
| Data Safety | With RAID 10, a disk failure causes no data loss |
Frequently Asked Questions
| Question | Answer |
|---|---|
| How do I activate the DVR service? | Write to destek@yayin.com.tr to request the DVR service. It will be activated as an add-on. |
| How long are recordings kept? | The retention period depends on your DVR package (1 day, 3 days, 7 days, 30 days, etc.). |
| How large are the MP4 downloads? | It depends on your camera's bitrate. At a 2000 Kbps bitrate, for example, one hour of recording is roughly 900 MB. |
| What happens when the disk fills up? | The oldest recordings are deleted automatically to make room for new ones (circular recording). |
| With scheduled recording, what happens outside the set hours? | Nothing is recorded outside the defined time ranges, saving disk space. |